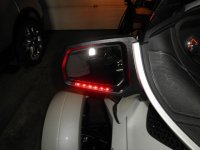
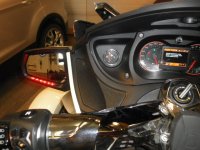
The signal indicators in the dash are quite small and sometimes difficult to notice when riding in sunny conditions. To help you notice that your signal is still on and to provide additional indication to the drivers behind you I installed a small 4" led strip on each mirror. The LED light strip "ON" is easy to notice when your signal did not cancel correctly. Simple to install and easy for any DIY. Here are the basic steps:
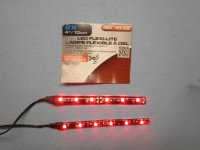
1. Purchased a small 4" red, 12v LED light strip with sticky backing. Purchased mine from Canadian tire. (In our province I don't think it matters if the strip is red or orange as I have seen both colors on many different types of vehicle mirrors)
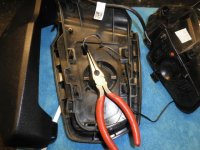
2. Remove mirror, disconnect wire harness.
3. Remove top and bottom plastic cover plates from front of the mirror assembly and remove 3 screws holding the signal indicator in position. A small flat head screwdriver can be used to depress the clips to allow removal of the cover plates.
4. Fish the LED strip wire around the mirror and pull through the small hole. Route the wire along side the existing wire harness.
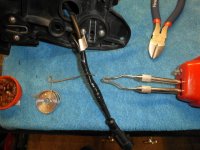
5. Split the harness wire and solder in each of the LED wires ensuring the ground wires are black to black. Plug the signal light harness back into the bike and test prior to reassembly and insulating the exposed wires.
6. Clean the mirror in the location where you will be installing the LED strip. I installed mine in the middle on the bottom side of the mirror as it slopes away from the mirror and will not glare in the mirror when it is on. Remove sticky back and install. Be careful not to press too hard on the light strip to avoid damage to the pixels.
7. Insulate the exposed wires with heat shrink or electrical tape.
8 Reinstall the signal light and plastic cover plates. Reinstall the mirror.
Your good to go.
1. Purchased a small 4" red, 12v LED light strip with sticky backing. Purchased mine from Canadian tire. (In our province I don't think it matters if the strip is red or orange as I have seen both colors on many different types of vehicle mirrors)
2. Remove mirror, disconnect wire harness.
3. Remove top and bottom plastic cover plates from front of the mirror assembly and remove 3 screws holding the signal indicator in position. A small flat head screwdriver can be used to depress the clips to allow removal of the cover plates.
4. Fish the LED strip wire around the mirror and pull through the small hole. Route the wire along side the existing wire harness.
5. Split the harness wire and solder in each of the LED wires ensuring the ground wires are black to black. Plug the signal light harness back into the bike and test prior to reassembly and insulating the exposed wires.
6. Clean the mirror in the location where you will be installing the LED strip. I installed mine in the middle on the bottom side of the mirror as it slopes away from the mirror and will not glare in the mirror when it is on. Remove sticky back and install. Be careful not to press too hard on the light strip to avoid damage to the pixels.
7. Insulate the exposed wires with heat shrink or electrical tape.
8 Reinstall the signal light and plastic cover plates. Reinstall the mirror.
Your good to go.

")

")