-
There were many reasons for the change of the site software, the biggest was security. The age of the old software also meant no server updates for certain programs. There are many benefits to the new software, one of the biggest is the mobile functionality. Ill fix up some stuff in the coming days, we'll also try to get some of the old addons back or the data imported back into the site like the garage. To create a thread or to reply with a post is basically the same as it was in the prior software. The default style of the site is light colored, but i temporarily added a darker colored style, to change you can find a link at the bottom of the site.
You are using an out of date browser. It may not display this or other websites correctly.
You should upgrade or use an alternative browser.
You should upgrade or use an alternative browser.
Ryker handlebar handbrake
- Thread starter bcraig
- Start date
One of you enterprising entrepreneurs should gather the parts in kit form with instillation instructions and appropriate liability disclaimers, messing with the brakes after all and provide it in a mail order form.
The design is well thought out, and easy to implement (install).
The design is well thought out, and easy to implement (install).
...and appropriate liability disclaimers, messing with the brakes after all...
In today's world this right here is what will stop most in their tracks - including me. I thought about getting my own tire machine for as many tires as I go through and the wife said, you could charge a few bucks and change tires on the side - I nope - I don't want the liability.
Catalyst105
New member
I recently got the ISCI hand brake for my F3 and was wondering if the way you did it was possible. I would feel better with handbrakes with lines going directly to the bikes master cylinder than the extra moving parts the ISCI kit has. Great job on figuring it out! I may need some tips from you if I decide to take on your method if you don’t mind?
robval1987
New member
There's been quit a few question in reference to this DIY brake job, one thing to remember is that you cannot have factory foot brake system with dual front and rear handbrake system. Reason being as you use one or the other (foot or handbrake) it forces the brake fluid to the point of less resistance (i.e, the opposite brake reservoir), when you push the foot brake it forces brake fluid to the handbrake reservoir rather then the brake caliper, and the opposite when you use the handbrake it pushes the fluid to the foot brake reservoir rather then the caliper. That is the reason you have to weld close the end of the Banjo Bolt (I even took it one more step and filled the bottom of the bolt with solder) to ensure it was sealed. Be careful not to get solder between the two line openings on the side of the Banjo Bolt . After completing this it will make the foot brake obsolete as the Bajo Bolt opening from the foot brake is sealed shut, but you need to keep the brake fluid in the foot brake reservoir at the proper level as there is a low fluid sensor in the reservoir which will effectively give you a VSS error code because of low fluid in the foot brake reservoir, but once you have the proper level of brake fluid in the foot reservoir you will never again mess with it as it is sealed off from the new handbrake system because you sealed off the Banjo Bolt. Also you need to wire in the brake lights from both hand brakes (simple Y harness from each brake handle switch down to the brake light wires described in first post), as the VSS system will not detect the brake lights, but will understand the bike is moving by RPM's, tilt and angle sensors.
Last edited:
robval1987
New member
So far so good, no error codes. Having the brakes on the handlebars feels so much natural then only a foot brake. Plus for those that can't use the foot brake for whatever reason this fixes the problem.
Last edited:
robval1987
New member
Update to Handbrakes
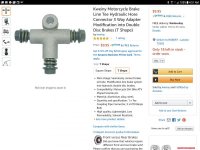
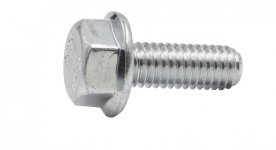
Ok everything has been working great, with the exception of a weld on one of the Banjo Bolts which allowed brake fluid to leak through to my foot brake reservoir. This allowed it to over fill and leak out. My initial goal was to be able to completely remove my foot brake assembly and run only Hand Brakes. So I decided to do just that. I purchased 2 Tee fittings and ran one set of lines (front brakes) to one Tee, and the second set of lines (rear brake) to the other Tee, I then capped off the third opening on each tee with a flange bolt (M10X1.25) cut to fit (approximately 1/2inch of threads) and added a brass washer to each bolt. Then I capped off the foot brake reservoir the same way, 2 flange bolts (M10X1.25), cut to fit (approximately 1/2 inch of threads) and then added a brass washer to seal off both openings on the foot brake master cylinder. I then removed the foot brake as it was obsolete and did not function anything. I'm still unable to remove the foot brake reservoir as it has two float sensors that detect low brake fluid, as soon as I can get around this I will be completely removing the foot brake master cylinder and reservoir from my Ryker as they serve no purpose now other then the float warning (low brake fluid warning). So to clarify all I did was remove the double Banjo Bolt and cap off the reservoir, and the used 2 tee fittings and tied together the front brake lines to 1 tee and the rear brake lines to another tee fitting and capped off the extra hole on the tee fittings. Here are the parts I used, 2 Tee Fittings from Amazon ($10) each and 4 flange bolts from Ace Hardware ($6) total for all 4 bolts. I will be adding more pics of the Tee fittings installed and all the Flange bolts capping off the different lines and foot brale master cylinder.:2thumbs:
Ok everything has been working great, with the exception of a weld on one of the Banjo Bolts which allowed brake fluid to leak through to my foot brake reservoir. This allowed it to over fill and leak out. My initial goal was to be able to completely remove my foot brake assembly and run only Hand Brakes. So I decided to do just that. I purchased 2 Tee fittings and ran one set of lines (front brakes) to one Tee, and the second set of lines (rear brake) to the other Tee, I then capped off the third opening on each tee with a flange bolt (M10X1.25) cut to fit (approximately 1/2inch of threads) and added a brass washer to each bolt. Then I capped off the foot brake reservoir the same way, 2 flange bolts (M10X1.25), cut to fit (approximately 1/2 inch of threads) and then added a brass washer to seal off both openings on the foot brake master cylinder. I then removed the foot brake as it was obsolete and did not function anything. I'm still unable to remove the foot brake reservoir as it has two float sensors that detect low brake fluid, as soon as I can get around this I will be completely removing the foot brake master cylinder and reservoir from my Ryker as they serve no purpose now other then the float warning (low brake fluid warning). So to clarify all I did was remove the double Banjo Bolt and cap off the reservoir, and the used 2 tee fittings and tied together the front brake lines to 1 tee and the rear brake lines to another tee fitting and capped off the extra hole on the tee fittings. Here are the parts I used, 2 Tee Fittings from Amazon ($10) each and 4 flange bolts from Ace Hardware ($6) total for all 4 bolts. I will be adding more pics of the Tee fittings installed and all the Flange bolts capping off the different lines and foot brale master cylinder.:2thumbs:
Attachments
robval1987
New member
Well after 2 1/2 hour ride, down the highway, through the twisting roads, all sort of braking on dry and wet surfaces (even causing the abs to kick in) no error codes. I've pushed this Ryker harder then ever to se if I can get a VSS error code and have not been able too. I can tell you one thing thought having the brakes at your finger tips has been a blast, as I stated in the beginning of this idea I have lost the use of my legs. I did have to make some Velcro straps (purchased at Lowes) to hold my legs and feet on too the bike, but after all I'm grinning from ear to ear, the freedom to be back on a bike is indescribable.
Last edited:
canamryder
New member
I'm happy to hear you're having a blast on your modified Rally. All I can do is wait for spring up here in northern Illinois. I would imagine your next successful project would be a nice set of floorboards with a tall lip on them. You gotta be on top of the world! Best wishes.
robval1987
New member
That sounds great, have you got any ideas where to find a set?
Last edited:
canamryder
New member
Type in on "search" "Ryker floorboards" . User "Swichback12" attached a set of Harley floorboards on his Ryker. They fold up and I think he got them off Amazon for about 125$. He attached them to the foot pegs.
Markubis
Member
That sounds great, have you got any ideas where to find a set?
Lamonster makes a set. Not sure if they are what you are looking for though
http://www.lamonstergarage.com/floorboards-ryker/
robval1987
New member
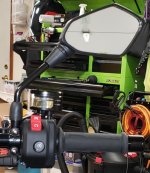
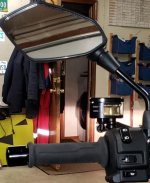
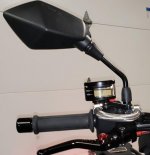
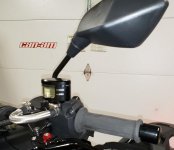
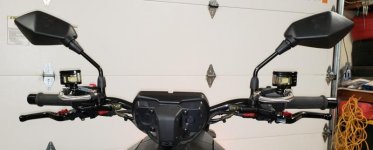
Well here's an update on my Rally, we changed out the cheaper looking handbrake reservoirs to a nicer set, that were more symmetrical and allowed me to use the mirror mount holes on the hand brake. So I removed the endbar stock mirrors for a different style of the brake handle mounted mirrors, and added a new set of end bar weights. Now I have the look I wanted on my Rally, more of a bike look.:thumbup: We also swapped out rear fender to the stock 900 fender, to me it looks cleaner, but that's just my opinion. I am working on a driver's backrest (once completed I'll post pic of it), and I am looking into a windshield that is functional and not just mounted there doing nothing (any suggestions would be appreciated).:riding: I also posted pics of parts installed, so now total cost of mod is about $250 total.
Attachments
-
 20200221_201215.jpg55.5 KB · Views: 71
 -
 20200221_201120.jpg46.2 KB · Views: 71
 -
 20200221_200955.jpg30.3 KB · Views: 74
 -
 20200221_200757.jpg37 KB · Views: 71
 -
 20200221_194036.jpg32.6 KB · Views: 68
 -
 Screenshot_20200222-065356.jpg63.4 KB · Views: 79
 -
 Screenshot_20200222-065435.jpg67.7 KB · Views: 82
 -
 Screenshot_20200222-065456.jpg82 KB · Views: 68
Last edited:
Treysonracin
New member
I got the brakes all plumbed into handlebars and work well...i cannot get the brake failure to go away though. Did you just wire to the black wires and leave the red ones alone?
left handbrake in parallel to pedal
Hi RobVal and congrats
I am a french old biker that experiences health challenge so I bought a 2019 riker 3 days ago.
I loved the way you did and explained the mod of your brake system, and I would like to do something close but slightly different, as my right foot and my right hand are becoming weak: put a handlebar left brake in parallel to the existing foot pedal.
The idea would be to actuate both front and rear brakes simultaneously with lever and/or pedal. I imagine putting a check valve on both pedal and lever lines.
As you are highly experienced, do you think it is possible? any advice?
Many thanks
Firstly, kudos on your production of the handbrake modification on the Ryker Robval1987. For those who may be interested and aware of the ISCI handbrake system that was developed for the Sypders, I contacted ISCI today to ask about a system for the Ryker. I was advised that they had attempted to develop a system but were not confident enough on it to put it into production. So no Ryker handbrake coming from ISCI by the sounds of it. It is unfortunate that BRP does not come out with a handbake system (at least as an option), since there are folk such as myself that do not have the lower limb function to operator a foot brake on a three wheeler. I know this comes down to the numbers, and there is a small percentage of folk that want or require a handbrake. Not helpful for the folk who have no option but to use a handbrake. Thus it comes down to an individual having to create their own product (which we could discuss the legal aspect about for days!). I have a ISCI handbrake for my ST, however recently purchases a Ryker, so will be working on doing a hand brake modification. I am toying with idea of going strictly mechanical, ie: using a clutch cable system tied to the existing foot brake lever. This would bypass the need to mess with the electronics and hydraulics on the system. Anyway, I would be curious Robval1987 how your system is working today and whether you have any issues over the time you have now been able to put it to use. Cheers.
nicolalanera
New member
Ok everything has been working great, with the exception of a weld on one of the Banjo Bolts which allowed brake fluid to leak through to my foot brake reservoir. This allowed it to over fill and leak out. My initial goal was to be able to completely remove my foot brake assembly and run only Hand Brakes. So I decided to do just that. I purchased 2 Tee fittings and ran one set of lines (front brakes) to one Tee, and the second set of lines (rear brake) to the other Tee, I then capped off the third opening on each tee with a flange bolt (M10X1.25) cut to fit (approximately 1/2inch of threads) and added a brass washer to each bolt. Then I capped off the foot brake reservoir the same way, 2 flange bolts (M10X1.25), cut to fit (approximately 1/2 inch of threads) and then added a brass washer to seal off both openings on the foot brake master cylinder. I then removed the foot brake as it was obsolete and did not function anything. I'm still unable to remove the foot brake reservoir as it has two float sensors that detect low brake fluid, as soon as I can get around this I will be completely removing the foot brake master cylinder and reservoir from my Ryker as they serve no purpose now other then the float warning (low brake fluid warning). So to clarify all I did was remove the double Banjo Bolt and cap off the reservoir, and the used 2 tee fittings and tied together the front brake lines to 1 tee and the rear brake lines to another tee fitting and capped off the extra hole on the tee fittings. Here are the parts I used, 2 Tee Fittings from Amazon ($10) each and 4 flange bolts from Ace Hardware ($6) total for all 4 bolts. I will be adding more pics of the Tee fittings installed and all the Flange bolts capping off the different lines and foot brale master cylinder.:2thumbs:
Hi robval
You can post more pictures of the modification with T connectors thanks
Similar threads
- Replies
- 15
- Views
- 976
- Replies
- 2
- Views
- 655
- Replies
- 3
- Views
- 361
- Replies
- 0
- Views
- 409