-
There were many reasons for the change of the site software, the biggest was security. The age of the old software also meant no server updates for certain programs. There are many benefits to the new software, one of the biggest is the mobile functionality. Ill fix up some stuff in the coming days, we'll also try to get some of the old addons back or the data imported back into the site like the garage. To create a thread or to reply with a post is basically the same as it was in the prior software. The default style of the site is light colored, but i temporarily added a darker colored style, to change you can find a link at the bottom of the site.
You are using an out of date browser. It may not display this or other websites correctly.
You should upgrade or use an alternative browser.
You should upgrade or use an alternative browser.
Ryker handlebar handbrake
- Thread starter bcraig
- Start date
Aufgeblassen47
New member
Has anyone fashioned an auxiliary handbrake for the Ryker?
Sounds superfluous. Kind of like adding one to a car for no particular reason.
bcraig
New member
Sounds superfluous.
You're probably right. Just hard to get used to not having a handbrake to grab.
Aufgeblassen47
New member
You're probably right. Just hard to get used to not having a handbrake to grab.
I went from a Piaggio MP-3 500, that had ONLY hand brakes (two of them). Took no time at all to get used to foot brake.
Sounds superfluous. Kind of like adding one to a car for no particular reason.
Paraplegic? Double amputee?
Saw one on one of the facebook groups.
Not in production yet from what I see .
.
Hopefully this link works.
https://www.facebook.com/photo.php?...set=pcb.2293949940658069&type=3&theater&ifg=1
Not in production yet from what I see
. Hopefully this link works.
https://www.facebook.com/photo.php?...set=pcb.2293949940658069&type=3&theater&ifg=1
robval1987
New member
Yes, I am I need of a handbrake as well. Was diagnosed with ALS last year, I've already sold off all my bikes when I began falling over because I was no longer strong enough to hold up the bikes (broke my spirit not to be able to jump on my bike and ride), then my son showed me the Ryker, with assistance I can get from my wheelchair to Ryker seat. I am having issues with my legs so braking is becoming a problem, but a handbrake would fix all as my hands are still able to squeeze the Brake lever. So anyone with any ideas, pics or thoughts, please chime in on this post.
ARtraveler
No longer with us - R.I.P. Dwayne
There are handbrakes available for the Spyder lineup. Senior moment, and I cannot remember the brand. Help someone. :bowdown:
They have been around for years, were about $2K installed. Not perfect, but they were helpful to those in need of that assistance.
 opcorn: opcorn:
Try.....ISCI brand. Thanks Highwayman
They have been around for years, were about $2K installed. Not perfect, but they were helpful to those in need of that assistance.
opcorn: opcorn:Try.....ISCI brand. Thanks Highwayman
Last edited:
I really do enjoy hearing all the ups and downs of Ryker and Spyder owners. I know ISCI has a $1250.00 hand brake for Spyders, I just wonder if anyone with a Ryker has spoken to them about a future production of a hand brake for the Ryker line ? I want to purchase a Ryker 900 Rally edition to ride for awhile, before I invest in a more expensive Spyder, if I love it as well as some of the riders here ! I understand some riders think its overkill, but for someone like me that has lost all but his left "shifting leg", it is the difference of being able to get back a part of my life that I truly miss. I wish BRP Can Am would just see it as an added safety feature for riders that want it. After all.......they have hand brake assemblies on their off road 4 wheeler line ups, so it should be extremely easy to incorporate a hand brake for the Ryker or Spyder line up. Anyways , if any of you have any insight on the future of hand brakes, it would be priceless info for me. Thanks
I'm sure it will have to be model specific, but like you say, as the base increases , if there's money to be made it will probably happen. It is sad BRP Can Am doesn't see this as a safety feature and give it as an option for riders that need it or just prefer it over a foot brake. After all , 4 wheelers , motorcycles , all have the same set up with braking, why not incorporate it into the Spyder and Ryker as a REASONABLY PRICED option !!!
I have another question for the masses about Rotax engines in general. How many miles can a owner expect out of a well kept , moderately ridden Rotax engine ? Mainly the 3 cylinder engines. I ask this in case I find a used machine in very good condition to purchase and install the hand brakes on it myself. I have customized all my motorcycles in the past and installed my own parts, I was an Industrial Maintenance man for 26 years before I was kindly ran over on one of my bikes. I long to get back riding on 3 wheels !!!
I have another question for the masses about Rotax engines in general. How many miles can a owner expect out of a well kept , moderately ridden Rotax engine ? Mainly the 3 cylinder engines.....
No-one can really answer that definitively, Ron, simply cos no-one's reached that limit yet!! :shocked: But there are more than 'just a few' Rotax Engined Spyders & other vehicles out there that've done more than 100,000 miles/the equivalent running hours, while a smaller number (so far) have comfortably topped 150,000 miles!!
 hyea:
hyea: Looked after and ridden with some mechanical sympathy, a Spyder engine should easily outlast whatever remaining ryding life you've got in you - even if you're still a young'un! :thumbup:
Jiversteve
New member
Following this thread, I have a nephew who has challenges with his legs, he likes my Spyder but it is way beyond his budget, a Ryker would make him the coolest disabled dude in town, provided it has a hand operated brake.
Ideally a frame to carry a light wheelchair for use when he reaches his destination.
A motorised invalid car is not really an option, positively dangerous when used on the streets of the U.K.
There is the second problem, parts get very expensive when shipped to the U.K. from the US. By the time customs and import duties are added, it can easily double the price.
robval1987
New member
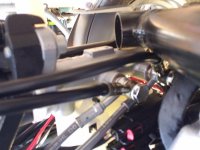
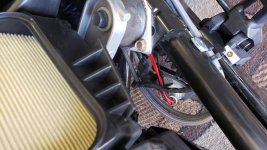
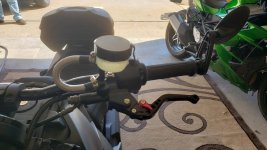
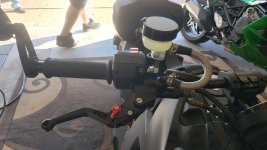
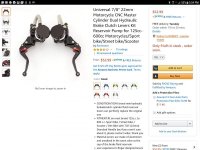
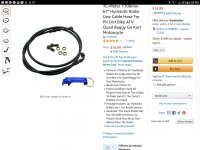
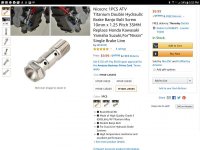
So here we go, I am a 100% Disabled Vet with the loss of use of my legs. My son and I both purchased a 2019 Can Am Ryker Rally as I love to ride, and sense my Diagnosis I have lost the ability to ride my motorcycles and sold them all (being unable to stand, or shift and brake) definitely makes riding a challenge. The Ryker took alot of those issues away (not having to stand to hold the bike up, no shifting), but I still had to address the issue of braking (pretty important). Searched the web over and over and found nothing, so I decided if I wanted to ride I was going to have to figure out how to move the brakes from the right foot peg to the handlebars. NOW I AM NOT TELLING ANYONE TO DO THIS AND AM IN NO WAY RESPONSIBLE FOR WHAT YOU DO TO YOUR RIDE! After several days of research and careful planning I came up with the idea to have dual handlebar brakes, right side front brakes and left side rear brakes. The idea was to mount the brake handles and then connect the new brake lines into the Rykers brake system. This was done by using Double Banjo Bolts (you will have to weld the hole on the bottom of the banjo bolt closed, to prevent brake fluid from entering into the Rykers brake reservoir, rather then going to the brake calipers which is what you want). So here is what we did. We started by removing the hand guards off the handlebars, and installed a set of handlebar brake systems on each side (everything I used I ordered right off Amazon and I will list parts at the end). We then ran two new brake lines (Don't forget the 2 washer on the line) from the new brake handles down through the bike to the bottom near the Rykers original master cylinder. We then removed the 2 stock banjo bolts from the master cylinder and added the 2 new lines using the new double banjo bolts (dont forget each bolt has 3 washers) a washer goes on the end of the bolt, between each lineand between the last line and the Rykers master cylinder. The front hole is front brakes and the rear hole is back brakes. After we installed the new lines we then used a brake bleeding kit that I purchased from Harbor Freight ($35). We started with the front brakes and just like a car we started with the furthest wheel first, left front (sitting on the bike), then moved to the right wheel. Now we had front functional brakes. We then bleed the rear wheel (pretty easy there only one). So now we had front and rear brakes that were fully operational. So my son took it up and down the street, the brakes worked great, but we did get a VSS error (which I will explain why). Anyone with a Ryker know the start sequence (press brake, motor switch to run, turn throttle reverse and press start button). Well we learned after a bit of research that the factory brake switch has 4 wires coming from it (2 black and 2 red, which go to a connector and change to a (1 red wire, 1 white wire, 1 white wire with a purple tracer and 1 black wire with a violet tracer). So after speaking with Can Am Tech we knew what happened, the computer could not understand all the moving (acceleration, braking and turning, lean angles) without any input from the factory brake pedal and it thought something was wrong and threw a VSS code and put the Ryker into Limp mode for safety reasons. So we built a (Y) harness to come from each new handbrake down to the factory brake switch. With the help from the Tech we knew where to cut the wires (we cut the two black wires, which corresponds with the red wire and white wire at the connector). We now had brake lights on both handbrakes and could start the Ryker holding either handbrake in place of the foot brake in the start up process. We lowered the moveable foot break pedal down and out of the way.
Attachments

Last edited:
robval1987
New member
Thanks, well we my son and I have put the Ryker through our own personal tests, from ECO, Sport and Rally Modes with alot of twisted turning and braking and have not had any error codes. I figured that the total project ran me approximately $150 dollars and 2 days (on and off) to complete. I am still going to post a few more pics, as well a list of all the parts, 1 set of brake handles, 2 brake lines, 2 banjo bolts (order washers too). I also bought the brake bleeder kit from Harbor Freight for $35 dollars
Attachments
Similar threads
- Replies
- 15
- Views
- 976
- Replies
- 2
- Views
- 655
- Replies
- 3
- Views
- 361
- Replies
- 0
- Views
- 409