bronzeflex42
Member
lava bronze
Nice :f_spider: Rob. Love the chrome rack on the trunk and wig wag brake lights. hyea:
hyea:
Nice :f_spider: Rob. Love the chrome rack on the trunk and wig wag brake lights.
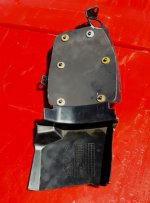
hyea:hyea:I installed this Value Accessories chrome trunk rack. Looks really good, I think. At only 9" deep from the top of the seat back to the tip of the defector, it's not too big and overpowering. Yet it's plenty big enough to hold a medium sized storage bag. Also I wanted one that would not hide my Custom Dynamics top brake light from cars behind me when the rack was being used.
This is a bit expensive but very well made. Chrome rack and deflector; bolts on with chrome hex-head bolts, lock nuts, and chrome braces inside the trunk lid (between the two bolts on both sides) for extra strength. They also provide plastic lipped shims for the 4 holes you drill in your trunk lid. It also comes with rubber tape gripping strips on the sides so as to take the stress off the bolts. I added a little 3M automotive molding tape under the top lip for additional support.


_______________________________________________________________________
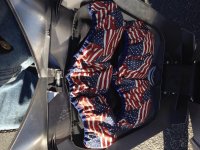
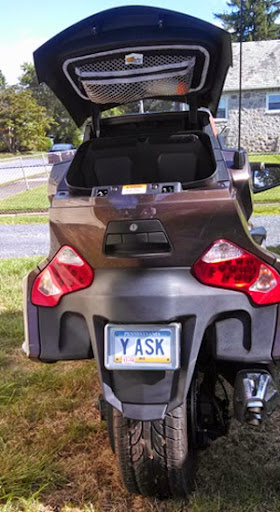
Here's a quick and easy farkle that's extremely useful. Spyder Pockets from TricLed are handy zippered mesh pockets that go into the various storage compartments on the RT. I got them to fit the lids for both saddlebags and the trunk. You can securely store small things in there that you want to easily get to in a hurry. I use them for things like gloves, sun glasses, flashlight, sun shield spray, USB power cord, etc.
... ...

I believe the supplier for the Spyer Pockets may not be producing them any longer. Don't know that for sure. Suggest you give TrickLed a call and see if you can find out more information.Anyone have a direct link for the Spyder pockets? I looked on the Tricled site and can not find them. :banghead:
I believe the supplier for the Spyer Pockets may not be producing them any longer. Don't know that for sure. Suggest you give TrickLed a call and see if you can find out more information.
I spent a little money at Spyderquest 2015. Got an F4 Custom vented windshield, and had "Mac the Knife" to some subtle pinstriping around the Spyder.

Thanks Pam,Rob, which windshield is that? I'm going to be ordering the tall and wide one from F4.
Looks great!!
Pam
Thanks Pam,
It's the stock size windshield, although it is slightly wider at the bottom. I looked at the tall and wide versions but decided against them. I don't usually carry a passenger so I don't need the extra width, and I wanted to be able to see over the top of it when I put it all the way down. The "Honda style" adjustable vent is very nice.
Pockets are good fyi found @ spyderfest called "FLO" Frunk Lid OrginizerI installed this Value Accessories chrome trunk rack. Looks really good, I think. At only 9" deep from the top of the seat back to the tip of the defector, it's not too big and overpowering. Yet it's plenty big enough to hold a medium sized storage bag. Also I wanted one that would not hide my Custom Dynamics top brake light from cars behind me when the rack was being used.
This is a bit expensive but very well made. Chrome rack and deflector; bolts on with chrome hex-head bolts, lock nuts, and chrome braces inside the trunk lid (between the two bolts on both sides) for extra strength. They also provide plastic lipped shims for the 4 holes you drill in your trunk lid. It also comes with rubber tape gripping strips on the sides so as to take the stress off the bolts. I added a little 3M automotive molding tape under the top lip for additional support.
_______________________________________________________________________
Here's a quick and easy farkle that's extremely useful. Spyder Pockets from TricLed are handy zippered mesh pockets that go into the various storage compartments on the RT. I got them to fit the lids for both saddlebags and the trunk. You can securely store small things in there that you want to easily get to in a hurry. I use them for things like gloves, sun glasses, flashlight, sun shield spray, USB power cord, etc.
... ...
 pps: ) Since good ol' Al Gore just blessed Pennsylvanians with two days of February temperatures in the high 50's I figured I'd tackle the job yesterday and today. So yesterday, with Dave's kit in my garage, I took the seat off the Spyder. After turning it over I found almost 200 tiny stables under there holding the cover onto the plastic base. Not having an easy way to get all those little stables out, OR back in, I "chickened out" and took my seat and Dave's gel pad to an auto seat repair guy this morning. It took him less than two hours to, take the seat apart, cut out the seat foam to position the pad exactly where I wanted it, and put my seat back together. The job cost me just $150, which I thought was well worth it.
I have the Spyder Pockets they are handy to have, I use them a lot, for extra storage. DeannaI installed this Value Accessories chrome trunk rack. Looks really good, I think. At only 9" deep from the top of the seat back to the tip of the defector, it's not too big and overpowering. Yet it's plenty big enough to hold a medium sized storage bag. Also I wanted one that would not hide my Custom Dynamics top brake light from cars behind me when the rack was being used.
This is a bit expensive but very well made. Chrome rack and deflector; bolts on with chrome hex-head bolts, lock nuts, and chrome braces inside the trunk lid (between the two bolts on both sides) for extra strength. They also provide plastic lipped shims for the 4 holes you drill in your trunk lid. It also comes with rubber tape gripping strips on the sides so as to take the stress off the bolts. I added a little 3M automotive molding tape under the top lip for additional support.
Update... A few folks have asked me how to get this trunk rack. I recently looked on the Value Accessories web site and don't see it there anymore. For those who may want to try to track it down, it is made by "Custom World International". Here is their web site, but it doesn't look like it's been updated since 2014. Don't know if you can reach anyone from that site. That said, Value Accessories does appear to sell a lot of other Custom World parts on this page. Perhaps if you emailed them, they might supply you with more info. Feel free to copy either of my pictures in this message if you do that.
_______________________________________________________________________
Here's a quick and easy farkle that's extremely useful. Spyder Pockets from TricLed are handy zippered mesh pockets that go into the various storage compartments on the RT. I got them to fit the lids for both saddlebags and the trunk. You can securely store small things in there that you want to easily get to in a hurry. I use them for things like gloves, sun glasses, flashlight, sun shield spray, USB power cord, etc.
... ...


 hyea:
hyea: