• There were many reasons for the change of the site software, the biggest was security. The age of the old software also meant no server updates for certain programs. There are many benefits to the new software, one of the biggest is the mobile functionality. Ill fix up some stuff in the coming days, we'll also try to get some of the old addons back or the data imported back into the site like the garage. To create a thread or to reply with a post is basically the same as it was in the prior software. The default style of the site is light colored, but i temporarily added a darker colored style, to change you can find a link at the bottom of the site.

Replacing the shift switch on my SE5

Rob Rodriguez

New member
I have 2012 RS. My gear shift switch was replaced under warranty 4 yrs ago. It's gone bad again so this time I'm going to replace it myself. I started diving into this and the wiring seems to disappear into the frame once it goes through the hole in the console (console being the large black center portion with the gauge cluster, headlights, mirrors) for the handle bars. I removed the center tupperware under the console and also the gauge cluster from the console thinking that would give me enough access to the wiring but no dice. So, I think I need to pull the entire center console off to be able to see where the wiring goes and where the connector is and make the connection. My issue....I can't seem to figure out how this "console" comes off either in pieces or as one unit. Has anyone removed this before? If so how did you do it? Maybe there is a youtube video somewhere?
 
I have 2012 RS. My gear shift switch was replaced under warranty 4 yrs ago. It's gone bad again so this time I'm going to replace it myself. I started diving into this and the wiring seems to disappear into the frame once it goes through the hole in the console (console being the large black center portion with the gauge cluster, headlights, mirrors) for the handle bars. I removed the center tupperware under the console and also the gauge cluster from the console thinking that would give me enough access to the wiring but no dice. So, I think I need to pull the entire center console off to be able to see where the wiring goes and where the connector is and make the connection. My issue....I can't seem to figure out how this "console" comes off either in pieces or as one unit. Has anyone removed this before? If so how did you do it? Maybe there is a youtube video somewhere?

Just a thought on this ..... could you cut the wires and splice in the new switch .... solder and heat shrink the connection .... Good luck .... Mike :thumbup:
 
I'm doing this job right now. It's on a 2013 RTL. The plugs are on the right side just forward of the headlight adjuster. I removed the frunk to get better access to the plugs. The console in the Green manual is considered to be a unit consisting of the windshield, headlights, and dashboard. You do not have to remove it, just tilt it forward so the rear end of it goes up about 2 inches. You can then see the wires come down the tube in the handlebars. You will need to pull the wire and plugs up through the tube. Tie a string onto the plugs as a fish string to use to pull the new wires down. Also, removing the frunk allows you to get closer to the console unit. It's heavy. Get the Green manual online. Do not try to cut and splice the new wire to the old one. This uses the can-bus and you will ruin it.
 
Why would soldering to the existing wires ruin the harness? The Can-bus shouldn't be able to tell the difference if the solder is any good at all. I solder rc airplane electronics and computer electronics all the time.

On the other hand, it might make the new harness easier to fish thru if you #1 take a pic of the wires in the plug and then #2 take the wires out of the plug and tape them together then #3 once fished thru to where they need to go now using your pic as a reference put the wires back into the plug.

I haven't done this either way, when my shifter started acting up I found and unplugged and cleaned (I spritzed the connectors with WD-40, MAF Sensor cleaner might work better IDK) every connector from the shifter harnass connector right at the top of the frunk all the way down to the electronic solenoids by the oil tank.... and it's worked well for the past ~2K miles or so now since I did that. Just saying.

- Michael

Do you really want to take a chance on a $430 unit? It only takes a little while longer and following the correct produre to do this job right. I spent 30 year as a cnc computer technician. You don't want to run afoul of the can bus system.
 
Yes, I do actually.... it isn't going to make any difference as long as the solder joints are done properly Nanny will never know.

But taking the wires out of the plug fishing them thru then putting them back in the plug might be easier if a bit less fun. :-\

At the end of the day, the OP who is doing this right now has to choose what he feels comfortable with doing. I wish him the best... maybe he's got it done already even!

- Michael
 
Thanks people. The trick is to remove the mirrors. Then you can remove the top plastic console housing and then the lower portion. You can leave the aluminum frame that holds the mirrors, lights etc in place. Then you are able to get to the wiring without much issue. I just used the old wire with a string to fish the new wire through the frame. This is the 3rd shift paddle this bike has had (the original, the warranty replacement, the new one). That would tell me this is a weak part in the SE5 system and that BRP could have made the wiring much easier to access so changing this would be really easy.
 
How many miles are on your Spyder?

Mine's nearing 19K. O2 sensor failed at just under 18K. Have had Check Tranny message come on before but seems to clear up quickly just by cleaning all the connector contacts between the paddle shifter harness and the electronic solenoids so I'm not convinced it's always the shifter itself that's at fault. The switches in the shifter are really well sealed nothing can get into them (moisture, spray cleaner etc.), they should last a very long time for many thousands of cycles at the least!

Thank you for posting such a detailed explanation of how you got to all the necessary wiring under the dash, you're making it far easier for very many others in the future! Sharing what you learn is the best part of Spyder Lovers IMHO!

- Michael
 
About 27K miles on the Bike. Its a 2012 RS. The warranty replacement was at about 12K miles I believe. The bike runs great and the only issue I've really had is the paddle shifter (except the terrible drain plug on the radiator). When the shifter goes bad it starts with the check transmission scrolling across the screen with a check engine light. Then it shows an E in the shift number area, then you'll have to press the shift switch multiple times to get it to shift. It doesn't seem to happen all at once, it gets progressively worse. That said. I might ride it 100 miles and its fine and then the shift issues start. They might last the rest of the day or only happen once and not happen again for another 5, 100, 200 miles. It's sporadic for sure. Last time this happened (the warranty replacement) I rode like 1000 miles with the issue before I had it changed. It's annoying more than anything but I assume at some point it will stop shifting and then you are screwed.
 
If you can. The next time the check engine light comes on. Try and get the fault code. You may be correct but the symtoms you describe may be the gear position sensor as well. Getting the fault code could point you in the right direction.

The gear shift switches are not connected to the can bus on a 2012 RS. As mentioned by others. So don't worry about that. The shifter switch is only about $175. Still too much money, but not the $475 for a RT one.

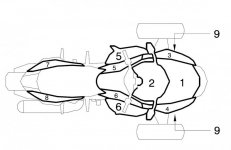
The MSS connector is located under the console. See picture zone 2. Get a service manual and it will tell you step by step how to remove the console if needed.
 

Attachments

  • 2012 rs MSS conector.jpg
    2012 rs MSS conector.jpg
    35.3 KB · Views: 39
If you can. The next time the check engine light comes on. Try and get the fault code. You may be correct but the symtoms you describe may be the gear position sensor as well. Getting the fault code could point you in the right direction.

The gear shift switches are not connected to the can bus on a 2012 RS. As mentioned by others. So don't worry about that. The shifter switch is only about $175. Still too much money, but not the $475 for a RT one.

The MSS connector is located under the console. See picture zone 2. Get a service manual and it will tell you step by step how to remove the console if needed.

I pulled the code. P0826, Shift up/down switch detection problem, Shift up/down switch out of range, switch defect. The same code that the warrantied shift switch threw. New switch was $159.
 
Good to confirm the problem. So time to install a new switch. Take lots of pictures as you take it apart. Always good for a reference when putting it back together.

Good Luck.
 
I have 2012 RS. My gear shift switch was replaced under warranty 4 yrs ago. It's gone bad again so this time I'm going to replace it myself. I started diving into this and the wiring seems to disappear into the frame once it goes through the hole in the console (console being the large black center portion with the gauge cluster, headlights, mirrors) for the handle bars. I removed the center tupperware under the console and also the gauge cluster from the console thinking that would give me enough access to the wiring but no dice. So, I think I need to pull the entire center console off to be able to see where the wiring goes and where the connector is and make the connection. My issue....I can't seem to figure out how this "console" comes off either in pieces or as one unit. Has anyone removed this before? If so how did you do it? Maybe there is a youtube video somewhere?
I have a 2011 RS SE5. What did your bike do before you had to replace the paddle shifter? The LCD section of my guage cluster isn't visible to read codes. My bike was working fine and then it wouldn't start. I noticed the neutral light wasn't on so I manually shifting it into neutral. It fired up but it wouldn't shift into reverse or first gear. I removed the gear shifting rod off from the gear shift lever. I can manually shift the transmission but the gear shifting rod coming from the HCM doesn't move when I try to shift it. I can't find any information on a fuse location so I checked them all. All were good.
 
Last edited:
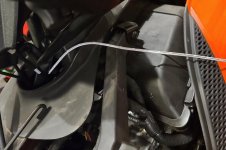
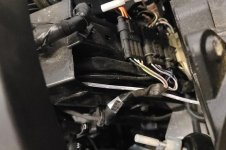
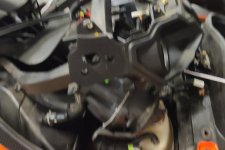
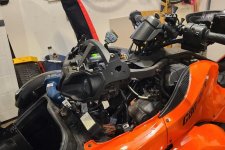
My 2012 RSS was intermittently throwing the transmission error for a couple of seasons. It never stranded me but it definitely got more persistent over time. It was pretty easy to replace the SE5 shifter and it doesn't require much disassembling to swap it out. As others recommended: 1. the service manual helps (but these pictures might help just as much) and 2. I used wire vs. a string to pull the new shifter wire harness thru the frame. I had to take one of the headlights out because there are two zip ties I couldn't get to. It probably took an hour from start to finish. Here are some pictures.
 

Attachments

  • 20240606_200703.jpg
    20240606_200703.jpg
    67.9 KB · Views: 41
  • 20240606_202659.jpg
    20240606_202659.jpg
    48.8 KB · Views: 35
  • 20240606_202958.jpg
    20240606_202958.jpg
    56.1 KB · Views: 34
  • 20240606_203007.jpg
    20240606_203007.jpg
    39.8 KB · Views: 36
Thanks people. The trick is to remove the mirrors. Then you can remove the top plastic console housing and then the lower portion. You can leave the aluminum frame that holds the mirrors, lights etc in place. Then you are able to get to the wiring without much issue. I just used the old wire with a string to fish the new wire through the frame. This is the 3rd shift paddle this bike has had (the original, the warranty replacement, the new one). That would tell me this is a weak part in the SE5 system and that BRP could have made the wiring much easier to access so changing this would be really easy.

So what do you think is the actual problem with the paddle shifter; do you think it is in the connectors, or the micro switches, the paddle itself? I thank you for your thoughts! I'm having issues with my 2008 and meaning to get to that connector up front there (I appreciate the advice on how to access it, I've been looking for that info) as I want to clean those connections. Wasn't sure what all I needed to remove to get to the connections. Are your mirrors and turn signals in the same unit? and you removed that whole arm assembly? Thanks so much for your thoughts.
 
I pulled the code. P0826, Shift up/down switch detection problem, Shift up/down switch out of range, switch defect. The same code that the warrantied shift switch threw. New switch was $159.

Might I ask where you sourced your switch assembly? If my contact cleaning doesn't do the trick I will need to get parts. And, what was the part # on that, I will check it against my 2008 part. Mine is throwing the exact same code. Thank you!
 
Last edited by a moderator:
Yes, there are signals in my mirrors. The process as I pull it out of my head was: Remove the windshield, remove the gauge, with the gauge out, you can disconnect the turn signal cables to the mirrors, unbolt the mirrors, pop the top cover out, then the bottom cover, now you can access the shifter connector plug. I bought my shifter paddle assembly right off of the BRP parts website.
 
Ok, well, a bit of follow-up. I ended up going to BRP and buying a new shifter assembly. Just this weekend I put it on. The worst part was pulling the darn connector pod thru the maze and thru this one small rectangular hole that already housed 2 other cable assemblies! Finally got it situated so that it pulled down thru. Today's ride to work was 'fault-free'! Solid reverse shift with no little check engine light, and no scrolling love notes about the tranny! I can even downshift again without lights and scrolling love notes!! YAY!! Happy riding!
 
Back
Top