-
There were many reasons for the change of the site software, the biggest was security. The age of the old software also meant no server updates for certain programs. There are many benefits to the new software, one of the biggest is the mobile functionality. Ill fix up some stuff in the coming days, we'll also try to get some of the old addons back or the data imported back into the site like the garage. To create a thread or to reply with a post is basically the same as it was in the prior software. The default style of the site is light colored, but i temporarily added a darker colored style, to change you can find a link at the bottom of the site.
You are using an out of date browser. It may not display this or other websites correctly.
You should upgrade or use an alternative browser.
You should upgrade or use an alternative browser.
Removing RT Antenna
- Thread starter BrianO
- Start date
BLUEKNIGHT911
Sadly Passed Oct 2024 - RIP
ANTENNEA REMOVAL
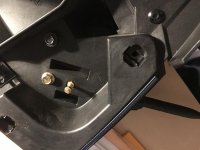
In that pic I don't see the antennae ....where did it go ..... most folks slide a 7mm deep socket over the antennae ( remove boot first ) then hold the socket with a vise grip pliers and un-screw it ....... it may not come out easily BRP uses the largest amount of lok-tite in the known Universe ..:roflblack::roflblack::roflblack:................MikeI am working on installing the BRP arm rests on our 2016 RT Limited.
I’m not sure how to remove the antenna.
Do I just remove the bolt and tiny nut shown in the photo or is there more to it?
Thanks for your advise......brian

Bob Denman
New member
The 7mm socket trick doesn't work on the new "Shorty" antennas.
But Lamont posted the most excellent video about it! :thumbup:
You just have to find it... :dontknow:
But Lamont posted the most excellent video about it! :thumbup:
You just have to find it... :dontknow:
Bob Denman
New member
I found this in a two year-old thread:
SPYDER RT:
1. REMOVE THE OEM ANTENNA BY FIRST PULLING UP ON THE RUBBER BOOT AT THE BASE OF THE ANTENNA.
2. USING A SMALL LOCKING PLIERS GRIP THE BOTTOM BRASS PIECE ON THE ANTENNA AND TURN LEFT TO REMOVE.
3. CLEAN THE FLAT SURFACE AROUND THE THREADED HOLE WITH A CLEAN RAG AND RUBBING ALCOHOL AND LET DRY. SEE FIG. 1.
4. TAKE THE NEW RUBBER GROMMET FROM THE PACKAGE AND PUSH IT INTO THE HOLE ON THE BODY PANEL AS SHOWN IN FIG. 2.
5. REMOVE THE SET SCREW FROM THE PACKAGE AND CLEAN THE THREADS WITH RUBBING ALCOHOL. LET DRY.
6. PUT A SMALL DROP OF REMOVABLE THREAD LOCK ON THE THREAD NEAR THE END OPPOSITE OF THE HEX SOCKET.
7. INSTALL THE SET SCREW INTO THE ANTENNA MAST AND TIGHTEN WITH A 3MM ALLEN WRENCH. SEE FIG. 3.
8. PUT A SMALL DROP OF REMOVABLE THREAD LOCK ON THE EXPOSED THREADS OF THE SET SCREW.
9. CAREFULLY INSERT THE MAST THROUGH THE HOLE IN THE GROMMET AND THREAD IT INTO THE THREADS IN THE SPYDER. SEE FIG. 4. HAND TIGHTEN.
10. YOU MAY NEED TO SLIGHTLY ROTATE THE GROMMET AS YOU ALIGN THE SET SCREW WITH THE THREADS IN THE SPYDER.
BLUEKNIGHT911
Sadly Passed Oct 2024 - RIP
This issue
What you can't see is the large metal block that the Antennae is screwed into .... Don't un-do those bolts/nuts because the metal piece won't fit thru the antennae hole...... If the antennae is after market ( ie shorty ) you will have to separate the two plastic parts and as stated be very careful ........... What exactly are you trying to accomplish in this Thread subject .....knowledge is power and a good way to get better answers ........ Mike :thumbup:Here are some more photos.
When I removed the boot, it looks like either a square nut or the square body of the antenna body....not sure which.
What you can't see is the large metal block that the Antennae is screwed into .... Don't un-do those bolts/nuts because the metal piece won't fit thru the antennae hole...... If the antennae is after market ( ie shorty ) you will have to separate the two plastic parts and as stated be very careful ........... What exactly are you trying to accomplish in this Thread subject .....knowledge is power and a good way to get better answers ........ Mike :thumbup:
I am installing the new BRP arm rests. I finished the left, now have to do the right side which as the antennae. The antennae is the original short one which came in my bike (2016 RT)
I needto remove it so I can slide off the tupperware from the speaker pod.
.....brian
I found this in a two year-old thread:
SPYDER RT:
1. REMOVE THE OEM ANTENNA BY FIRST PULLING UP ON THE RUBBER BOOT AT THE BASE OF THE ANTENNA.
2. USING A SMALL LOCKING PLIERS GRIP THE BOTTOM BRASS PIECE ON THE ANTENNA AND TURN LEFT TO REMOVE.
3. CLEAN THE FLAT SURFACE AROUND THE THREADED HOLE WITH A CLEAN RAG AND RUBBING ALCOHOL AND LET DRY. SEE FIG. 1.
4. TAKE THE NEW RUBBER GROMMET FROM THE PACKAGE AND PUSH IT INTO THE HOLE ON THE BODY PANEL AS SHOWN IN FIG. 2.
5. REMOVE THE SET SCREW FROM THE PACKAGE AND CLEAN THE THREADS WITH RUBBING ALCOHOL. LET DRY.
6. PUT A SMALL DROP OF REMOVABLE THREAD LOCK ON THE THREAD NEAR THE END OPPOSITE OF THE HEX SOCKET.
7. INSTALL THE SET SCREW INTO THE ANTENNA MAST AND TIGHTEN WITH A 3MM ALLEN WRENCH. SEE FIG. 3.
8. PUT A SMALL DROP OF REMOVABLE THREAD LOCK ON THE EXPOSED THREADS OF THE SET SCREW.
9. CAREFULLY INSERT THE MAST THROUGH THE HOLE IN THE GROMMET AND THREAD IT INTO THE THREADS IN THE SPYDER. SEE FIG. 4. HAND TIGHTEN.
10. YOU MAY NEED TO SLIGHTLY ROTATE THE GROMMET AS YOU ALIGN THE SET SCREW WITH THE THREADS IN THE SPYDER.
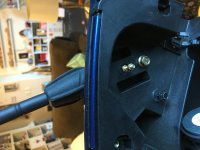
There is no brass piece at the bottom of the antenna. After removing the boot, I see the corigated rubber at the base of the antennae goes right down to the brass block. That corrugated rubber doesnt seem to move at all.
Since my objective is to remove the Tupperware from the speaker pod, I a, thinking about removing the bold which holds the brass mounting block. Hopefully this will let me move the antennae around enough so I can remove the Tupperware.
were you able to find Lamonster’s video?.....brian
Deanna777
Well-known member
Bob,The 7mm socket trick doesn't work on the new "Shorty" antennas.
But Lamont posted the most excellent video about it! :thumbup:
You just have to find it... :dontknow:
I used a 7mm deep socket wrench to replace my long antenna ( which I snapped off at the gold base) with a short antenna. Look @ "My Albums". I did not scratch the paint. Deanna
Deanna777
Well-known member
I have a 2014RTS-SE6 and I replaced my original ( long antenna) to a short antenna.Here are some more photos.
When I removed the boot, it looks like either a square nut or the square body of the antenna body....not sure which.
Here is a picture:
 Boot/ Short Antenna
Sorry no pictures of inside where gold base is.
I used a 7mm deep socket wrench. I did this on my own.
Deanna
trikermutha
Active member
If it doesn't come off use a hair dryer to warm up the area. They may have used Loctite on the threads.
Bob Denman
New member
I discovered I could leave the antennae attached to the brass mounting block, and detach the mounting block from the speaker housing. This allowed the antennae to flop around enough to get the Tupperware off.
thank you everyone for your suggestions!
.....brian
:congrats: :clap::firstplace::2thumbs:
nightcruiser
New member
turn the antenna to the right like your tightening it and pull up at the same time. It's on a spring that tightens when you turn left. Lamonster garage has a video on it.
IdahoMtnSpyder
Well-known member
turn the antenna to the right like your tightening it and pull up at the same time. It's on a spring that tightens when you turn left. Lamonster garage has a video on it.
Do you realize you just posted to a three year old thread wherein the OP said how he solved the problem?
Similar threads
- Replies
- 7
- Views
- 679
- Replies
- 0
- Views
- 376
- Replies
- 1
- Views
- 490
- Replies
- 11
- Views
- 585