• There were many reasons for the change of the site software, the biggest was security. The age of the old software also meant no server updates for certain programs. There are many benefits to the new software, one of the biggest is the mobile functionality. Ill fix up some stuff in the coming days, we'll also try to get some of the old addons back or the data imported back into the site like the garage. To create a thread or to reply with a post is basically the same as it was in the prior software. The default style of the site is light colored, but i temporarily added a darker colored style, to change you can find a link at the bottom of the site.

Rear caliper question

Interesting tidbit. I saw a Ural motorcycle the other day. Made in Russia and is an updated copy of ancient BMW (for those that don't know). Anyway, I notice the rear brake caliper looks completely identical to the Spyder unit. I don't know if it is, or not, but visually they appear to be identical. Urals are famous for cheap, so it might be a low cost alternative for rebuild parts? :dontknow:
 
wish i read it first

Wish i read this thread first..I took the caliper off after 2 hours and taped the piston back lightly with a hammer..Wow love this web site2014 RT limited..put New Vrubber tire on rear
 
..put New Vrubber tire on rear

Did you put the new, just-released Vee on the back? Vee Part Number 35004? The older tires Vee makes are part number 35002. The load rating on 35004 is 80H which is good for the RT's. BRP spec's 76H. However, the 35002 has a load rating of 68H which is good for the RS's but not the RT's. If you don't know the part number (which was on the paper label), you can read the load rating on the sidewall of the tire. The new 35004's were just made available. If that is what you have, great. Let us know how you like it. I have one but haven't put it on yet.
 
new v rubber

Yes I got the new v rubber 35004...Oringinal lasted 4000 miles ...interesting that is tell you on the side wall of the tire that tire pressure should be 25 lbs min -max..did the chalk test across the tire and it seems to wear off chalk evenly...only have 25 miles on tire so far
 
Yes I got the new v rubber 35004...Oringinal lasted 4000 miles ...interesting that is tell you on the side wall of the tire that tire pressure should be 25 lbs min -max..did the chalk test across the tire and it seems to wear off chalk evenly...only have 25 miles on tire so far

The tire sidewall says the load ratings are at the:

"Recommendation pressure 25 psi min 30 psi max (min 25 psi)".

That pretty much sums it up. Vee is recommending the standard pressure range (26-30 psi). I had asked Vee's tech people for a recommendation and they confirmed that saying they recommend the factory specified pressure range.
 
Just completed doing the brake pad replacements

2014 RT Limited - completed brake job around 22,000 miles. Fronts could have went awhile yet (maybe 5K) and rear brake pads were close to needing replacement, so decided to do a complete front/rear replacement on the pads.

I purchased from BajaRon (great service as you all know) the fully sintered HH pads.

I started with the fronts - super easy, just like all of the cars I've done in the past. The surprise for me is that each brake on the front is a four piston system (2 pistons per pad). The pistons pressed in with my hand without tools, just used the old pads to insure I bottom them out and not too far in.

The rear concerned me more due to all of the discussion on the forum. After removing the caliper from the rear, I decided to utilize a small pair of needle nose pliers in the two holes on the piston. I proceeded to turn the piston clockwise while applying a slight pressure inward. So smooth, it was easy and took less than a couple of minutes. I did not have to crack the brake bleeder. I checked the brake fluid reservoir levels and they look fine (check before and after for each system).

I completed the brake's breaking in process per BajaRon's instructions. Worked great and got the brakes through the "bedding-in" process just fine. They work well and pedal feels solid.

Here's a pic of the rear caliper with the piston in the starting (out) position - for those who would like to know what to expect when pulling off the rear caliper....good luck all who do this. Please note: when you pull off your rear caliper, be careful to watch for a thin washer that is used as a shim for alignment. I had one in the lower rear bolt position. It's very thin...just watch to make sure if you have one, you know which bolt hole it came from.

I thought the overall brake pad replacement process was very easy and was "lucky" that my rear brake piston moved easily.
 

Attachments

  • IMGP1739.jpg
    IMGP1739.jpg
    40.9 KB · Views: 85
Last edited:
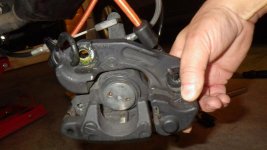
I was wondering what the two holes are for in the head of the piston. Possibly for a tool to use to screw it back in, and it is all the way out, what with me playing with it. I've tried the tension lever on the back but it only goes forward and that extends the piston. Yet the service manual says to rotate back to pull piston in. So now I have to find a special tool to see if I can screw it back in. Weird, with my Goldwing I just compressed the pistons back. Oh, Yes I removed the reservoir caps to relieve any pressure.

Use a needle nose plyers to screw the piston back in. The plyers must be small enough for the ends to fit into the holes. Turn the piston clockwise as you push it in. Remove cap on reservoir to allow for over flow and place cloth around it. Good Luck!
 
So as a summery of what I have read here,if you have a 2013 or later use a pair of needle nose pliers to turn piston CLOCKWISE while pushing lightly in on it. With a 2012 and earlier use a C Clamp to push the piston back in. Remove master cyl. caps for room just in case and pack with rags to catch any overflow. Are there sny special precautions to be taken for the ABS brake system in changing the pads? I haven't heard of anyone mentioning any but you never know.

Did I miss anything?

I took off the sensor at the rear caliper area. It has shims and one bolt holding it on. I did that to protect it when removing the caliper. To get room to move the caliper, I also removed the bracket holding both cables to the swing arm. It allows more movement for the caliper when it's removed.

I taped the sensor/shims/bolt together so I would not lose any of the shims - must have been three or four very thin shims in the sensor mount.
 
Wish i read this thread first..I took the caliper off after 2 hours and tapped the piston back lightly with a hammer.......


This one wins the prize for best post in this thread. Used a light hammer and a block of hardwood .5" x .5" and 3" long set directly in the center over the hole to lightly tap an extended piston back into place. Voilà!!! After that it was a piece of cake to use needle nose to CLOCKWISE turn the piston in to stop. Best to crack the bleeder too. I will never let my pads get that thin again.
 
Spyder rear caliber : instructions from BajaRon
"Rear pad install
The rear caliper also serves as the parking brake the rear piston needs to be retracted as the fronts with a C-clamp.however, it is likely that it will not retract far enough to complete the install. You will see 2 holes in the top of this piston bag for inserting a tool. The rear piston must be turned CLOCKWISE to retract the parking brake system. It is best to clean the rubber piston boot before this step it may take a good deal of force to start the piston turning but should get easier once the piston begins to turn. Turn the piston until it bottoms out.”:firstplace:
 
This one wins the prize for best post in this thread. Used a light hammer and a block of hardwood .5" x .5" and 3" long set directly in the center over the hole to lightly tap an extended piston back into place. Voilà!!! After that it was a piece of cake to use needle nose to CLOCKWISE turn the piston in to stop. Best to crack the bleeder too. I will never let my pads get that thin again.

Be very careful cracking bleeders on any of the calipers on a Spyder. I am glad it worked well for you. But doing that can also cause some issues.
 
Pure speculation on my part as I've never done the rear caliper, but do any of you remember the rear adjusters on drum brake automobiles? I think this is the same thing, where you have a hydraulic system interfacing with a mechanical system. As the brake pads wear thinner, the parking brake lever advances a notch (just like the old mechanically adjusted rear drum brakes on cars), which keeps the clamping force (Distance) within a tolerance that works for the limited mechanical stroke of the parking brake. The piston can retract some, but with the parking brake ratcheted all the way out probably not enough to fit new pads.
 
There is a tool you can buy at Harbor Freight that will do the trick. I don't know the name of the tool. It turns and pushes it back in easily. I had tried to push it in by pushing and turning with needle nose pliers so I went and bought the tool.
 
Use a pair of needle nose pliers. both pointy ends in the 2 holes and turn to open it. Im pretty sure you turn left.
 
I carry this tool for the rear calipers (Brembo). It's $14.95 delivered. Fits on the end of a 3/8" drive ratchet or extension. I see I need to update the pictures. These will work for the 2019 models as well.

They work pretty slick! Of course, as mentioned above. There are other options.

Caliper Tool-1.jpg

Caliper Tool-2.jpg
 
I can't thank you enough for putting this up on the boards! I tried compressing the caliper piston on my 2014 RT Limited: to no avail. Then I remembered when I had my 2013 that I squeezed the brake and did something to the piston to get it to go in, but I couldn't remember what it was until I read you post today! You save me probably a couple hours and not having to go redo the brake lines etc... Again: Thanks!!!
 
Back
Top