• There were many reasons for the change of the site software, the biggest was security. The age of the old software also meant no server updates for certain programs. There are many benefits to the new software, one of the biggest is the mobile functionality. Ill fix up some stuff in the coming days, we'll also try to get some of the old addons back or the data imported back into the site like the garage. To create a thread or to reply with a post is basically the same as it was in the prior software. The default style of the site is light colored, but i temporarily added a darker colored style, to change you can find a link at the bottom of the site.

Question about replacing stock air compressor with Viair 097c

NoJive

New member
My compressor on my 2012 RT-S is very loud, and has been causing the fuse to blow anytime I ride two up. I did some research, and purchased the Viair 097c to replace mine with. How hard is it to replace? I can't find any vids on it, like I have been able to with my other Spyder repairs, but I assume once the Tupperware is off, it shouldn't be that hard. Also, I have heard that I will need longer screws to mount it. If someone can let me know what size screws I need, I would appreciate it. I'd like to have everything ready to go when I dig into it this week. :D
 
Don't know. ..!!

But I would start by getting hold of a shop manual to help guide you along. I have not seen a video on this even though there have been issues with the compressors for some time. Once you have the old one out you can see how long the screws/bolts need to be and pick them up at home depot or car parts store. Let us know how it goes could help others with compressor problems...:thumbup:
 
I keep forgetting I have a shop manual! I'll take pics as I go along, and it may help someone in the future. I do wonder how these will hold out vs. the stock one, I would hope they last a bit longer.
 
Replacement done!

Just finished replacing the stock air compressor with the Viair 097c unit. Whew....so much tupperware! Anyways, to help out the next person that wants to do this, I took some pics.


attachment.php


This is all the tupperware you'll need to remove. I have the shop manual, and it will walk you through the process. You'll be taking off the seat, backrest, side panels, and the entire rear cargo unit. That is the fun one!! One thing to note about that is you will need to unlatch the schrader valve from its mounting point under the seat. The shop guide does not mention this! The valve twists about a 1/4 turn and it will unlatch. I did not take a pic of this, but it is pretty self explanatory once you see it. The rear cargo unit is HEAVY! There are some electrical plugs that you need to unhook, again, follow the shop manual. Once it is unbolted, it will slide out the back of the bike. Again, make sure you have unlatched the schrader valve!! You really need two people to handle this part, as the shop manual says not to carry it via the grab handles. Be careful sitting it down, as it will rest on the rear fender, and could crack it. You will also need to remove the splash guard from the rear as well. This pops off via 4 push pins, and gives you access to the compressor. The compressor is attached with two short bolts and nuts. Again, the shop manual will walk you through removing it. Very easy!

Once you have the compressor removed, this is what is looks like:
attachment.php


Note the metal mounting cage. There is also a rubber wrap under that. Here it is with the metal cage off, and the rubber wrap.
attachment.php


And here is a comparison between it and the Viair 097c:
attachment.php


One thing to note here is that the air connection is pointed the opposite way on the new one. You'll need to remove the 4 long allen screws and flip it. Here is the after flip pic, showing the allen screws.
attachment.php


--CONTINUED--
 

Attachments

  • 20160310_195532.jpg
    20160310_195532.jpg
    73.1 KB · Views: 589
  • 20160311_100459.jpg
    20160311_100459.jpg
    49.5 KB · Views: 572
  • 20160311_100510.jpg
    20160311_100510.jpg
    55.1 KB · Views: 575
  • 20160310_202502.jpg
    20160310_202502.jpg
    48.3 KB · Views: 576
  • 20160311_102302.jpg
    20160311_102302.jpg
    44.9 KB · Views: 574
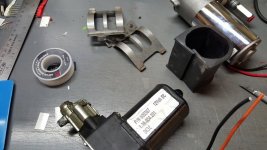
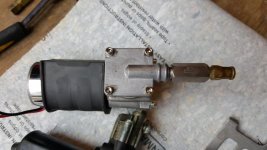
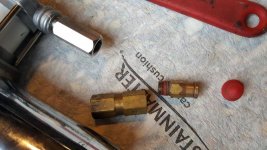
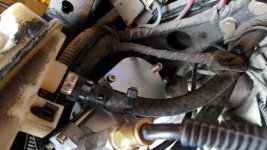
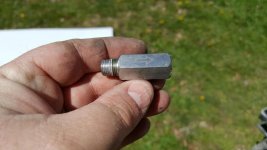
You'll need to remove the compression fitting off of the air hose on the Spyder, and unscrew that fitting and install it in the 097c. The compression fitting is on the right of this pic. The manual says to use Locktite 597 on the threads, but I could not find that in my area. I used a product called Rectorseal 5, that seems to work well.
attachment.php


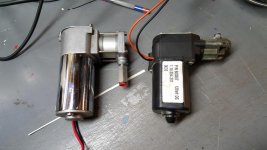
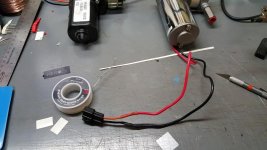
Once that is done, you'll need to cut the connector off of the old compressor, and solder it to the new one.
attachment.php


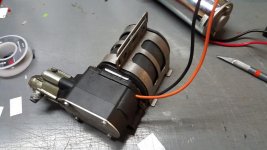
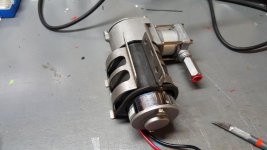
Note that the 097c compressor is round, whereas the old one has flat sides. This is why you need to get longer bolts. I used M6 1.00x40, and they worked well.
attachment.php


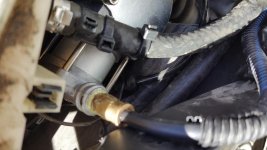
Once you mount it, and reconnect the connector, this is it:
attachment.php


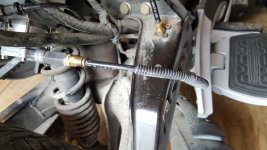
And this is where I ran into a problem. The 097c is a tad longer than the old one. One side is right up against the battery compartment, and the other is against the brake line. The brake line worried me, but no matter how I adjusted it, there was no way to avoid it. What I ended up doing is using some thick pinball flipper rubber (yeah, another expensive hobby) to put between the brake line, and the compressor. I then zip tied all of this up so it can't move. There is no rough edge where it is laying on, but It still worries me. I will keep and eye on it though.
attachment.php


Also, you'll need to rotate the compressor in the mount. If the output valve part is pointing downward, the splash guard will not fit!

The only other issues I had were sliding the rear cargo compartment back on. It seems on the sides, it has to slide under the splash guard, which I did not know. One cracked splash guard later, I figured it out. Again, this will take two people!! Also, watch the schrader valve!! You'll need to feed it through the hole and twist it as you slide the rear on. One other thing is that I could not test the compressor until I put the seat back one. I assume the seat sensor is the culprit, but just double check you have everything hooked back right. You do not want to have to take everything apart again, trust me!

That's about all there is to it. I notice it is much quieter than my old one, and hopefully, it will stop the fuse from blowing when the Mrs. is on the back. So far so good!
 

Attachments

  • 20160311_101047.jpg
    20160311_101047.jpg
    64.9 KB · Views: 570
  • 20160310_203053.jpg
    20160310_203053.jpg
    52.2 KB · Views: 570
  • 20160311_100551.jpg
    20160311_100551.jpg
    39.6 KB · Views: 574
  • 20160311_110842.jpg
    20160311_110842.jpg
    65.5 KB · Views: 578
  • 20160311_110848.jpg
    20160311_110848.jpg
    56.4 KB · Views: 581
Last edited:
THE PICS AND THE PROCESS

:yes::yes::yes::yes:........LET ME SAY ...THANK YOU FROM EVERYONE ......:thumbup::thumbup::thumbup::thumbup::thumbup:.......Mike :bbq:
 
I too want to join in this chorus. Great tech article and nice clear pictures. This is a valuable write up. If I hadn't had my warranty replacing this compressor would have cost over $500.00 As it is now if it goes out again after the warranty expires I will do this.:bowdown::bowdown::bowdown::2thumbs:
 
Great job on documenting it. My compressor is bad but bike is only a few months old so replacing under warranty. Was it really necessary to remove all that tupperware, especially the seat and the whole rear?
 
Great job on documenting it. My compressor is bad but bike is only a few months old so replacing under warranty. Was it really necessary to remove all that tupperware, especially the seat and the whole rear?

Yes. The compressor is right up under the seat, and due to the saddlebags being built in on the RT, they completely block access. Also, I don't think you can remove the splash guard without removing the rear, and you have to remove that. It's funny how I used to complain about the tupperware on my GS....I didn't realize how good I had it!
 
I too want to join in this chorus. Great tech article and nice clear pictures. This is a valuable write up. If I hadn't had my warranty replacing this compressor would have cost over $500.00 As it is now if it goes out again after the warranty expires I will do this.:bowdown::bowdown::bowdown::2thumbs:

Thanks! I'm wondering if the title of this thread needs to change. Might be easier for people to find if it's called "TECH: Replacing air compressor on the RT". Not sure I can change the title thought, might be something the mods will need to look into.
 
It's funny how I used to complain about the tupperware on my GS....I didn't realize how good I had it!


No kidding.
Thanks for an excellent write up. :yes:


Question: Why the Viair 97C? They make other compressors that have slightly different capacities and dimensions that might make mounting easier?
 
Last edited:
Awesome work! So good to see someone figure something out on their own, and actually IMPROVE what they have vs. simply take it to the dealer. Very cool!

Sent from my Nexus 6 using Tapatalk
 
No kidding.
Thanks for an excellent write up. :yes:


Question: Why the Viair 97C? They make other compressors that have slightly different capacities and dimensions that might make mounting easier?

Good question. The 097c was what everyone suggested as a replacement. A smaller one, even 1" shorter, would be ideal.
 
Slight update to this!

After a couple days of riding, I noticed the bag didn't seem to hold air. I had checked all the fittings after I installed the compressor, and everything seemed fine. I decided to pull the rear off again and double check everything. Turns out there is a little extension that is on the compressor. This extension puts the air line in the path of the saddlebags, so when you mount the rear back on, it rubs against the air line. What I ended up doing was removing the extension, and screwing the air line straight into the compressor. I am not sure what the purpose of that extension is, but everything seems to work fine without it. I still seem to have a slight leak, but I am not sure where it is other than maybe the bag. Everything else I checked with soapy water, and saw no bubbles. Seems like after a couple days of sitting, the bag goes flat. The compressor doesn't seem to run much when riding though.


On the left of the pic is the extension on the compressor:

attachment.php


This is it after removal:

attachment.php


And finally, the airline screwed straight into the compressor:

attachment.php
 

Attachments

  • 20160311_103614.jpg
    20160311_103614.jpg
    55.4 KB · Views: 466
  • 20160416_151650.jpg
    20160416_151650.jpg
    36.6 KB · Views: 462
  • 20160416_151656.jpg
    20160416_151656.jpg
    45.1 KB · Views: 463
NoJive.... Nice job and write up!

You will probably never wear out that compressor even if you develop issues with the air bag...

BRP used the cheapest compressor they could find! They should have used this one... Probably would have saved them a lot of warranty work costs..

Bob
 
First of all, thank you for this thread it is "priceless". I had a bad compressor and no warranty. So... your thread to the rescue. Purchased the replacement compressor from Amazon.com and followed your instructions . Wow, it fired right up with me and the wife on the back and we are good to go.

The one issue I came across was the push on fitting, on the compressor, would not seal so I got a compression type fitting from Home Depot and everything seams fine. (no Leaks). I have several production machines (at work) that came with the push on fittings and plastic tubing and have been nothing but trouble.

Again, Thank you for the time and effort for posting this article.
 
Hi All,

Ryan from Viair here. Just so you guys know, the fitting that was removed was the check valve. The check valve is a one-way check valve that prevents back pressure against the compressor. This will also prevent air from leaking out the suspension and out through the compressor.

Please feel free to contact me if you guys have any other questions about our compressors.

Thanks,
Ryan
Viair Corporation
 
Back
Top