BajaRon
Well-known member
This is for the Full, BajaRon Custom Performance Sway Bar Kit - Ryker Only. And only for the Arms in this kit. It has nothing to do with the End Links. (See Picture Below). If you have the End Links Only, this Will NOT Apply to You!
This is NOT a Recall or notice of a Faulty Component. This is an Installation Error Only.
There has been a small, but persistent, problem with both customers and professional installers putting the BajaRon Ryker Swaybar Arms on incorrectly. The instructions have always explained this step clearly. Over time, I have attempted to emphasize this simple step more. It may be this step seems to be such a 'No Brainer', that some don't look at the instruction for this step. I don't know.
My Ryker sway bar sales and installs continue to go up quickly. and I have managed to reduce the percentage of errors greatly. But the number of these errors has remained fairly steady.
I plan to do even more to point out the importance of this step for future instructions. But I wanted to be pro-active and ask those who have already had a Full Sway Bar Kit installed, to check their arms
The installation orientation of the Stainless Steel clamping bolt is VERY important! A few are putting the clamping bolt in from the top. It must go in from the bottom, as described in the instructions. When installed from the top, the arm will fall off EVERY TIME. Some will fall of quickly. Others may go quite some distance before falling off. But they will fall off. When an arm falls off, the rider typically puts it back on and tightens the bolt more. This process is repeated 1 or 2 more times until the bolt head is stripped from over-tightening. That's when I get a phone call.
When I recommend the simple fix of removing the Stainless Steel Clamping Bolt and installing it correctly. They say the Loctite is preventing removal of the bolt. It isn't the Blue Loctite. This version of Loctite only keeps the bolt from backing out, it does not prevent it from being removed. It's the over-tightening and stripping of the bolt head that is the problem.
The reason for this post is for those who may have this bolt installed incorrectly, to catch the problem before a simple fix is no longer possible. If the bolt cannot be removed, the arm must be replaced. And that is a shame.
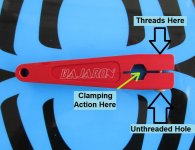
As you can see in the picture. The top bolt hole is threaded. The bottom hole is straight through or UnThreaded. Putting the clamping bolt in from the top will provide ZERO clamping force, regardless of how tight you get it.
Putting the bolt in from the bottom, it passes through the open, unthreaded hole, though the split and into the threads at the top. The bolt is only needed to keep the arm from spreading under stress. So reasonably 'Snug' is tight enough. This is why we include Loctite. And why it isn't necessary to get the bolt so tight that it cannot be removed.
So, please, if you have installed a Full BajaRon Sway Bar Kit, or had one installed by someone else, on your Ryker. I ask you to check to be sure the Stainless Steel Bolt on each Arm is threaded in from the bottom (Bolt Head on the bottom). If so, you're good to go! If you find the bolt head on the top of the arm, please remove the bolt from the arm, (Do Not Remove the Arm), be sure the arm is seated all the way onto the bar (there should be just a small amount of the bar protruding beyond the Arm Hex). Then thread the clamping bolt in from the bottom with a bit of BLUE Loctite on the threads at the top end of the bolt where it will engage with the threaded portion of the arm, and tighten until snug.
As always, if you have any questions, please call me at 423-552-3720 or email me at [email protected]
This is extremely obvious and easy. Hopefully, it won't entail anything more than a quick look to discover that all is well. If you do find it wrong. All you need is the right Allen Wrench (hex wrench) and a few minutes. It can be done on the ground, no lifting, no removing anything but the bolt. And everything is out where you can get to it. Anyone can do this.
This is NOT a Recall or notice of a Faulty Component. This is an Installation Error Only.
There has been a small, but persistent, problem with both customers and professional installers putting the BajaRon Ryker Swaybar Arms on incorrectly. The instructions have always explained this step clearly. Over time, I have attempted to emphasize this simple step more. It may be this step seems to be such a 'No Brainer', that some don't look at the instruction for this step. I don't know.
My Ryker sway bar sales and installs continue to go up quickly. and I have managed to reduce the percentage of errors greatly. But the number of these errors has remained fairly steady.
I plan to do even more to point out the importance of this step for future instructions. But I wanted to be pro-active and ask those who have already had a Full Sway Bar Kit installed, to check their arms
The installation orientation of the Stainless Steel clamping bolt is VERY important! A few are putting the clamping bolt in from the top. It must go in from the bottom, as described in the instructions. When installed from the top, the arm will fall off EVERY TIME. Some will fall of quickly. Others may go quite some distance before falling off. But they will fall off. When an arm falls off, the rider typically puts it back on and tightens the bolt more. This process is repeated 1 or 2 more times until the bolt head is stripped from over-tightening. That's when I get a phone call.
When I recommend the simple fix of removing the Stainless Steel Clamping Bolt and installing it correctly. They say the Loctite is preventing removal of the bolt. It isn't the Blue Loctite. This version of Loctite only keeps the bolt from backing out, it does not prevent it from being removed. It's the over-tightening and stripping of the bolt head that is the problem.
The reason for this post is for those who may have this bolt installed incorrectly, to catch the problem before a simple fix is no longer possible. If the bolt cannot be removed, the arm must be replaced. And that is a shame.
As you can see in the picture. The top bolt hole is threaded. The bottom hole is straight through or UnThreaded. Putting the clamping bolt in from the top will provide ZERO clamping force, regardless of how tight you get it.
Putting the bolt in from the bottom, it passes through the open, unthreaded hole, though the split and into the threads at the top. The bolt is only needed to keep the arm from spreading under stress. So reasonably 'Snug' is tight enough. This is why we include Loctite. And why it isn't necessary to get the bolt so tight that it cannot be removed.
So, please, if you have installed a Full BajaRon Sway Bar Kit, or had one installed by someone else, on your Ryker. I ask you to check to be sure the Stainless Steel Bolt on each Arm is threaded in from the bottom (Bolt Head on the bottom). If so, you're good to go! If you find the bolt head on the top of the arm, please remove the bolt from the arm, (Do Not Remove the Arm), be sure the arm is seated all the way onto the bar (there should be just a small amount of the bar protruding beyond the Arm Hex). Then thread the clamping bolt in from the bottom with a bit of BLUE Loctite on the threads at the top end of the bolt where it will engage with the threaded portion of the arm, and tighten until snug.
As always, if you have any questions, please call me at 423-552-3720 or email me at [email protected]
This is extremely obvious and easy. Hopefully, it won't entail anything more than a quick look to discover that all is well. If you do find it wrong. All you need is the right Allen Wrench (hex wrench) and a few minutes. It can be done on the ground, no lifting, no removing anything but the bolt. And everything is out where you can get to it. Anyone can do this.
Attachments
Last edited:
 opcorn: