tntnj
Active member
How to Paint Can Am Parts for under $100
Things needed to do the job
Try not to Paint on Very humid day or rainy day (Best to paint on 70 + degree day with a 60% or less day humidity)
Paint (base coat and clear coat) (scratches happen web site) $70
Gray scotch bright Fine (600-800) grit (Lowes) $6
Prep Spray (oil and wax remover) (Auto Zone) $13
Clean wax free rags (Walmart)
Gloves (Included in the paint from Scratches Happen) (Your skin absorbs chemicals and it protects oils on your skin ruining from your paint)
A clean dry dust free surface (not outside if possible) Wind, dirt and bugs will get in your paint
REMOVE TO TOP CASE SIDE PIECES
1. remove 3 screws on the side piece, 2 on the top edge 1 by the speaker
2. remove two push pins on the brake light cover
3. pull back a little on the speaker cover
4. GENTLY remove the side cover NOTE: the bottom has a little hook toward the speaker cover
Prepping your piece for paint
1. Put the gloves on, use a micro cloth and spray some prep spray on the cloth (TEST a piece to see if it effects the paint) If it doesn’t go to #2 (If it took paint off STOP) You need to find another wax and oil remover
2. Wipe down the pieces you want to paint (try to handle only the parts that are NOT to painted, your fingers contain oil and will affect the paint (that is why you wear gloves)
3. Get a CLEAN contain of water, wet the scotch bright pad and lightly scuff the painted surface All you want to do is make the painted area dull (Mind the edges don’t cut through the paint)
4. Wipe the parts dry making sure you remove any loose residue
5. Now that the ENTIRE piece is dull you can wipe down the part with Prep Spray
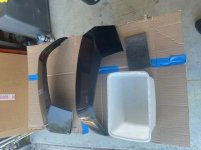
6. Lay the parts on a clean dry flat surface (I like to put my parts on a piece of paper or cardboard)
7. Spray several LIGHT coats of the base coat on your pieces. Be sure to let the paint dry (setup) between coats. To check to see if the paint is dry touch the paper NOT the Painted piece. (Keep the spray about 6 inches away from your parts) NOTE the paint will be dull with no shine until you spray the clear coat. A HEAVY SPRAY WILL MAKE METALIC STREAKS ON YOUR PIECES - GO TO 8 if this happens - SKIP IF PAINT IS EVEN
8. IF you have streaks in your base while painting try to raise your spray about 12 inches and spray fast over the piece to try to even the metallic (This is called dusting)
9. If you are happy with the base coat and it is dry all over to the touch and it is ready for your clear coat Again light coats (make sure the base coat is dry, it will be a uniform color)
10. After your first coat of clear, wait about 5- 10 minutes, On the second coat spray a little slower making sure you do not run your clear coat the third and final coat (5-10 minutes) You want to make the paint look wet (overlap your spray so the clear looks wet and has a shine)
11. Now let it dry and when the paint is no longer tackey you can put it in the sun to dry
12. 24 hours later Install you painted parts
13. If you have a bad area (Like I had) DON’T WORRY, IT CAN BE FIXED - Wait 24 hrs, then sand the area down with the gray pad wet, until smooth, then sand the entire part with the gray, if you break through to the paint spray the small area with color and let it dry the give the entire part 2 coats of clear.
I am not an expert, I used to do body work 30 years ago. If I wrote something wrong, let the readers know.
Note: I tried to add pictures but the site will not let me add more
Things needed to do the job
Try not to Paint on Very humid day or rainy day (Best to paint on 70 + degree day with a 60% or less day humidity)
Paint (base coat and clear coat) (scratches happen web site) $70
Gray scotch bright Fine (600-800) grit (Lowes) $6
Prep Spray (oil and wax remover) (Auto Zone) $13
Clean wax free rags (Walmart)
Gloves (Included in the paint from Scratches Happen) (Your skin absorbs chemicals and it protects oils on your skin ruining from your paint)
A clean dry dust free surface (not outside if possible) Wind, dirt and bugs will get in your paint
REMOVE TO TOP CASE SIDE PIECES
1. remove 3 screws on the side piece, 2 on the top edge 1 by the speaker
2. remove two push pins on the brake light cover
3. pull back a little on the speaker cover
4. GENTLY remove the side cover NOTE: the bottom has a little hook toward the speaker cover
Prepping your piece for paint
1. Put the gloves on, use a micro cloth and spray some prep spray on the cloth (TEST a piece to see if it effects the paint) If it doesn’t go to #2 (If it took paint off STOP) You need to find another wax and oil remover
2. Wipe down the pieces you want to paint (try to handle only the parts that are NOT to painted, your fingers contain oil and will affect the paint (that is why you wear gloves)
3. Get a CLEAN contain of water, wet the scotch bright pad and lightly scuff the painted surface All you want to do is make the painted area dull (Mind the edges don’t cut through the paint)
4. Wipe the parts dry making sure you remove any loose residue
5. Now that the ENTIRE piece is dull you can wipe down the part with Prep Spray
6. Lay the parts on a clean dry flat surface (I like to put my parts on a piece of paper or cardboard)
7. Spray several LIGHT coats of the base coat on your pieces. Be sure to let the paint dry (setup) between coats. To check to see if the paint is dry touch the paper NOT the Painted piece. (Keep the spray about 6 inches away from your parts) NOTE the paint will be dull with no shine until you spray the clear coat. A HEAVY SPRAY WILL MAKE METALIC STREAKS ON YOUR PIECES - GO TO 8 if this happens - SKIP IF PAINT IS EVEN
8. IF you have streaks in your base while painting try to raise your spray about 12 inches and spray fast over the piece to try to even the metallic (This is called dusting)
9. If you are happy with the base coat and it is dry all over to the touch and it is ready for your clear coat Again light coats (make sure the base coat is dry, it will be a uniform color)
10. After your first coat of clear, wait about 5- 10 minutes, On the second coat spray a little slower making sure you do not run your clear coat the third and final coat (5-10 minutes) You want to make the paint look wet (overlap your spray so the clear looks wet and has a shine)
11. Now let it dry and when the paint is no longer tackey you can put it in the sun to dry
12. 24 hours later Install you painted parts
13. If you have a bad area (Like I had) DON’T WORRY, IT CAN BE FIXED - Wait 24 hrs, then sand the area down with the gray pad wet, until smooth, then sand the entire part with the gray, if you break through to the paint spray the small area with color and let it dry the give the entire part 2 coats of clear.
I am not an expert, I used to do body work 30 years ago. If I wrote something wrong, let the readers know.
Note: I tried to add pictures but the site will not let me add more
Attachments
Last edited by a moderator:
")
")
 hyea:
hyea: 


