-
There were many reasons for the change of the site software, the biggest was security. The age of the old software also meant no server updates for certain programs. There are many benefits to the new software, one of the biggest is the mobile functionality. Ill fix up some stuff in the coming days, we'll also try to get some of the old addons back or the data imported back into the site like the garage. To create a thread or to reply with a post is basically the same as it was in the prior software. The default style of the site is light colored, but i temporarily added a darker colored style, to change you can find a link at the bottom of the site.
You are using an out of date browser. It may not display this or other websites correctly.
You should upgrade or use an alternative browser.
You should upgrade or use an alternative browser.
Nothing spectacular just making it mine.
- Thread starter pitzerwm
- Start date
PrairieSpyder
New member
Congrats on all your farkles! And on all the fun you're having!
pegasus1300
Well-known member
I love your "out of the box" thinking and creativity. Thank you for keeping us posted on your ideas and progress.
pitzerwm
New member
New Gas Door
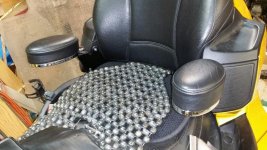
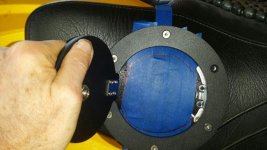
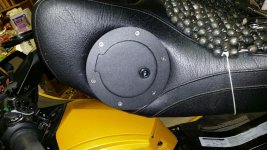
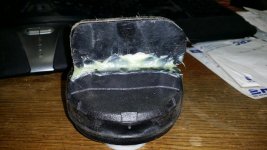
Like a few of you that hate to have your passenger get off the bike or take all of your junk off the seat so you can get gas, I decided to put in the gas door. BlueKnight911 has done it and is offering to help people do it at Spyderfest, but I didn't want to wait. I got a 6" Dodge keyed door off ebay and the slant cap that you can stick the nozzle right in. The slant is a piece of crap and didn't fit right. Talked to Mike and he made his work, but I couldn't. I will look for the Perma one, when I go to Spyderfest. They are illegal here for some reason.
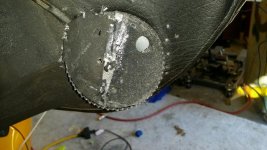
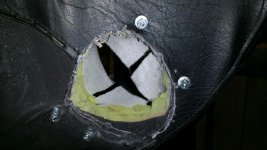
I mis measured and I should/could have been a 1/2" closer to the front. Mike says not to use a drill for the bolts to go thru so I used a Dremel tool and then a drill. I have the Ultimate seat and it is well built and has a bunch of foam on the side, so you need 3" bolts to replace what comes with it. Of course 2 of them are M4 and Lowes didn't have any, so I got 6/32"x3 and epoxied them in. The other two are actually screws which I replace with #10 bolts. As you can see by the pixs, I wanted it as neat as I could on the inside too. I found that when I cut the hole (a hole saw worked great) To use the regular cap, I could use it bigger. That part of the deat "frame" is 3/4" thick on one side maybe 1/2" on the other. I uses the Dremel to cut more plastic out tapering it to the inside. Then a sanding drum on a drill to smooth it out. I have big hands and its not a problem to use the regular cap. It would be better if I had it 1/2" closer to the front. You are pretty much at the bottom of the seat at that point.
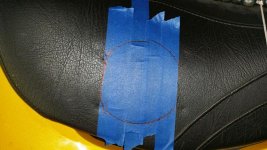
I then used 3M weather stripping glue to glue the vinyl inside the hole. I'm waiting for that to dry and I have some black vinyl that I will line the inside of the hole to cover where the seat vinyl didn't cover. Feel free to ask questions. I took my time but its not difficult with a minimum of tools.


Like a few of you that hate to have your passenger get off the bike or take all of your junk off the seat so you can get gas, I decided to put in the gas door. BlueKnight911 has done it and is offering to help people do it at Spyderfest, but I didn't want to wait. I got a 6" Dodge keyed door off ebay and the slant cap that you can stick the nozzle right in. The slant is a piece of crap and didn't fit right. Talked to Mike and he made his work, but I couldn't. I will look for the Perma one, when I go to Spyderfest. They are illegal here for some reason.
I mis measured and I should/could have been a 1/2" closer to the front. Mike says not to use a drill for the bolts to go thru so I used a Dremel tool and then a drill. I have the Ultimate seat and it is well built and has a bunch of foam on the side, so you need 3" bolts to replace what comes with it. Of course 2 of them are M4 and Lowes didn't have any, so I got 6/32"x3 and epoxied them in. The other two are actually screws which I replace with #10 bolts. As you can see by the pixs, I wanted it as neat as I could on the inside too. I found that when I cut the hole (a hole saw worked great) To use the regular cap, I could use it bigger. That part of the deat "frame" is 3/4" thick on one side maybe 1/2" on the other. I uses the Dremel to cut more plastic out tapering it to the inside. Then a sanding drum on a drill to smooth it out. I have big hands and its not a problem to use the regular cap. It would be better if I had it 1/2" closer to the front. You are pretty much at the bottom of the seat at that point.
I then used 3M weather stripping glue to glue the vinyl inside the hole. I'm waiting for that to dry and I have some black vinyl that I will line the inside of the hole to cover where the seat vinyl didn't cover. Feel free to ask questions. I took my time but its not difficult with a minimum of tools.
Attachments
pitzerwm
New member
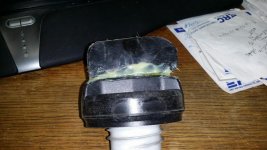
One more pix, waiting for the glue to dry. I will line the inside of the hole to finish dressing it up.


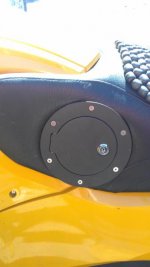
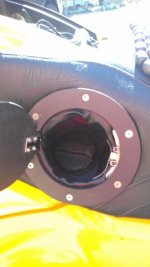
Finished product.
Attn: Mike pointed out that if you don't have a Dremel, don't think that just using a drill will work as well. The nylon fibers in the vinyl can catch in the drill and mess you up. If you don't have a Dremel, then use Mike's method which is a soldering iron or a hot nail, once you are thru the vinyl then you can use a drill.
I got gas today and it worked well with the OEM cap, however I think that I will epoxy a piece of plastic on to the top of the cap, which will extend the griping part of the cap making it even easier.
The added part on the gas cap is sort of ugly, but really works well to remove and replace the OEM cap. It was a 3/8" piece of plastic, I put 2 small screws into the top of the cap and drilled 2 holes to receive the heads of the screws in the new part. Just to strengthen the connection.
NOte: I would recommend moving the door 3/4"-1" to the left and 1" off the bottom.
Attachments

Last edited:
pitzerwm
New member
I added a Parking, blind spot sensor to my bike
http://www.spyderlovers.com/forums/...d-spot-sensors&p=1132081&posted=1#post1132081
http://www.spyderlovers.com/forums/...d-spot-sensors&p=1132081&posted=1#post1132081
pitzerwm
New member
Most of us "Zonies" just pop the seat up here in the Desert! I am about 250 miles from there. Surely someone is a lot closer.
Jack
Wrong Thread Jack
pitzerwm
New member
New Mission Trailer
At Heart of WA ride Kevin had one of these and I liked it a lot. It came in black so needed to do something to make it look like its part of the bike. You get about 2x the space of a 622. There is about 5" in the lid that's usable too, just need to figure out what will go there and build a holder for it.

The reflective strips are from HF too, I'll put on a few more, when I decide where.

I picked up these rubber mats 12x12 peel & stick (be sure and look that the sticky isn't old) and use them to protect the front of the fender.


I put Tricled modulators on the brake lights but there aren't working yet, got a call into Reggie to see what's wrong.
At Heart of WA ride Kevin had one of these and I liked it a lot. It came in black so needed to do something to make it look like its part of the bike. You get about 2x the space of a 622. There is about 5" in the lid that's usable too, just need to figure out what will go there and build a holder for it.
The reflective strips are from HF too, I'll put on a few more, when I decide where.
I picked up these rubber mats 12x12 peel & stick (be sure and look that the sticky isn't old) and use them to protect the front of the fender.
I put Tricled modulators on the brake lights but there aren't working yet, got a call into Reggie to see what's wrong.
pitzerwm
New member
Thanks to Blueknight I moved my iPod/aux plug from the trunk to the glovebox
This isn't difficult, as usual you have to tear half the bike apart, but we all knows that is needed for anything. I decided to change the oil at the same time.
You unscrew the metal ring that holds the plug in place and push it out the back. A small pair of needle nose will make that easier. Since I had added a dongle and backup sensors in the past, I needed to remove the right speaker pod. I had zip tied the wires all together.
Either way it is taped into the main/big wiring harness on the side of the radio. Be careful not to cut any wires. I removed the passenger backrest too. Take off all of the panels, including the passenger control panel by their seat. There is some foam around the glovebox.
I used a hole saw to take out what I needed. I then used a vari-bit to drill the hole in the side of the glovebox. I would put it somewhere from the middle down to the bottom. The wire is just long enough. Put the metal "nut" back on the plug and you are done.


 In this pix it is the grey wire with the plug just about out.
This isn't difficult, as usual you have to tear half the bike apart, but we all knows that is needed for anything. I decided to change the oil at the same time.
You unscrew the metal ring that holds the plug in place and push it out the back. A small pair of needle nose will make that easier. Since I had added a dongle and backup sensors in the past, I needed to remove the right speaker pod. I had zip tied the wires all together.
Either way it is taped into the main/big wiring harness on the side of the radio. Be careful not to cut any wires. I removed the passenger backrest too. Take off all of the panels, including the passenger control panel by their seat. There is some foam around the glovebox.
I used a hole saw to take out what I needed. I then used a vari-bit to drill the hole in the side of the glovebox. I would put it somewhere from the middle down to the bottom. The wire is just long enough. Put the metal "nut" back on the plug and you are done.
In this pix it is the grey wire with the plug just about out.
Last edited:
pitzerwm
New member
Blinker modulator for Fender LED lights
I'm sorry that I didn't document this better, but instead of paying $50 for this end result, you can get a $5 auto relay anywhere and accomplish the same thing. Basically you run the fender LED + wire thru the normally closed contacts of the relay. You use a pigtail from the blinker lights on the mirror to "pick" the relay removing power from the fender LEDs. You need to do this on each side.
I found the fender wires when they came off the A arm. IF you only wanted one or two of the lights to blink, you will need to take the fender apart and find the right wires. I just blinked all 3 lights.
I mounted the relays on some frame location, using the screw to attach the ground wire too.
gas door move for RS as mentioned by blueknight911
I hope this is the post you mentioned blueknight911. I found an earlier post with these ebay item numbers. 401050379839, and
192037098313 that you sent me earlier. I have my mechanic on board so I am going to get this ordered today. I was asked by Blueknight911 to post pictures when doing this project. I will do my best. But for now ....this will be on hold until the parts arrive. My thanks to Blueknight's patience in helping me out with this project.
Like a few of you that hate to have your passenger get off the bike or take all of your junk off the seat so you can get gas, I decided to put in the gas door. BlueKnight911 has done it and is offering to help people do it at Spyderfest, but I didn't want to wait. I got a 6" Dodge keyed door off ebay and the slant cap that you can stick the nozzle right in. The slant is a piece of crap and didn't fit right. Talked to Mike and he made his work, but I couldn't. I will look for the Perma one, when I go to Spyderfest. They are illegal here for some reason.
I mis measured and I should/could have been a 1/2" closer to the front. Mike says not to use a drill for the bolts to go thru so I used a Dremel tool and then a drill. I have the Ultimate seat and it is well built and has a bunch of foam on the side, so you need 3" bolts to replace what comes with it. Of course 2 of them are M4 and Lowes didn't have any, so I got 6/32"x3 and epoxied them in. The other two are actually screws which I replace with #10 bolts. As you can see by the pixs, I wanted it as neat as I could on the inside too. I found that when I cut the hole (a hole saw worked great) To use the regular cap, I could use it bigger. That part of the deat "frame" is 3/4" thick on one side maybe 1/2" on the other. I uses the Dremel to cut more plastic out tapering it to the inside. Then a sanding drum on a drill to smooth it out. I have big hands and its not a problem to use the regular cap. It would be better if I had it 1/2" closer to the front. You are pretty much at the bottom of the seat at that point.
I then used 3M weather stripping glue to glue the vinyl inside the hole. I'm waiting for that to dry and I have some black vinyl that I will line the inside of the hole to cover where the seat vinyl didn't cover. Feel free to ask questions. I took my time but its not difficult with a minimum of tools.
BLUEKNIGHT911
Sadly Passed Oct 2024 - RIP
GAS DOOR PROJECT
Rick ..... these Pics are for the ...... RT ...... not for the GS / RS ....... His door is much larger than yours will be , and yours will have to have the bolt nubs on the back made a bit shorter than they are now......Also the lock needs to be cut off , but the KEY slot needs to remain so there will be NO HOLE . I'll explain further and see if I can find a Pic of the smaller DOOR ....... Maybe " Camogirl " can post a PIC of Hers !!!!!....... Mike :thumbup:
Rick ..... these Pics are for the ...... RT ...... not for the GS / RS ....... His door is much larger than yours will be , and yours will have to have the bolt nubs on the back made a bit shorter than they are now......Also the lock needs to be cut off , but the KEY slot needs to remain so there will be NO HOLE . I'll explain further and see if I can find a Pic of the smaller DOOR ....... Maybe " Camogirl " can post a PIC of Hers !!!!!....... Mike :thumbup:
thanks blueknight911...that would help.
I went out and did a few measurements, your correct, its going to be a very tight fit, but If done right, will do the job. I did know that this was a RT model. I was going to repack the seat and replace the skin with some Harley Davidson leather. I have been replacing my wheelchair leather with the same materials. You don't slide around on this leather.... at some point this will be done too. Still working on a few options for my feet.... from Velcro on the bottom of my boots and on the floorboards to brackets. I will post something for this fix as soon as I decide which works best. But for now until a few more parts come in, I am going riding for awhile.
Thank you Blueknight911.
Rick ..... these Pics are for the ...... RT ...... not for the GS / RS ....... His door is much larger than yours will be , and yours will have to have the bolt nubs on the back made a bit shorter than they are now......Also the lock needs to be cut off , but the KEY slot needs to remain so there will be NO HOLE . I'll explain further and see if I can find a Pic of the smaller DOOR ....... Maybe " Camogirl " can post a PIC of Hers !!!!!....... Mike :thumbup:
BLUEKNIGHT911
Sadly Passed Oct 2024 - RIP
SMALL GAS DOOR
Rick , I couldn't find any other pics :banghead::banghead: ...... on the Velcro thing ..... IMHO when it gets wet and or muddy it's going to Stop working !!! so consider what I did on my floor boards .... I took a small piece ( to fit ) of Galv. sheet metal and made a lot of semi-holes with a large nail in 3/8" pattern. when turned over it is a traction surface that is fantastic .... I did it to prevent my feet from slipping when the boards ( alumin ) get wet . It really works well....Mike :thumbup:
Rick , I couldn't find any other pics :banghead::banghead: ...... on the Velcro thing ..... IMHO when it gets wet and or muddy it's going to Stop working !!! so consider what I did on my floor boards .... I took a small piece ( to fit ) of Galv. sheet metal and made a lot of semi-holes with a large nail in 3/8" pattern. when turned over it is a traction surface that is fantastic .... I did it to prevent my feet from slipping when the boards ( alumin ) get wet . It really works well....Mike :thumbup:
more on the velcro idea.
Yeah I kinda thought the same thing. It really depends on what floorboards I decide to use. Right now I am using a drop down floorboard from the stock peg. I don't have any pics on my surface pro at the moment, but they are about as big as my boot and 4" below peg, replacing the stock peg. We can fashion, weld and shape about anything so I have a friend making a couple of stirrup steel straps, the shape of my boots. Going to tack them in place giving me just enough room to slide my boot in. I have tried Velcro straps around my boots and thru the peg brackets...that has possibilities, Testing ways that make it safe for me to ride, but independence is important too. Thank you for the additional ideas I forgot to mention but my right leg is basically dead... but sometimes it gets jumpy, that's my MS kicking in, that's why I am looking into ways on dealing with them. We can discuss this another time , ok
Yeah I kinda thought the same thing. It really depends on what floorboards I decide to use. Right now I am using a drop down floorboard from the stock peg. I don't have any pics on my surface pro at the moment, but they are about as big as my boot and 4" below peg, replacing the stock peg. We can fashion, weld and shape about anything so I have a friend making a couple of stirrup steel straps, the shape of my boots. Going to tack them in place giving me just enough room to slide my boot in. I have tried Velcro straps around my boots and thru the peg brackets...that has possibilities, Testing ways that make it safe for me to ride, but independence is important too. Thank you for the additional ideas I forgot to mention but my right leg is basically dead... but sometimes it gets jumpy, that's my MS kicking in, that's why I am looking into ways on dealing with them. We can discuss this another time , ok
Rick , I couldn't find any other pics :banghead::banghead: ...... on the Velcro thing ..... IMHO when it gets wet and or muddy it's going to Stop working !!! so consider what I did on my floor boards .... I took a small piece ( to fit ) of Galv. sheet metal and made a lot of semi-holes with a large nail in 3/8" pattern. when turned over it is a traction surface that is fantastic .... I did it to prevent my feet from slipping when the boards ( alumin ) get wet . It really works well....Mike :thumbup:
Similar threads
- Replies
- 4
- Views
- 400
- Replies
- 4
- Views
- 397
- Replies
- 4
- Views
- 681
- Replies
- 12
- Views
- 470