• There were many reasons for the change of the site software, the biggest was security. The age of the old software also meant no server updates for certain programs. There are many benefits to the new software, one of the biggest is the mobile functionality. Ill fix up some stuff in the coming days, we'll also try to get some of the old addons back or the data imported back into the site like the garage. To create a thread or to reply with a post is basically the same as it was in the prior software. The default style of the site is light colored, but i temporarily added a darker colored style, to change you can find a link at the bottom of the site.

Need to Repair Broken Screw Hole Piece on Upper Tupperware Panel

StevenQ

New member
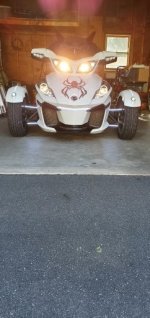
For our 2017 RT SE6 Spyder, I broke off part of a screw hole from the long upper tupperware panel. I am looking for advice to repair the tupperware panel, from anyone that has experienced breaking a piece of tupperware. I see quite a few epoxy choices to choose from, but not sure which one will work the best. I haven't been able to find what our tupperware panels are made of. I did find one post about using Plast Aid, and a reference to Q Bond. But I am not sure if there is now a better product out there.
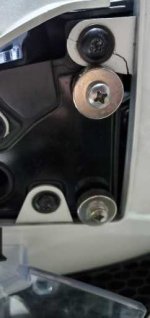
Thank you for any help, suggestions, or advice to accomplish such a repair. Right now the broken piece is being held in place by the relatively large washer on the screw, which is located by the upper Magic Mirror magnet.
Again, thank you:
StevenQ
 

Attachments

  • 4806.jpg
    4806.jpg
    44.5 KB · Views: 64
Last edited by a moderator:
Possibly some photos of your broken off bit may help rather than a general shot of your ride may help.

FWIW I broke some tabs off on my GL1800 Tupperware and managed to get remedied with a local bloke that did plastic welding. It was some sort of Poly-carbonate or something but he managed to get whatever he had to stick.
 
Another option that we have had to do on our 4 wheelers with broken tabs is you can’t get it to plastic weld, go get some gorilla epoxy glue and piano wire. Depending where the tab is get a larger bolt to represent the hole so you can bend the wire around it. Place the bolt beside the plastic broken tab. Epoxy the metal wire extending at least 1-2 inches to the back. Tape it with duct tape and use extra large paper clips to keep it tight against the back. Bend the wire around the bolt making a “U”. Cut the other side 1-2” in and repeat that side. Let is sit for 48 hours. Leave the duct tape on the back for good. You might have to take a pair of needle nose to pinch in or out to mak the table perfectly fit. It will be a bit loose but will not fly off. Done it many times. I epoxy and leave some extra along the side like a weld. We’ve even hot glued the tips together first to hold then epoxied and taped. It will work for a while.
 
The broken screw hole tab is located at the upper right corner, where the Magic Mirror is attached. Our bike is a 2017 Spyder RT SE6. I hope the 2 attached pictures help to clarify where the broken screw hole tab is located.
Thanks again:
StevenQ
 

Attachments

  • 5538.jpg
    5538.jpg
    10.6 KB · Views: 98
  • 5539[1].jpg
    5539[1].jpg
    32.5 KB · Views: 86
The broken screw hole tab is located at the upper right corner, where the Magic Mirror is attached. Our bike is a 2017 Spyder RT SE6. I hope the 2 attached pictures help to clarify where the broken screw hole tab is located.
Thanks again:
StevenQ

I have done this type of repair. I like JB-Weld, but just about any epoxy will work. It would be better if you remove that panel, but this can be done with it in place .... I like to scuff the parts first, then clean with alcohol. I use a thin piece of alum. or 24 ga. sheet metal drill the same size hole in it, trace the shape you need, then mix Epoxy .... apply Epoxy to the patch and put it on the plastic tab. To hold it together use that bolt and a larger washer. But first put a piece of tape onto the Spyder where this patch is going to go .... you DON'T want the panel to adhere to the Spyder .... you could do both sides ( if your quick ) at the same time , but I don't think this piece has a lot of stress on it..... good luck .... keep us informed .... Mike :thumbup:
 
I have done this type of repair. I like JB-Weld, but just about any epoxy will work. It would be better if you remove that panel, but this can be done with it in place .... I like to scuff the parts first, then clean with alcohol. I use a thin piece of alum. or 24 ga. sheet metal drill the same size hole in it, trace the shape you need, then mix Epoxy .... apply Epoxy to the patch and put it on the plastic tab. To hold it together use that bolt and a larger washer. But first put a piece of tape onto the Spyder where this patch is going to go .... you DON'T want the panel to adhere to the Spyder .... you could do both sides ( if your quick ) at the same time , but I don't think this piece has a lot of stress on it..... good luck .... keep us informed .... Mike :thumbup:

Yep. Now I have seen it I reckon Mike is on the money with a great way to remedy that. :thumbup:
 
I agree with mike. No brained. Cut a thin piece of aluminum like mike said. I’d predrill the hole and then glue/job weld it together with aluminum. Use tin snips to clean up any extra sticking out. another option is simply get 2 thin stainless steel washers. Epoxy one on back and other on front with epoxy sandwiched in between. Then small grinder to clean up.
 
I never done the cigarette ash trick, I don't smoke. I have used the baking soda trick back in my model building days. Forgot all about it until I saw these videos, Thanks Peter and everyone else who provided creative answers. And thanks Steven for asking such a great question. Even after 10 years here the collective wisdom and experience of the people here continues to humble me. Thank you all.
 
Last edited:
The smoke coming off a cigarette between the ash and the cig body will function as a quick set for superglue.
 
It's amazing what you can do with cigarette ash & superglue - you might wanta check this vid out:

https://youtu.be/VlXPOMGFrWI

That's pretty cool Peter. I had not seen that one before.

You can do something similar using abs plastic and acetone. We use this in the 3d printing world to do repairs. And I have repaired tabs just as StevenQ has broken. It is a very strong repair and actually bonds to the ABS of the broken piece. You must use abs plastic for this to work. I use shavings to make my slurry which breaks down much faster. Here are a couple of videos to demonstrate.

https://www.youtube.com/watch?v=2YIV0XVkkPE

https://www.youtube.com/watch?v=a4LoMJGfhzg
 
These are all great repair answers. But I'd like to offer some preventive advice to keep this from happening to your other side panel and to everyone else that uses the magnetic mirror mounts. As you can see, the magnet for the upper fitting is too large for the panel to clear. To remove this panel without breaking that tab you have to remove that magnet first. A better idea is to remove that magnet all together and go back to the factory hook in that position. It is not one of the spring clips. The remaining two magnets are plenty strong enough to hold the mirror in place at the forward and bottom positions, and it cannot go anywhere since it is captured by the upper hook. I've seen people use the mirror housing for stability while climbing on or off the bike and the mirror will come off the magnets and get scratched/broken and be hanging by the wire. With the upper hook still in place the mirror will not come off until it is lifted upward, but is still removed easily when needed. Also, there is no chance of breaking that tab to remove the panel for service.
 
These are all great repair answers. But I'd like to offer some preventive advice to keep this from happening to your other side panel and to everyone else that uses the magnetic mirror mounts. As you can see, the magnet for the upper fitting is too large for the panel to clear. To remove this panel without breaking that tab you have to remove that magnet first. A better idea is to remove that magnet all together and go back to the factory hook in that position. It is not one of the spring clips. The remaining two magnets are plenty strong enough to hold the mirror in place at the forward and bottom positions, and it cannot go anywhere since it is captured by the upper hook. I've seen people use the mirror housing for stability while climbing on or off the bike and the mirror will come off the magnets and get scratched/broken and be hanging by the wire. With the upper hook still in place the mirror will not come off until it is lifted upward, but is still removed easily when needed. Also, there is no chance of breaking that tab to remove the panel for service.

:agree: ... I designed and built my own ( mirror magnets ) at the same time ' No Boots " was working on His .... they are similar, but mine are actually smaller. My magnets " float " on the bolt , so they adjust to the imperfections of the BRP panels...... Mike :thumbup:
 
Back
Top