• There were many reasons for the change of the site software, the biggest was security. The age of the old software also meant no server updates for certain programs. There are many benefits to the new software, one of the biggest is the mobile functionality. Ill fix up some stuff in the coming days, we'll also try to get some of the old addons back or the data imported back into the site like the garage. To create a thread or to reply with a post is basically the same as it was in the prior software. The default style of the site is light colored, but i temporarily added a darker colored style, to change you can find a link at the bottom of the site.

My simple shelf for RTL rear compartment

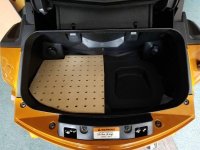
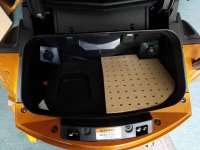
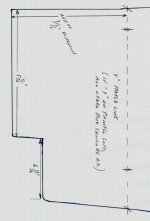
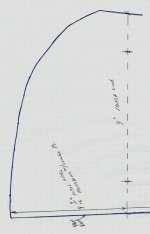
I've had this for a few years now, and decided maybe someone else would like to make it also. Not complicated at all, but works for us while out riding and not wanting to hold everything in pockets or lose it in the bigger compartment spaces. Others have addressed this issue I'm sure - this is just "my way". I used a piece of 1/4" pegboard I had laying around, but many things would work I'm sure. I've included JPG sketches (2) that you can use to make 1 complete template for each half, but I caution all...….make sure you check your printout for correct overall sizes as I note on the sketches.
You can scale JPG up or down if needed in Excel, but I couldn't find ANY program I have that would print the JPGs at PERFECT SIZE the first time. So much for 100% sized copies of things from printers
:banghead:

FYI - Part of my reason for making the shelf this way is because I can put it in or take it out easily in 2 pieces, without fighting the compartment sidewalls, etc.
Oh BTW, the underside (which is usually UP in ours) is covered with household rubber shelf lining matl. so things don't move around much. Also, the forward lip sits on top of the "dinner plate" Velcro area BRP installed, and the rear edge sits just inside the lid closing ridge. :ohyea:

Any questions, please just let me know. Complete shelf.jpgSpyder RTL deck shelf part2.jpgLeft side.jpgRt side half.jpgSpyder RTL deck shelf part1.jpg
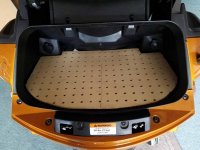
 
I've had this for a few years now, and decided maybe someone else would like to make it also. Not complicated at all, but works for us while out riding and not wanting to hold everything in pockets or lose it in the bigger compartment spaces. Others have addressed this issue I'm sure - this is just "my way". I used a piece of 1/4" pegboard I had laying around, but many things would work I'm sure. I've included JPG sketches (2) that you can use to make 1 complete template for each half, but I caution all...….make sure you check your printout for correct overall sizes as I note on the sketches.
You can scale JPG up or down if needed in Excel, but I couldn't find ANY program I have that would print the JPGs at PERFECT SIZE the first time. So much for 100% sized copies of things from printers
:banghead:

FYI - Part of my reason for making the shelf this way is because I can put it in or take it out easily in 2 pieces, without fighting the compartment sidewalls, etc.
Oh BTW, the underside (which is usually UP in ours) is covered with household rubber shelf lining matl. so things don't move around much. Also, the forward lip sits on top of the "dinner plate" Velcro area BRP installed, and the rear edge sits just inside the lid closing ridge. :ohyea:

Any questions, please just let me know. View attachment 162270View attachment 162275View attachment 162272View attachment 162273View attachment 162274
Nice solution!
 
Nicely done

Is a nice solution and the little holes let the old gym sox in the bottom breath...:roflblack: like that you can open just half rather than take out all the upper stuff to get to the bottom...congrats I'm sure it has served you well...love the DIY stuff...:2thumbs:
 
SHELF IDEA

" DIY'ers "- ROCK ...I lovvvvvvvvvvvvvvvvvvve it :clap::clap::clap: .... I've DIY'ed so many things on my RT I have to keep a list because I can't remember them all when asked :banghead: ..... Soooooooo I think I have to make one :yes::yes::yes::yes: ...... Thanks , .. Mike :thumbup:
 
Back
Top