• There were many reasons for the change of the site software, the biggest was security. The age of the old software also meant no server updates for certain programs. There are many benefits to the new software, one of the biggest is the mobile functionality. Ill fix up some stuff in the coming days, we'll also try to get some of the old addons back or the data imported back into the site like the garage. To create a thread or to reply with a post is basically the same as it was in the prior software. The default style of the site is light colored, but i temporarily added a darker colored style, to change you can find a link at the bottom of the site.

my new project but had to stop

cuznjohn

New member
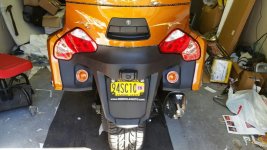
due to a really bad headache, i still need to remove the sides of the bike and run the wires that are now under the seat to a switch and battery supply. oh yea i forgot, they are amber strobes for emergency's, i bought the strobe lights off a police vehicle supply company than i looked around for a set of amber replacement lenses, i removed the bottom license plate black plastic piece and drilled two 2 3/4 inch holes in it one on each side and after fastening the strobes into the amber replacement lenses i than hot glued the plastic rings into the holes and attached the wiring with quick connect connectors and ran the wire up under the seat for now and during the week i will install the lighted switch i got and run the power line directly to the battery with a fuse in it. the switch lights when turned on and will be installed somewhere on the dash so i can see if it is lit and the strobes are on or off. i love lights and i love to be seen if i am stopped. as soon as i finish hooking them up i will post a video of them working.
attachment.php
 

Attachments

  • 20150425_145612.jpg
    20150425_145612.jpg
    63.1 KB · Views: 197
Keep us updated. You can't have to many lights. Do you have the Spyderpops lighted bumpskid? It's beautiful when lit up. That one is plug and play.
 
have not bought that one yet, can you remove the frunk with out taking the skid plate off

Here is some installation information on the bump skid.

Had my dealer install it. No frunk removal needed. Took one half hour labor. Jack up :ani29: so you can get under it. Old skid plate unscrews (about 4 screws). There is a wiring harness up under the old plate. The electrics plug into one of the connectors. Mount new skid plate using the four holes already there. Two new holes have to be drilled. Use short drill so you don't hit radiator hoses. Tighten screws and you are in business. The directions are very clear and easy. I just could not romp around on the floor and work under the :spyder2:.
 
Well done..!!

Hope you can knock that headache out. Then finish the job and video your results..:2thumbs: looks great, congrats..!!
 
Back
Top