• There were many reasons for the change of the site software, the biggest was security. The age of the old software also meant no server updates for certain programs. There are many benefits to the new software, one of the biggest is the mobile functionality. Ill fix up some stuff in the coming days, we'll also try to get some of the old addons back or the data imported back into the site like the garage. To create a thread or to reply with a post is basically the same as it was in the prior software. The default style of the site is light colored, but i temporarily added a darker colored style, to change you can find a link at the bottom of the site.

Mounting a Zumo up high

Nice Options and thanks for share'n with the rest of the Spyder-Hood

attachment.php
Hey Lamont, Teddy had me also try this position first after we disconnected the analogue gauges:thumbup:
We have since switched (like I think you have as well) to the top of the dash:2thumbs: & am very pleased with it there:firstplace:
Did you notice any issues with sun-glare on the screen of the GPS while ride'n at certain times of the day?:hun:

Nice think'n outside the box :thumbup: Have you noticed any issues with Sun-Glare while ryde'n at cetain times of the day?:hun:

This set-up is what Teddy likes BEST :firstplace: and it works well for us :thumbup::thumbup:
 

Attachments

  • 036.jpg
    036.jpg
    32.9 KB · Views: 148
  • 084.jpg
    084.jpg
    38.6 KB · Views: 153
  • 075.jpg
    075.jpg
    40.3 KB · Views: 140
  • 16769.jpg
    16769.jpg
    41.1 KB · Views: 128
Have you noticed any issues with Sun-Glare while ryde'n at cetain times of the day?:hun:

With the sun full on it, sure there is glare -- but that's really only early or late in the day, so I ride to the east in the morning and into the sunset at the end of the day... :ohyea:
IMG_0594.jpg
 
Last edited:
With the sun full on it, sure there is glare -- but that's really only early or late in the day, so I ride to the east in the morning and into the sunset at the end of the day... :ohyea:
View attachment 43443

You avoid glare off your sat-nav screen by riding into the sun, there and back?
Sheesh! You are going to ruin your complexion... :roflblack:
 
IMG_0623.jpg

IMG_0624.jpg


I goofed whne I put the hole in the dash top where I did as it required the longer RAM arm to position it right for me. That made it bouncy so I kluged a little wedge of wood to stabilize it then used the handymans favorite duct tape to cover my kluge.

I am very tall and took the second picture from eye level. even though it seems to be so high up as to block vision it really sits just under my regular line of sight and gives me an unobstructed view of the road with only a little eye movement to see the GPS. Not my best install but I am happy with the result.
 
I goofed whne I put the hole in the dash top where I did as it required the longer RAM arm to position it right for me. That made it bouncy so I kluged a little wedge of wood to stabilize it then used the handymans favorite duct tape to cover my kluge.

All is not lost, this unfortunate installation can be saved! As an expert in correcting stuff after I've screwed up, I would suggest starting again from scratch. Your incorrectly-positioned hole can be filled in and neatly hidden with a rubber blank, they usually sell them where they sell rubber grommets and cost very little money. When that is done you can make a new hole, but this time you should measure where to put it at least 3 times to make sure it's in the right place!

Most of the bounce you experienced the first time around came from having such a long arm, (to reach the hole you drilled in the wrong place :opps:). This time use a short 3" arm. When mounting the arm place a penny washer about 30 mm in diam both under and over the mounting hole. This will stiffen up the plastic nicely and take away any tendency for it to flex under the weight of the arm/sat-nav combination.

I hope you don't mind getting some well-intentioned, friendly British advice. :2thumbs:
 
Last edited:
Took a lot of advise from the people that posted here and ended up tearing my Spyder apart and installing my Zumo 660 up high. It was a pain in the tail, but I am very happy with the outcome. Just wish I would have realized before I got it all back together that I had one screw left over. Oh well lesson learned, will find where it goes during my next mod......
 

Attachments

  • IMAG0487.jpg
    IMAG0487.jpg
    27.4 KB · Views: 263
  • IMAG0494.jpg
    IMAG0494.jpg
    37.3 KB · Views: 266
  • IMAG0479.jpg
    IMAG0479.jpg
    50.2 KB · Views: 255
  • IMAG0493.jpg
    IMAG0493.jpg
    52.3 KB · Views: 245
  • IMAG0485.jpg
    IMAG0485.jpg
    39.8 KB · Views: 225
Took a lot of advise from the people that posted here and ended up tearing my Spyder apart and installing my Zumo 660 up high. It was a pain in the tail, but I am very happy with the outcome.

Good job. Don't worry about the left over screw, the Spyder was designed to lose at least one at every stripdown. The RAM mount you've used has a good-sized footprint, I'm betting your satnav sits as steady as a rock. You might want to blacken those shiny mounting nuts though, when the light is right you will see those little suckers reflected in your windscreen. They only do it 'cos they enjoy being an irritation. :shocked: Not that I'm paranoid. :shocked:
 
Well guys, I have tried every approach known to get my dealer to mount my Zumo 660 up high....talked to everyone at the dealership including the owner who is also over the service dept. I was told that mounting the zumo up high was "in the line of sight" and BRP nor my dealer were willing to take the liability that could come from a potential accident. They also informed me the Zumo motorcycle harness wouldn't work with the RT-S and I would need one of their OEM harnesses. I pleaded that with a metal plate in my neck it wasn't very comfortable looking down (I also wear a full face helmet). They just said their hands were tied. So, basically I can have someone do it and ruin my electrical warranty or put up with the dealer's standard mounting position.

To all of you who are able to do your own unique installs, I salute you!!!

Just do it yourself. It is not difficult. I bought the Zumo 660 online from amazon and the BRP mount for the handlebars. The BRP instructions for installing the GPS mount are great so I did the install myself.

After nearly rear ending SEVERAL cars :gaah: because the GPS was SO FREAKING FAR OUT OF MY LINE OF SIGHT :banghead: I moved it up high after seeing CyncySpyders mounted on top. Took me about 2.5 hours to move it, it is installed EXACTLY the way BRP would do it using all the same wiring. The only difference is the position.

Piece of cake!
 
Last edited:
Agreed, we LUV ours being mounted up High, so much better than anywhere else IMHO

Just do it yourself. It is not difficult, I did the install myself.After nearly rear ending SEVERAL cars :gaah: because the GPS was SO FREAKING FAR OUT OF MY LINE OF SIGHT :banghead: I moved it up high after seeing CyncySpyders mounted on top. Took me about 2.5 hours to move it, it is installed EXACTLY the way BRP would do it using all the same wiring. The only difference is the position.Piece of cake!

:agree: :agree:
 
OK, I know this thread has not been active for a bit, but wanted to ask a question. From what I have read, you have been able to use the BRP wiring harness to reroute from the handlebars up to the dash. There is enough slack in the BRP harness for that? Is there a preferred routing path? I also find it dangerous to have it low since you have to look so far down to see it. Also, sun reflection can be pretty bad in that position and when that occurs, it becomes useless...
 
OK, I know this thread has not been active for a bit, but wanted to ask a question. From what I have read, you have been able to use the BRP wiring harness to reroute from the handlebars up to the dash. There is enough slack in the BRP harness for that? Is there a preferred routing path? I also find it dangerous to have it low since you have to look so far down to see it. Also, sun reflection can be pretty bad in that position and when that occurs, it becomes useless...

I did use the factory harness and had no problem at all mounting it up on top of the dash. I think I just pulled my harness up top by going behind the right headlight, there was plenty of wire and holes to get to where you need to.
 
So much for the factory mount for the Garmin...mine snapped in half yesterday while riding with other forum members...Was just riding along and pieces of the mount started flying all over the place and my GPS was free gliding at the end of the harness which thankfully hung on...Grrrr...and my helmet shield started sticking and wouldn't let me take the d_*m thing off my head...and yes..all the bolts were secured tightly..I check them before every ride. Not a pleasant day for me equipment wise but the Spyder ran great.
 
I did use the factory harness and had no problem at all mounting it up on top of the dash. I think I just pulled my harness up top by going behind the right headlight, there was plenty of wire and holes to get to where you need to.

Thanks, SpyderMan, that is what I was hoping to hear. How much of the tupperware did you have to take off to get the cable rerouted? Sorry if this is in this thread, but I looked and did not see it. Did you have to take off the side panel, front facia, windshield, windshield mount and the top of the dash? Don't mind doing it, but don't want to tear down too much if I don't have to...

This will be my first mod so I am trying to do my homework up front so I don't get any surprises :yikes: while I have it torn apart...

I agree with Cyncy, or is that Teddy :dontknow:, that the current location is a disaster waiting to happen. Too low and out of the safety zone for my line of site...

Some more details here :

http://www.spyderlovers.com/forums/showthread.php?34118-RT-Garmin-Dash-Install
 
Perfect! That is what I was looking for. I will let you know how it goes. I ordered the Ram parts tonight. Hopefully this heat will let up a little to let me get out and do this. Outside, or in a garage, at 111 in Oklahoma is no fun. :(

Thanks again for digging that up.

BitSlayer

Sent from my iPad using Tapatalk HD
 
Another successful mount

Do not mean to highjack the thread, but added material here to make it easier for other forum users to find information in one location.

I just installed a Zumo 350 on a Spyder RT with A/C, heavily "inspired" from other user's experience and recommendations.

Here are my thoughts/advice if you consider doing the install: Note that I had never removed any tupperware before this.


  1. It is worth it. IHMO beats hands down BRP's factory location. (I first did a test ride with temporary install close to the factory location)
  2. Remove the body parts to have good access to your work area. Even though there is a long list of body parts to remove, they are all easy to remove if you follow the instructions. Don't let that discourage you. Just do it when you are not in a rush or don't have a deadline.
  3. Get the shop manual. Do your search in the forum, there are many available. I paid $24 for mine and I am satisfied. It helped me a lot identifying what to remove and in which order.
  4. Measure, measure, measure. Once you think you have found a location on the dashboard where you think the GPS base should go, check what's underneath. I used my kid's play-doh and squished it between the 2 pieces of the console to figure out how mush space I had for the lock nut and washer, and I found out it is pretty tight in many areas.
  5. Find the exact location where you want it to be and do the drilling on a good work bench. You don't get a second chance.

After crosschecking with the electrical diagrams, I followed NancyToys advice on the power hookup http://www.spyderlovers.com/forums/showthread.php?42602-GPS-Power-Source-Question.


Here are a few pics of the install. The original High-Res pics can be seen here: http://bchauvette.smugmug.com/Forums/Spyder-Forums/22362150_fb2wtC

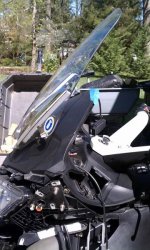
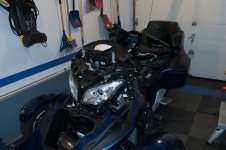
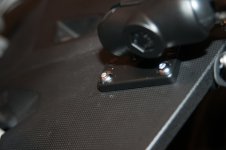
Do yourself a favor: remove the body parts and get a good access to the working area:
i-jq43B7x-M.jpg


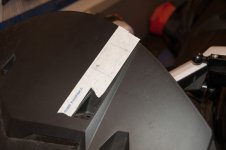
Mark your location. Note that I ended up locating the mount further left (viewed from the driver's position) after I realized there was some obstruction below one of my planned screw location.
i-bZtg8CS-M.jpg


Look for obstruction and check the clearance under your planned location. (I used Play-Doh and measured clearance)
i-QLjX96b-M.jpg


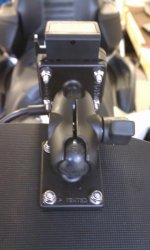
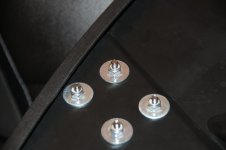
I used a square RAM mount plate with large washers underneath for increased stability. I also selected a short RAM connecting arm to reduce the chances of unit vibrating on harsh roads.
i-pDhc5vM-M.jpg

i-NLH55Wp-M.jpg

In my mount, one of the screws ended up a bit too close to the edge and it was a bit of a struggle to slide the console cover back into its location. Do not mount it any closer to the edge than I did.


I used power taps on the fuel gauge to get the power
i-Hdrn7xM-M.jpg


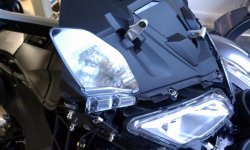
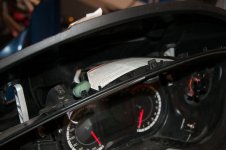
Having removed the console cover gave me a good location to install the Gamin power module:
i-nWQkKhg-M.jpg


I attached the power cable to prevent it from being pulled out too far, but gave it enough loose to allow the GPS position to be adjusted. I only slotted the lower portion of the console to run the cable and did not touch the cover to make it less noticeable.
i-9rDdNNP-M.jpg

i-dxW3wBK-M.jpg


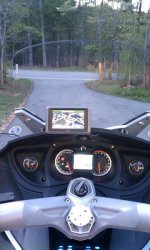
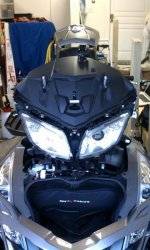
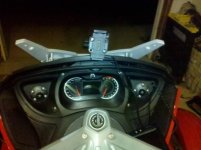
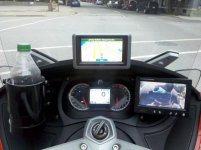
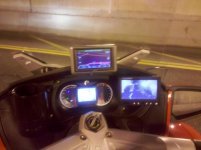
Pics of the final product:
i-jj2JqGc-M.jpg

i-BWZ8XwX-M.jpg

i-7DjzTmz-M.jpg


i-PJWKhRc-M.jpg


Mounted on the left, I found the GPS is easier to reach and it occupies an area that is already obstructed by the windshield mount so it could be a good option for shorter riders.
i-GLs4gSF-M.jpg


My first test ride showed that the overall mounting is very sturdy and very stable. You really have to look hard to see any vibration that does not follow the console itself, even on rough roads. I am extremely happy with the end results and I am glad I did it.


Tx to all other forum members who's posts helped me make this a successful install.


...Ben...
 

Attachments

  • i-jq43B7x-M.jpg
    i-jq43B7x-M.jpg
    78.4 KB · Views: 84
  • i-bZtg8CS-M.jpg
    i-bZtg8CS-M.jpg
    59.2 KB · Views: 84
  • i-QLjX96b-M.jpg
    i-QLjX96b-M.jpg
    58.3 KB · Views: 96
  • i-pDhc5vM-M.jpg
    i-pDhc5vM-M.jpg
    48.9 KB · Views: 89
  • i-NLH55Wp-M.jpg
    i-NLH55Wp-M.jpg
    43.1 KB · Views: 78
Great write-up. Thanks for all the pics as well. I received my Ram parts a couple of days ago, but still waiting for the heat to break here in OK before I tackle it.
 
I used the Lamont method

I thought I had an original idea when I replaced the dash screw with a longer one in much the same manner Lamont did to attach a Ram mount. That location offers some glare protection due to the overhang of the top of the dash. For power I replaced the left hand gauge with the cover from the "basic" RT since I liked having the temp. and fuel better. I had the dealer install the BRP power plug (a cigarette lighter) in the cover rather than in the trunk. I removed the dash cover (4 bolts) and spliced into the lighter plug wires. The factory plug is only on when the RT power is on so I get the advantage of the unit power going. off when the engine does.

I am on the fence about a separate GPS unit. It looks like one of the pictures is of a Garmin ZUMO 350 LM. How do you like the unit. It seems expensive for a somewhat basic unit. The other unit I am considering the "older" 665. I already installed the XM unit in the glove box and ran the wires (antenna and audio) back to the rear trunk. I would use the already run cable for the 665 XM. The 665 is a cleaner option and it is only $100.00 more than the 350. I do like the size, ruggedness and newness(a newer model) of the 350.

My other concern about the 665 is the A2DP (?) bluetooth profile it uses. I have a Uclear intercom, and I know when I use my iphone with it, the GPS does not interrupt the intercom when talking to my wife since the intercom has a higher priority than the A2DP music profile the Iphone uses for GPS.

Does anyone have any experience with this combination of Uclear and 665, and does the GPS mute the intercom to give voice instruction? Uclear says the HF profile of the 350LM will interrupt the intercom to give instructions but is not sure how the 665 wil handle the intercom override I seek.

Either way I already have the Ram Mount issue resolved since I used the same screw replacement
method he used.

665 or 350LM? Opinions being solicited

Thanks
 
Back
Top