GeoffCee
New member
When I took delivery of my RT I wanted to fix my trusty Zumo 550 up where I could glance at it without losing contact with what was happening ahead on the road. Finding a neat way of doing that has taken some time but at last it's done.
The double-skinned moulding above the instruments is plenty strong enough to support the weight of the Zumo, its cradle and a RAM-Ball mount and the air space between the skins is deep enough to allow the wiring for the Zumo to be run along inside there without danger of it being crushed. All that was needed was to cut a hole for the wiring to pass through into the air space.
That done, another hole was needed in the top skin for a RAM ball. The neatest option was RAM-B-260, a 1" ball on a threaded pillar which I could bolt from underneath. It was supplied from RAM Mount UK with a 10-24 thread but I didn't think this was substantial enough so I drilled it out and tapped it to take a M6 bolt. I thought it sensible to spread the weight of the Zumo with an oversized washer both under and over the plastic.
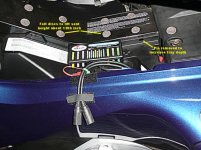
As well as providing turn-by-turn road directions the Zumo can Bluetooth to a phone and it can play mp3 music files, all of which is handled admirably by an Autocom Pro Automatic which I have found a place for under the RT's seat. It was necessary to lift the seat a wee bit for added clearance and for this I used felt washers, the kind used to stop wooden furniture legs making a din on hard floors. I had to adjust the seat locking mechanism to take care of the slight increase in height. I also took the back peg out of the over-battery tray which also added a little more headroom for the Autocom unit. It sits on a Velcro patch to keep it in position.
See also my post "Mounting a Zumo Up High - Job Done!" on this Forum for addtional photo coverage of the installation.
The double-skinned moulding above the instruments is plenty strong enough to support the weight of the Zumo, its cradle and a RAM-Ball mount and the air space between the skins is deep enough to allow the wiring for the Zumo to be run along inside there without danger of it being crushed. All that was needed was to cut a hole for the wiring to pass through into the air space.
That done, another hole was needed in the top skin for a RAM ball. The neatest option was RAM-B-260, a 1" ball on a threaded pillar which I could bolt from underneath. It was supplied from RAM Mount UK with a 10-24 thread but I didn't think this was substantial enough so I drilled it out and tapped it to take a M6 bolt. I thought it sensible to spread the weight of the Zumo with an oversized washer both under and over the plastic.
As well as providing turn-by-turn road directions the Zumo can Bluetooth to a phone and it can play mp3 music files, all of which is handled admirably by an Autocom Pro Automatic which I have found a place for under the RT's seat. It was necessary to lift the seat a wee bit for added clearance and for this I used felt washers, the kind used to stop wooden furniture legs making a din on hard floors. I had to adjust the seat locking mechanism to take care of the slight increase in height. I also took the back peg out of the over-battery tray which also added a little more headroom for the Autocom unit. It sits on a Velcro patch to keep it in position.
See also my post "Mounting a Zumo Up High - Job Done!" on this Forum for addtional photo coverage of the installation.
Attachments
Last edited:
") really cool job ... hope you have no copyright s..
really cool job ... hope you have no copyright s..


")
