I have been wanting to get my 2010 RT-S Audio system sound into my Sena SMH10 set for a while
since I got the Spyder a month ago so timing on this combo was perfect for me.
I got the SM10 and wiring harness from Dave yesterday and I'm very happy with the install.
The harness looks good and performs perfectly.
I followed Finless Bob's video and it only took about an hour.
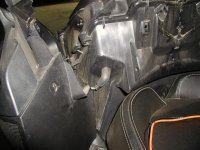
I went with the speaker removal method for the cleanest look.
I did drill my whole in a slightly different place, just because I already had the MP3 player
jack there and it kind of looks like it belongs there. Plus it hides nicely from the other side.
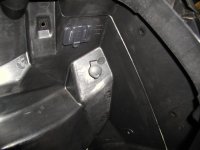
I used a HF step drill to drill my hole.
I trimmed just a tad off the sides of the orange usb connector so I didn't have to step up to
the next hole size.
The next few things are not necessary but things I wanted to do.
I put a grommet in the whole, again for looks and it might seal some moisture out.
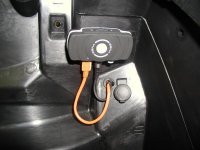
I tie wrapped the cables to my MP3 player connector inside the speaker box and several other spots
just so there can't be any connectors yanked on for any reason.
I did almost paint the wires in the trunk black before I installed the harness but it looks good orange.
There is nothing visible at all until you open the trunk.
The hardest thing about the whole install was remembering where all the screws went.
I'm happy with the cable and the video makes it very simple.
Sure, you can make your own (and I usually do) but what a hassle to source the parts.
Here's a few pics.
Thanks Guys


since I got the Spyder a month ago so timing on this combo was perfect for me.
I got the SM10 and wiring harness from Dave yesterday and I'm very happy with the install.
The harness looks good and performs perfectly.
I followed Finless Bob's video and it only took about an hour.
I went with the speaker removal method for the cleanest look.
I did drill my whole in a slightly different place, just because I already had the MP3 player
jack there and it kind of looks like it belongs there. Plus it hides nicely from the other side.
I used a HF step drill to drill my hole.
I trimmed just a tad off the sides of the orange usb connector so I didn't have to step up to
the next hole size.
The next few things are not necessary but things I wanted to do.
I put a grommet in the whole, again for looks and it might seal some moisture out.
I tie wrapped the cables to my MP3 player connector inside the speaker box and several other spots
just so there can't be any connectors yanked on for any reason.
I did almost paint the wires in the trunk black before I installed the harness but it looks good orange.
There is nothing visible at all until you open the trunk.
The hardest thing about the whole install was remembering where all the screws went.
I'm happy with the cable and the video makes it very simple.
Sure, you can make your own (and I usually do) but what a hassle to source the parts.
Here's a few pics.
Thanks Guys


")