• There were many reasons for the change of the site software, the biggest was security. The age of the old software also meant no server updates for certain programs. There are many benefits to the new software, one of the biggest is the mobile functionality. Ill fix up some stuff in the coming days, we'll also try to get some of the old addons back or the data imported back into the site like the garage. To create a thread or to reply with a post is basically the same as it was in the prior software. The default style of the site is light colored, but i temporarily added a darker colored style, to change you can find a link at the bottom of the site.

Luggage rack installation failure - thoughts?

Woodswoman

Member
Luggage rack installation, frozen bolts

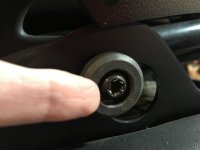
Tried today to do an easy mod, namely adding a CanAm Spyder Accessories rear luggage rack to my F3-S. While trying to remove the screws that hold in place the passenger hand grips and Cross Country saddlebags, 2 of the 4 screws (1 on each side) simply would not come out. Something is binding them, and now the heads of these 2 screws are effectively stripped. I'm beyond frustrated.

Has anyone else experienced this? ANY ideas what might be binding these screws, that remove oh so easily in Pierre's how-to-install YouTube video??
 
A picture or link or something would be helpful.

Also what kind of head on the screws; square, Phillips, torx or hex?
 
I don’t know about F3 but on the “new” RT heads for the armrest are in the trunk. Which is inside out. So you might want to check and see if plastic liner inside the truck gets removed and then the backrest and then the arm rest. It’s all one unit on the F3 like the new RT everything on dads new RT is from the inside out not outside in if that makes since. The armrests are attached to trunk behind armrest so only 4 screws removed to remove entire unit to make it sports mode. Agree with Utahpete. I’d attach a few pictures. Not sure what bolts you’re trying to turn. Should be 4 30 torx from behind to remove plate then 4 torx from front behind backrest. At least that was with dads new rt. I installed the arm rests for mom. I not sure about top liner. I see no bolts to hide top rack behind after armrest removed. That part doesn’t make since to me but would have to watch video for the rack installation.

I just reread your post. You said F3s. I might be talking about F3L. Not sure how armrest attaches on S without full trunk. Assume you bought the trunk after?
 
the bolts for the passenger hand grip are a 6mm Allen head. I would recommend that anyone who plans to do much work on their Spyder purchase a set of Allen head sockets. These are available from Amazon for $15. LEXIVON HEX Bit Socket Set, Premium S2 Alloy Steel | 13-Piece Metric 2mm - 14mm Set | Enhanced Storage Case (LX-141)
 
Did they turn but not come out or are they very difficult to turn? Most of the bolts on Spyders have strong loctite and make removing bolts hard to remove.
 
BRP uses some seriously strong yellow loctite on their hardware. As stated above, a nice 3/8" drive 6mm allen socket is basically a must. If they're stripped, maybe tapping in a torx tip might help. Might need to be doing some drilling :(
 
That’s was an Allen not torx. “ Now” it’s a torx. I’d start with a really good snap-on T45 and beat it in if it as a 7mm. If you break it replace it free. You will break it on the second or third one. No buggy they’ll replace it if bought from truck. Anyway beat it in with hammer and crank out with 3/8 ratchet. Apply some heat first with the torx bit in and it will come out. I had a sled oil plug so stripped I had to heat and beat in a 2 times larger torx. With some direct heat and super tight torx it will come out. If not heat it up and apply reverse thread and drill out until it grips. I’ve had to drill and tap before too with reverse thread on only tractor. So once the hex head is tightened it actual loosens the original bolt. Heat will be your friend
 
Lock-Tite as the problem makes sense.This used to be a 7-millimeter torx head.View attachment 191525

I don't know what tools or skills you have. I think if it was me I'd cut a straight slot in the head with a dremel tool and then use a large straight blade screwdriver.

As suggested elsewhere, try heating the head with a soldering iron or some concentrated flame to melt the lock-tite before using the screwdriver on the screw.

Sometimes an impact wrench with an oversize torx bit will work.

If all else fails, drill it out and use a tap to chase the threads clean.
 
It's been awhile since I had those on my 2015, but those looked like torque head screws. The washers under the screw heads look like they are plastic and, as such, will not take kindly to heat: heat does aid in thinning out the thread locker for removal but you may end up replacing the washers.

Drilling and tapping out the bolt shank requires the need for precision drilling. An "easy out" or screw extractor is a bit more forgiving but it's hard to get high torque to remove the stubborn thread shank. Some success can be had by using a center punch or chisel on the periphery of the screw head, tapping with a hammer, in CCW direction.

Utah Pete's suggestion to cut a slot for a screwdriver is a good one. Another trick I've used is to use a round punch, set into the depth of the wrench hole, then hit the punch sharply with 16 oz or larger hammer: stretches the bolt slightly and the shock can aid in loosening the thread sealant. Another trick is to put correct wrench into the bolt head and then use a small round punch to drive the upset metal in the bolt head back in contact with the wrench.
 
I don't know what tools or skills you have. I think if it was me I'd cut a straight slot in the head with a dremel tool and then use a large straight blade screwdriver.

As suggested elsewhere, try heating the head with a soldering iron or some concentrated flame to melt the lock-tite before using the screwdriver on the screw.

Sometimes an impact wrench with an oversize torx bit will work.

If all else fails, drill it out and use a tap to chase the threads clean.


Thank you! Using the soldiering iron suggestion, we managed to get one of the two stuck bolts out. Progress!!

Heat alone hasn't been enough to let us extract the second one that is stuck. Using a Dremel tool, we cut a slot for a flat-blade screwdriver to try, then applied heat via soldiering iron, and gave it a whirl. No luck yet, but we'll try again another day when we've gathered up some more patience.

If this fails, we'll resort to the dreaded tapping procedure, but I'm going to get a mechanic I know to do it. I've seen screw-tapping go badly wrong too often to feel confident trying it myself.
 
Back
Top