-
There were many reasons for the change of the site software, the biggest was security. The age of the old software also meant no server updates for certain programs. There are many benefits to the new software, one of the biggest is the mobile functionality. Ill fix up some stuff in the coming days, we'll also try to get some of the old addons back or the data imported back into the site like the garage. To create a thread or to reply with a post is basically the same as it was in the prior software. The default style of the site is light colored, but i temporarily added a darker colored style, to change you can find a link at the bottom of the site.
You are using an out of date browser. It may not display this or other websites correctly.
You should upgrade or use an alternative browser.
You should upgrade or use an alternative browser.
Looking for proven Plastic repair methods?
- Thread starter RickyRed
- Start date
Hi Ricky, & welcome to posting on the Forum! :clap:
Can you give us an idea of what plastic you want to repair, maybe even what on (your Spyder??) and why?? :dontknow:
Sometimes, especially with Spyder tupperware, a little bit of context helps?!
Can you give us an idea of what plastic you want to repair, maybe even what on (your Spyder??) and why?? :dontknow:
Sometimes, especially with Spyder tupperware, a little bit of context helps?!
Looking for proven plastic repair methods. TIA
Specifically Tupperware cracks.
So now we know that it's for tupperware cracks, is there any chance you could tell us which panel, what year model Spyder, maybe even how the crack occurred?? :dontknow:
Maybe give us a bit more (orright, maybe give us a lot more - as much as you can, would be good!
So again, the more info you can give us about the why's & wherefores of your need for plastic repairs, the better we'll be able to help. :thumbup:
K80Shooter
Active member
If you have a decent body shop nearby, go ask them if they can weld it for you.
Thats how they repair the plastic bumpers on cars and trucks.
Thats how they repair the plastic bumpers on cars and trucks.
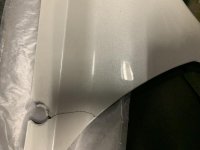
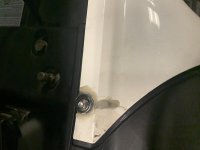
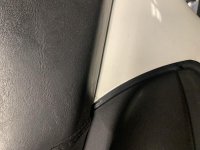
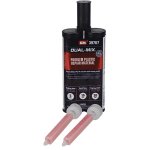
I bought a used RTL 2019 a few weeks ago and found this while replacing the seat strut. I repaired it and 99% is hidden under the seat. Just fishing for proven alternatives for repairing plastic in the future. I used jb weld plastic repair compound and it worked fine.
Here is the repair. Note: 99% hidden under the seat.
Here is the repair. Note: 99% hidden under the seat.
Attachments
Last edited by a moderator:
Snowbelt Spyder
Well-known member
Here is the repair. Note: 99% hidden under the seat.
Well, Rick, I think that you have done superbly. JB Weld. You took the words right out of my mouth. No amount of ABS plastic welding will make the crack invisible, unless it was then refinished and repainted. And, if it was welded from the back side, it could interfere with the fitment of the panel. And, I've seen plenty of ABS welds crack. It looks as though the crack goes all the way to the edge of the panel, so even a stop hole would not be necessary, either. It has already spread to the edge.
Because it is a 2019, that panel is probably available from the BRP parts system and you could get a new one, if desired. So, get out there and start riding. Be safe.
Last edited:
Snoking1127
Well-known member
White RH Upper Lateral Panel
705006177
$329.99
705006177
$329.99
BLUEKNIGHT911
Sadly Passed Oct 2024 - RIP
Looking for proven plastic repair methods. TIA
I have had good luck with JB weld .... ( the type that takes awhile to cure ) ..... It also helps a great deal if you add a thin piece of sheet metal or even thin aluminum to the back of the crack .... I have used this method to attach broken MOUNTING tabs back onto a panel ..... Good luck ....Mike :thumbup:
I'm currently using acetone and old LEGOS - these are ABS plastic and melt in the acetone. A Glass airtight container will be needed. I use white Legos, but there are a multitude of colors. These usually take 24 hours to melt into a "slurry" to repair cracks/tabs etc. Add a few more Legos if it's too runny. The area may need "support" to allow it to cure in place.
Last edited by a moderator:
racoon
Well-known member
I'm currently using acetone and old LEGOS - these are ABS plastic and melt in the acetone. A Glass airtight container will be needed. I use white Legos, but there are a multitude of colors. These usually take 24 hours to melt into a "slurry" to repair cracks/tabs etc. Add a few more Legos if it's too runny. The area may need "support" to allow it to cure in place.
As a Lego collector, I am appalled at your murder of innocent Lego bricks! :roflblack:
Last edited by a moderator:
I appreciate your concern for the inhumane treatment of LEGOS....however, rest assured, they are giving new life and donating altruistically to a broken tab or a otherwise cracked portion of Tupperware. BTW I only could build a column so I'd be lying if I said I loved legos......As a Lego collector, I am appalled at your murder of innocent Lego bricks! :roflblack:
BoatFixx
Member
Last edited by a moderator:
canamjhb
Well-known member
I used a method like Mike described in post #11 on a broken area on one of my bikes. First, I removed and cleaned the part. Then super glued them together. The crack was nearly invisible. Then I applied a thin layer of JB Weld along the back side perpendicular to the break. Before the JB completely set up I pressed a serrated nail with the head clipped off into the JB. After that set, I covered it all with another coat of JB Weld. I let it cure overnight and resisted the temptation to play with it or test its strength. I believe that broken area became much stronger than it was originally. A little polish and some wax and it was never thought of or even noticed again. Good luck..... Jim
rmag
Member
I have used both methods, JB Weld and the Lego/acetone method; but instead of nail heads, I took a small piece of zero steel wool and pulled the strands or "fluffed" it, mixed it into the adhesive, and applied, similar to a fiberglass method. Both worked great for me.
Ryde safe.
Ryde safe.
Last edited by a moderator:
FrogmanDave
Active member
I have used both methods, JB Weld and the Lego/acetone method; but instead of nail heads, I took a small piece of zero steel wool and pulled the strands or "fluffed" it, mixed it into the adhesive, and applied, similar to a fiberglass method. Both worked great for me.
Ryde safe.
It is easier to get some aluminum screen repair material and either use your method or better yet melt it in with a soldering iron and flat tool. The repair is crazy strong!
Similar threads
- Replies
- 5
- Views
- 709
- Replies
- 13
- Views
- 2K
- Replies
- 6
- Views
- 288
- Replies
- 47
- Views
- 3K


