• There were many reasons for the change of the site software, the biggest was security. The age of the old software also meant no server updates for certain programs. There are many benefits to the new software, one of the biggest is the mobile functionality. Ill fix up some stuff in the coming days, we'll also try to get some of the old addons back or the data imported back into the site like the garage. To create a thread or to reply with a post is basically the same as it was in the prior software. The default style of the site is light colored, but i temporarily added a darker colored style, to change you can find a link at the bottom of the site.

Latest Farkle - Digital volt gauge CHEAP!

finless

New member
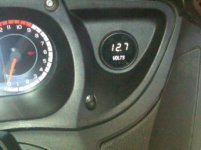
Thought I would share my latest farkle.

Got this on Ebay for $16 shipped! It's exactly the same as some of the $50 models sold on gauge only web sites!

Be aware, there are a few models of these that are cheaper but the LEDs have over glow and thus can be seen through the smoked glass. This model was the best of the bunch. It's made by Xtune even though the Ebay ad did not say that. Here is the link I got it from. It's NOT shipped from China.

http://www.ebay.com/itm/121347773499?_trksid=p2059210.m2749.l2649&ssPageName=STRK:MEBIDX:IT

BUT!!! I see he raised the price since I bought mine! I got it for $15.99 and now he wants $29.99. Oh well....


This took me all of 10 minutes to install using posi-taps to the original analog gauge wires (black and orange).


Here is a video of what it looks like:


Enjoy,
Bob
 
Last edited:
Nicely done..!!

Good choice of gauge to replace stock ones...looks great and thanks for the info...:2thumbs: :clap:
 
By the way, first person that wants the Harbor Freight analog volt gauge I removed, ask. First person gets it. Send me $5 to cover shipping and it's all yours. Much better than throwing it away.

For an analog gauge it works well and has a backlight (not LED but a bulb) so you can see it at night.

Bob
 
Wow that is the same one I have been watching for months waiting to see if it went down any. I saw it for $40, might still have to get one.
 
Wow that is the same one I have been watching for months waiting to see if it went down any. I saw it for $40, might still have to get one.

There are several gauges almost exactly the same with the same look and functionality on Ebay. They can cost as low at $18.
However, MOST of them have terrible bleed through of unlit LED segments. The first one I bought I returned because it was just ugly with the bleed through. If you look at the pictures or videos posted by these sellers you will see the bleed through on them. AVOID THEM! Way too cheap looking in my opinion....

This one by Xtune is freaking perfect and seriously looks stock!

Bob
Thanks for the info. I didnt consider the bleed through issue. I guess I will narrow my search for the brand as well.
 
OK please do not PM me... the analog volt gauge is gone. Spyderlover user spacetiger got it....

Bob
 
Finless

I removed my gauges a while ago So I could see the gauges on the digital screen and the plugs are simply disconnected. When Installing this digital gauge, what wires do I connect to what? Will this affect what shows on the digital center screen?

I ordered on of the gauges!
Thanks
Larry
 
Finless

I removed my gauges a while ago So I could see the gauges on the digital screen and the plugs are simply disconnected. When Installing this digital gauge, what wires do I connect to what? Will this affect what shows on the digital center screen?

I ordered on of the gauges!
Thanks
Larry

One the right side there are 4 wires that go to the stock gauge. 3 are in the triangular connector. One is a stab on connector. This stab on connector powers the light bulb in the stock gauge.

Of the 3 wires on the triangular connector the white one is the signal wire to the cluster. You do not hook that to anything or it may signal the cluster a gauge is hooked up. There is a black wire. This is ground and goes to the black wire on this voltage gauge. I used a posi-tap. The other wire (orange with a stripe) is 12V that powers the gauge. I would not use that even though you could. I tapped into the single stab on wire used to power the light in the stock gauge.

Bottom line the new voltage gauge has 3 wires (red, yellow, black):

Red = hook to 12V switched - Again I hooked this to the single stab on wire using a posi-tap.

Black = Hook to ground - Again I hooked this to the black wire on the triangular connector using a posti-tap.

Yellow = you are suppose to hook this to a always on 12V source. Unfortunately there is none at the stock gauge connector. You only hook this up if you want the power down animation. If you don't hook this up the gauge still works fine you just do not get the power down animation and only get the power up animation as my video shows. If you want the fancy power down animation then run this yellow wire to a always on 12V wire.

Personally about the yellow wire, I would not hook that up as it means the gauge can draw power when the key is switched off (that's how it does the power down animation). I think it might draw a little power over time off your battery which I prefer not to have when the spyder is parked for long periods. I could check this with an AMP meter to be sure but I didn't. I don't care if I have a power down animation so again I just did not hook this up.

Finally, no it wont mess with the cluster and cause your digital gauges to go away if you hook it up as I explained.

Hope that answers the question?


Bob
 
Last edited:
How bright is this voltmeter at night? It looks plenty bright during the day but I would be concerned about it blinding me at night.


Charles
 
OK responses

For posi-taps I used 18-20 gauge

As for brightness. It's actually not all that bright during the day out in the sun. Night is fine for me and it is not brighter than the cluster when it is in night mode. This was another reason I got this model with the darker smoked glass. The other unit that had LED bleed through was way too bright!


Bob
 
One the right side there are 4 wires that go to the stock gauge. 3 are in the triangular connector. One is a stab on connector. This stab on connector powers the light bulb in the stock gauge.

Of the 3 wires on the triangular connector the white one is the signal wire to the cluster. You do not hook that to anything or it may signal the cluster a gauge is hooked up. There is a black wire. This is ground and goes to the black wire on this voltage gauge. I used a posi-tap. The other wire (orange with a stripe) is 12V that powers the gauge. I would not use that even though you could. I tapped into the single stab on wire used to power the light in the stock gauge.

Bottom line the new voltage gauge has 3 wires (red, yellow, black):

Red = hook to 12V switched - Again I hooked this to the single stab on wire using a posi-tap.

Black = Hook to ground - Again I hooked this to the black wire on the triangular connector using a posti-tap.

Yellow = you are suppose to hook this to a always on 12V source. Unfortunately there is none at the stock gauge connector. You only hook this up if you want the power down animation. If you don't hook this up the gauge still works fine you just do not get the power down animation and only get the power up animation as my video shows. If you want the fancy power down animation then run this yellow wire to a always on 12V wire.

Personally about the yellow wire, I would not hook that up as it means the gauge can draw power when the key is switched off (that's how it does the power down animation). I think it might draw a little power over time off your battery which I prefer not to have when the spyder is parked for long periods. I could check this with an AMP meter to be sure but I didn't. I don't care if I have a power down animation so again I just did not hook this up.

Finally, no it wont mess with the cluster and cause your digital gauges to go away if you hook it up as I explained.

Hope that answers the question?


Bob


Not sure what you mean by - Again I hooked this to the single stab on wire using a posi-tap.

Can you clarify?
Larry
 
Not sure what you mean by - Again I hooked this to the single stab on wire using a posi-tap.

Can you clarify?
Larry

The stab on wire is the single wire of the four at the gauge that is not in the triangular connector. Trust once you take the front of your dash off (4 screws) it will make sense what the stab on connector is.

Bob
 
Bob,

Got another question on this gauge for ya.

I ordered one from the eBay link and it arrived today. Hooked it up to my bench DC power supply which outputs 13.9v. The gauge spun up and reads 13.9 in the display. Looks good however the warning light stays lit all the time.

Looking the single page documentation that came with the gauge, it states that the warning LED will light up is the voltage being read drops below 11.0v or goes higher than 16.0v for more than 3 seconds.

So I take a look at your video again and notice that your warning LED stays on all the time too.

Did you find a fix for that or have you just let it be?

Allen
 
I did the same thing on my 2010 and then transferred it to my 2014 (fours years old and going strong).
 

Attachments

  • image.jpg
    image.jpg
    29.1 KB · Views: 101
Last edited:
Everyone has mentioned replacing the existing gauges. Does anyone know if the base model RT is pre-wired to accept the gauges?
 
Pre wiring

Everyone has mentioned replacing the existing gauges. Does anyone know if the base model RT is pre-wired to accept the gauges?

99% sure it is and it is easy to verify. On either side of the instrument cluster you will see a black disc. Just pry one off and look for the described wire harness.
 
Back
Top