• There were many reasons for the change of the site software, the biggest was security. The age of the old software also meant no server updates for certain programs. There are many benefits to the new software, one of the biggest is the mobile functionality. Ill fix up some stuff in the coming days, we'll also try to get some of the old addons back or the data imported back into the site like the garage. To create a thread or to reply with a post is basically the same as it was in the prior software. The default style of the site is light colored, but i temporarily added a darker colored style, to change you can find a link at the bottom of the site.

LAST FARKLE (for awhile - LOL) Bumpskid Install on 2014 RT

Jim&Teresa

New member
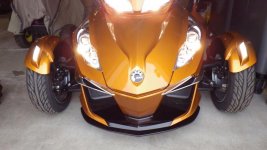
Hello all, just finished my bumpskid install on my 2014 RT L! :yes::yes::yes: I had installed one on my 2012 RT L as well. This one went very smooth and an easy install expecially that I had the bike up in the air for the BajaRon sway bar install yesterday....worked great! :thumbup:

Here's a few pics of the install and a few suggestions:

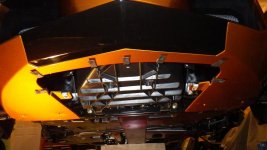
1. Have your Spyder up so you can drill it easily (I had the bike up about 18" ground to frame).

2 Just follow instructions -- I thought this was "easier" than my 2012 RT L install of the bumpskid!

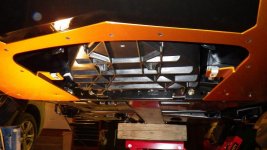
3. The back two holes you need to drill into the metal frame....careful to not penetrate your drill bit too far to prevent damage! I just used tape on the drill bit wound around a few layers to act as a stop....some of you may have a formal drill bit stop, but that's my solution (had about a 1/4" of the drill bit exposed to drill through the metal -- worked great! The holes drilled into the tupperware I drilled while the bumpskid was mounted, the two back holes into the metal -- I marked with the bumpskid in place, then drilled those back two holes with the bumpskid off to insure I could see what was happening as I drilled!

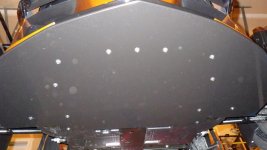
4. I looked twice at the top of the bumpskid and discovered it was protected with the premask layer as well. Glad I caught that before the install. Obviously pulled the top premask off before mounting the bumpskid to the Spyder. The last thing I did was pulled the premask protection layer off the bottom of the bumpskid when completely finished with the install.

Here's the farkles I have completed on my new 2014 RT L (which I purchased in January 2014 and has ZERO miles on it due to this :cus::cus: winter!):

HMT 3rd Brake Light w/ Dual Converter
Helmet Guardian dual locks
LED's on mirrors
SENA Bluetooth
BajaRon's High Performance Sway Bar
BajaRon's Heim Joint Links
Bumpskid
Netting in all compartments
 

Attachments

  • IMGP5792.jpg
    IMGP5792.jpg
    45.6 KB · Views: 367
  • IMGP5790.jpg
    IMGP5790.jpg
    38.6 KB · Views: 438
  • IMGP5776.jpg
    IMGP5776.jpg
    44.4 KB · Views: 371
  • IMGP5773.jpg
    IMGP5773.jpg
    49.9 KB · Views: 431
  • IMGP5740.jpg
    IMGP5740.jpg
    55 KB · Views: 384
Last edited:
Now you are ready for that first ride now that the warmer weather is just aroud the corner - I just wish I could find that :cus: corner.
 
Now you are ready for that first ride now that the warmer weather is just aroud the corner - I just wish I could find that :cus: corner.

Way too gritty around here to ryde even though the roads seem dry....I can wait awhile (but not 'till July!!). That's the problem with buying one early in the year...oh well, had time to get all my farkles done....just about the way I had my 2012 RT L. Only item missing is the highway pegs, and............I don't know if I will add them since this has floorboards. Gonna check those floorboards out before making that decision. I did use the highway pegs frequently on my 2012...we will see!

Remember to post pics when you get your new Spyder!
 
That looks great, really finishes off the front end of the Spyder! :thumbup:

Thanks for the tips, will be installing mine as soon as I welcome the new addition to the family home in a couple weeks.
 
I gotta show your pictures of the finished project to the Missus... :thumbup:
She might even provide "Authorization", for such a useful and great-looking addtion! :yes::yes::yes:
 
23_33_15.gif
36_1_1.gif
 

I think you'll have no problems.....BTW....since my RT is nice and clean, decided to give it a quick wax job today as well.....notice the shine!!! :ohyea::ohyea: I am trying something new ...Lucas slick mist speed wax...spray on and wipe off with a microfiber. It states that it provides more of a slick surface so bugs and crud come off easier....we will see! Have you ever used this type of wax????
 
Last edited:
What does this "bumpskid" cost? :f_spider: Wife said yes. :ohyea: Maybe? :hun: Cost? :shocked: Hey Bob, we can have an install party. :roflblack: Tom :trike:
 
Bumpskid Cost

What does this "bumpskid" cost? :f_spider: Wife said yes. :ohyea: Maybe? :hun: Cost? :shocked: Hey Bob, we can have an install party. :roflblack: Tom :trike:

I bought it from Spyderpops, one of the Spyderlovers sponsor. You can look on the home page and it's listed on the top of the page first one on the left at this time. We had one on our 2012 and just installed one on our 2014....a good preventive step to avoid damage to the front end and/or underneath. I call it "insurance"..... Good luck :thumbup:

Cost for a 2014 is 169 + 19.50 for shipping , here's a snap from the webpage:

[SIZE=+0]SPY147 - 2014 BumpSkidTM FUNCTIONS AND INSTALLS THE SAME AS THE EARLIER YEARS, JUST NEW DESIGN CHANGE![/SIZE]

SPY147 - A bargain at $169.00 + Priority USPS shipping of $19.50 domestic

 
Bumpskid install

After scraping my 14 RT coming out of a mall parking lot I knew it was time for the bump skid.Already had mine jacked up from the Baja Bar install. the Bumpskid was a 15 minute install and gives me another place to put LED's across the front.The added protection and the way it smooths out the air under the RT ,I figure it should also help with fuel mileage a little bit.
 
After scraping my 14 RT coming out of a mall parking lot I knew it was time for the bump skid.Already had mine jacked up from the Baja Bar install. the Bumpskid was a 15 minute install and gives me another place to put LED's across the front.The added protection and the way it smooths out the air under the RT ,I figure it should also help with fuel mileage a little bit.

Yes, well worth putting on the bumpskid. My 2014 has zero miles and that bumpskid is installed before I even rode it! I had one on my 2012 RT L and installed it about 2 months after I bought it.. That bumpskid saved my 2012 several times.....speedbumps are the worst in towns.....even at an angle, the bumpskid saved my front end a couple times. The 2014 install was super easy! After putting 7600+ miles on my 2012 last year, I looked at the bumpskid and sure enough, many dings, scratches, etc. on the bottom side.....never "bumped" with the nose, but surely that would save the tupperware if that happened!
Post some pics if you end up adding some LED's to the front of your RT along the bumpskid area -- I would like to see that! :yes::yes:
 
Last edited:
I think you'll have no problems.....BTW....since my RT is nice and clean, decided to give it a quick wax job today as well.....notice the shine!!! :ohyea::ohyea: I am trying something new ...Lucas slick mist speed wax...spray on and wipe off with a microfiber. It states that it provides more of a slick surface so bugs and crud come off easier....we will see! Have you ever used this type of wax????
Believe it or not; I use this stuff called, "Pig Snot"...
It is about the slipperest stuff I've ever seen! nojoke
 
Back
Top