• There were many reasons for the change of the site software, the biggest was security. The age of the old software also meant no server updates for certain programs. There are many benefits to the new software, one of the biggest is the mobile functionality. Ill fix up some stuff in the coming days, we'll also try to get some of the old addons back or the data imported back into the site like the garage. To create a thread or to reply with a post is basically the same as it was in the prior software. The default style of the site is light colored, but i temporarily added a darker colored style, to change you can find a link at the bottom of the site.

Installing Pit Bull Shock Relocator

jthornton

New member
I installed the Pit Bull Shock Relocator kit this morning and I thought I'd share the experience in case anyone else is installing them. First thing I have to say is the machining is excellent on the parts. Just as some background on me I design and build automation equipment and own a CNC machine shop and fab shop so I know a tiny bit about making things.

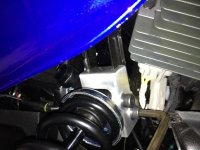
This is one of the adapters with the supplied fasteners.
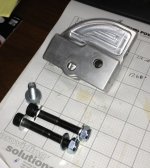
shock-01.jpg

Installation

  1. Jack up the bike so the front wheels are off the ground.
  2. Remove the bolts that hold the shock on and remove the shock.
  3. Install the adapter and insert the M10 Hex Head Cap Screw but leave it loose.
  4. Left side only, partially insert the M10 SHCS into the inner hole where the original shock mount is to locate where to cut the air horn and using cutting pliers cut two notches one on either side of the screw.
  5. Using pliers bend down the tab on the air horn and install the screw and nut but do not tighten the nut all the way.
  6. Install the shock and insert the screws then tighten all the nuts.
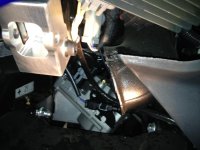
shock-02.jpgshock-03.jpg

Edit: it helps to lower the bike till the front wheels just touch the ground to get the shock bolts out, then jack it back up and remove the shock.

JT
 
Last edited:
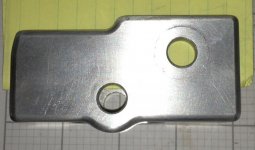
When I looked at the adapters I notice the slot intersected the new shock mounting holes by a small amount.

shock-04.jpg

You can see in the photo where the yellow paper in the slot interferes with the new shock mount hole. This is why you can't tighten the Hex Head screw all the way up till you get the shock mounted as you won't be able to install the bolt. I would have moved the new shock hole down about 0.125" so the bolt didn't rub on the frame. There may be a reason for this and I don't know.

In any case there you go boys and girls...

Edit: I spoke to Len about the design and he said that was part of the design so the relocator would fit every bike from 2008 -2012.

Happy Riding
JT
 
Last edited:
It looks as if you're goiong to have to fill us all in on what you think of the change in the ride now! ;)
Thanks! :thumbup:
 
I have to go and scope out if I can get out to the black top today without looking like I went mudding...

JT
 
Looks like the county has repaired the road yesterday sometime so I just cranked up the backhoe and need to fill some divots in my driveway from the recent rains and I'm off for a ride.

JT
 
Thanks for that..!!

great info and installation instruction. Looking forward to the road report..!! :popcorn:
 
NEW SHOCK MOUNT BRACKET

It appears to me (correct me if I am wrong) when you move the shock up to a higher standing position, you either lengthen the shock or it lowers the front of the :spyder2: if you mount the top of the shock in side the frame rail. With this New Style mount, the shock remains the same length and the front end stays at the same elevation. Since ground clearance is an issue, I am wondering if there is a way to raise the ground clearance by using little different style of upper shock block?

In reference to above yellow paper showing through the shock mount bolt hole. Could this bolt hole be relocated away from the frame and the block beefed up a little to maintain strength? I am sure there is a need for strength in this block when a wheel goes into a pot hole and drops down and extending the shock to it's maximum length.

I am sure there has been great thought and experiments in proto types to come up with what they have.

any thoughts??
 
great info and installation instruction. Looking forward to the road report..!! :popcorn:

I went to my friends house and we took turns riding each spyder (his is a stock 2010 RT) and the biggest thing I noticed after adding the LenShock Kit was the stability when in the turbulent zone near a truck going at highway speeds. The bike pretty much tracks well on the highway and in the curves I was able to kick in the nanny once and I was not uncomfortable with my turn so that says a lot about the setup.

When we got back to my friends house he got the information from me to order both the LenShock Kit and the BajaRon Sway Bar Kit.

I'm pretty sure my fuel mileage won't be very good when I tank up after that ride this morning!

JT
 
Last edited:
It appears to me (correct me if I am wrong) when you move the shock up to a higher standing position, you either lengthen the shock or it lowers the front of the :spyder2: if you mount the top of the shock in side the frame rail. With this New Style mount, the shock remains the same length and the front end stays at the same elevation. Since ground clearance is an issue, I am wondering if there is a way to raise the ground clearance by using little different style of upper shock block?

In reference to above yellow paper showing through the shock mount bolt hole. Could this bolt hole be relocated away from the frame and the block beefed up a little to maintain strength? I am sure there is a need for strength in this block when a wheel goes into a pot hole and drops down and extending the shock to it's maximum length.

I am sure there has been great thought and experiments in proto types to come up with what they have.

any thoughts??

Installing the LenShock Kit didn't seem to change the height by any measurable amount.

I'm sure the new shock mount hole could be moved and I don't think anything would need to be beefed up as the kit adds strength to the existing frame with its design.

JT
 
Thanks John! :clap: :thumbup:
When I get "LenBracketed-up", we'll have to go see if we can wake up the local LEOs a little bit! :roflblack::roflblack: :joke::roflblack:
 
Ahem, are you making fun of us.

We are watching you Bob and John.

We will have your photo's posted at the post office and the donut shops.

Signed the LEO's
 
Ahem, are you making fun of us.

We are watching you Bob and John.

We will have your photo's posted at the post office and the donut shops.

Signed the LEO's

So long as your watching our tail lights it is ok... posting our photos in the donut shops won't help I don't eat them any more and I'm sure Bob doesn't eat them either.

I can't wait to see your pneumatic popl up bubble gum light unfold from your frunk at the push of a button.

See you at SpyderFest

JT

Posting your photos at the donut shop so the LEO's can see it.

Cruzr Joe
 
:yikes:

Back from a 160 mile trip and the spyder handled the winds very good. The most noticable difference is how it is not blown around by the turbulence from 18 wheelers... just steady speed when passing them and no hurry to pass them up and flush out a LEO or two.

JT
 
For those one when to spyderfest is any feed back about the Pitt Bull shock relocating kit?
any comment for those one they have it install on there :spyder2:
 
Clearance problem ?

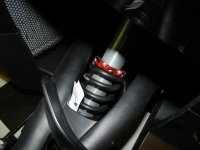
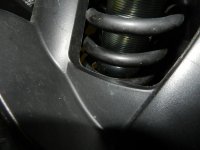
Has anyone else that installed the new shock relocator brackets noticed a clearance problem where the Elka Spring goes through the A-Arm panel?

On mine it looks like the change in shock angle has put the spring close enough to the panel to rub, depending on how the shock is rotated. See pics below, the arrow shows where it is rubbing and on mine that paper will not clear in the center.
.
I'll be interested to hear if others have this problem. I am about to fix mine with a little Dremel work on the lip of the panel...

DSCN1538.jpg DSCN1534.jpg
 
Back
Top