-
There were many reasons for the change of the site software, the biggest was security. The age of the old software also meant no server updates for certain programs. There are many benefits to the new software, one of the biggest is the mobile functionality. Ill fix up some stuff in the coming days, we'll also try to get some of the old addons back or the data imported back into the site like the garage. To create a thread or to reply with a post is basically the same as it was in the prior software. The default style of the site is light colored, but i temporarily added a darker colored style, to change you can find a link at the bottom of the site.
You are using an out of date browser. It may not display this or other websites correctly.
You should upgrade or use an alternative browser.
You should upgrade or use an alternative browser.
How to install the Baja Ron Sway Bar on a 2010-12 RT
- Thread starter finless
- Start date
finless
New member
Early this year is over! LOL. It's November.... Just giving you a hard time.
A crap.... OK early in 2014
If you really want me to do it for you I am somewhat serious about doing it when I am out there. You might enjoy the ride to Ashville and my buddy has a list and all the tools needed.
Bob
Barlock
New member
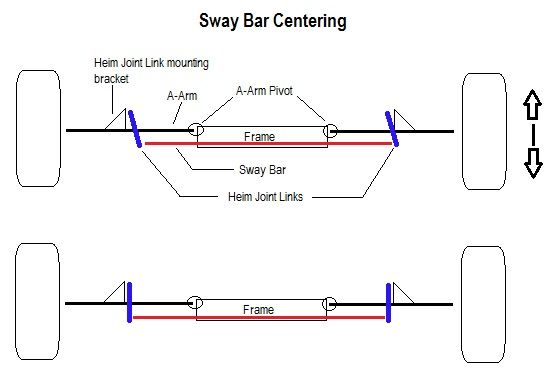
The top picture is what you want to avoid. The bottom picture is a correct install with equal distance (whatever that may be) between the link and the bracket.

While I like your picture, Ron (I really do!), the next post demonstrates that your drawing isn't sufficient without a picture of the actual thing and those gaps depicted on it:
What exactly would cause this, Ron? Is there anything that you would suggest using as a spacer to center the sway bar?
After watching the video, I think I understand what you meant, but it is obvious that your drawing doesn'r explain it to those of us who did not watch the video. So, the photo would definitely help.
BajaRon
Well-known member
What exactly would cause this, Ron? Is there anything that you would suggest using as a spacer to center the sway bar?
I am not sure how to answer your question except to guess that you're not grasping the concept here. It is extremely simple and you may be trying too hard. There isn't anything you can do or need to do other than get the spacing between the outside of the links to the inside of the mounting bracket equal.
It's real easy to center the bar as my video shows under the Spyder and the plastic links and the spacing to the frame (link mounting brackets on the frame). You do not need to make this rocket science! I "felt" the gaps and even eye balling it is fine as my video shows. The point of doing this is so the links to not hit the brackets and break or damage them. If your off on one side my a little (small enough you cannot eye ball) I don't think that is a big deal. Again it's super easy to just eye ball them to be the same. It's really obvious once you get under the bike and look.
Bob
Exactly! Once you get under your Spyder and look at the components it becomes very clear.
While I like your picture, Ron (I really do!), the next post demonstrates that your drawing isn't sufficient without a picture of the actual thing and those gaps depicted on it:
After watching the video, I think I understand what you meant, but it is obvious that your drawing doesn'r explain it to those of us who did not watch the video. So, the photo would definitely help.
Agreed, as the stick drawing was not designed to stand alone. Coupled with the video and looking at your own Spyder I am hoping it will clarify things somewhat.
I know I always risk making things seem more difficult than they are when I try to simplify them.... :banghead:
Last edited:
Barlock
New member
I am not sure how to answer your question except to guess that you're not grasping the concept here. It is extremely simple and you may be trying too hard. There isn't anything you can do or need to do other than get the spacing between the outside of the links to the inside of the mounting bracket equal.
That was exactly what I meant, but I did not want to be as straightforward as you were in your response. Now you can see that the actual picture of a link with a bar end attched to it and those spaces depicted would help IMHO.
finless
New member
Ron, feel free to snap a frame from my video for a picture of the area. If you do not know how to do that I would be glad to do it from my original high def footage (not the youtube converted footage).
Ah hell.... give me a little time and I will do it and post the pictures.
Maybe tomorrow AM.
Then feel free to use them to add to your instructions or whatever.... I am glad to help people.
The most important thing is I think just about ANYONE can do this themselves. Really it is not major surgery or rocket science!
Stay tuned.
Bob
BajaRon
Well-known member
Ron, feel free to snap a frame from my video for a picture of the area. If you do not know how to do that I would be glad to do it from my original high def footage (not the youtube converted footage).
Ah hell.... give me a little time and I will do it and post the pictures.
Maybe tomorrow AM.
Then feel free to use them to add to your instructions or whatever.... I am glad to help people.
The most important thing is I think just about ANYONE can do this themselves. Really it is not major surgery or rocket science!
Stay tuned.
Bob
I did try that but none of the shots looked good enough to post. If you can get a good, clear, identifiable shot that would be great.
finless
New member
I did try that but none of the shots looked good enough to post. If you can get a good, clear, identifiable shot that would be great.
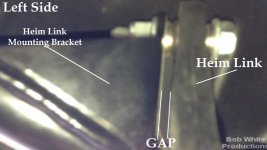
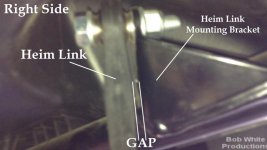
Here you go. Snapped from my video and full rez. Hope this helps people understand the gap from the heim link to the frame (Heim Link Mounting Bracket). I show both the left and right sides of the bike. You will see this exact view by laying on your back and looking straight up into the spyder front end.
The point is to center the sway bar so these gaps left and right are the same.
Enjoy,
Bob
Attachments
rick_w
Member
This is a little video I did on how to install the Baja Ron Sway Bar in a 2011 Spyder RT. 2010-12 is the same.
Sorry for the shaky video as the iPhone does not have optical jitter correction! It's the only camera I could use and get under the bike to film. But this video should explain all the steps to install the bar. Enjoy! I have to say, this was far easier than what I have read! Don't be afraid to do it. Just some simple tools is all that is needed.
Video is in 2 parts:
Enjoy,
Bob
Bob,
Great Video.
Since we started carrying the Sway Bars we have had lots of people ask about a video.
It is a little intimidating for a lot of people and this will help a lot.
Thanks,
Rick
Value-Accessories
M&Ms_Spyder
New member
easy Baja Ron sway bar install
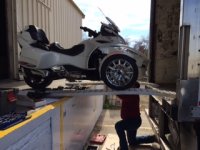
have access to a loading dock and a trailer? Baja Ron sway bar & heim links install on a 2013 RT-Limited install - ideal conditions...!!


and I know there are folks out there who are or were as unnerved as me by the "spyder dance" when they first took their spyder for a ride over 55 mph, got in a semi backwash and/or thru some twisties... and heaven forbid if you experienced this for the first time with a passenger!!!
Let me be crystal clear here, the Baja Ron sway bar Should Be STANDARD issue on every Spyder leaving the factory. Make no mistake, Ron's sway bar transforms this machine in an immediate and dramatic way... I no longer have visions of my untimely demise if I have to make a steering correction mid-corner anymore. The handling dynamics of this machine went from a 3-stage(lean, suspension loads, then oversteers) characteristic, to now, it just goes the way you point it - immediately and precisely-one motion..... This will be the best $$$ you will ever spend on an accessory for your Spyder - make no mistake - just do it.
have access to a loading dock and a trailer? Baja Ron sway bar & heim links install on a 2013 RT-Limited install - ideal conditions...!!

and I know there are folks out there who are or were as unnerved as me by the "spyder dance" when they first took their spyder for a ride over 55 mph, got in a semi backwash and/or thru some twisties... and heaven forbid if you experienced this for the first time with a passenger!!!
Let me be crystal clear here, the Baja Ron sway bar Should Be STANDARD issue on every Spyder leaving the factory. Make no mistake, Ron's sway bar transforms this machine in an immediate and dramatic way... I no longer have visions of my untimely demise if I have to make a steering correction mid-corner anymore. The handling dynamics of this machine went from a 3-stage(lean, suspension loads, then oversteers) characteristic, to now, it just goes the way you point it - immediately and precisely-one motion..... This will be the best $$$ you will ever spend on an accessory for your Spyder - make no mistake - just do it.
BajaRon
Well-known member
have access to a loading dock and a trailer? Baja Ron sway bar & heim links install on a 2013 RT-Limited install - ideal conditions...!!
View attachment 79033
and I know there are folks out there who are or were as unnerved as me by the "spyder dance" when they first took their spyder for a ride over 55 mph, got in a semi backwash and/or thru some twisties... and heaven forbid if you experienced this for the first time with a passenger!!!
Let me be crystal clear here, the Baja Ron sway bar Should Be STANDARD issue on every Spyder leaving the factory. Make no mistake, Ron's sway bar transforms this machine in an immediate and dramatic way... I no longer have visions of my untimely demise if I have to make a steering correction mid-corner anymore. The handling dynamics of this machine went from a 3-stage(lean, suspension loads, then oversteers) characteristic, to now, it just goes the way you point it - immediately and precisely-one motion..... This will be the best $$$ you will ever spend on an accessory for your Spyder - make no mistake - just do it.
Pretty ingenious!
I've seen people pull their Spyder over the basement access stairway in their garage, lift the front wheels on the forks of a pallet lift, run up the ramps to a flat bed trailer, and even suspended with straps using a cherry picker. But this is the first loading ramp install I'm aware of. :thumbup:
Glad you like the bar!
finless
New member
Bobs video's are great. I learned how to build a RC helicopter from his video's:clap:
Thanks
Glad to see someone into RC helis that is also into spyders!
Bob
Top End Unlimited
New member
This is a little video I did on how to install the Baja Ron Sway Bar in a 2011 Spyder RT. 2010-12 is the same.
Sorry for the shaky video as the iPhone does not have optical jitter correction! It's the only camera I could use and get under the bike to film. But this video should explain all the steps to install the bar. Enjoy! I have to say, this was far easier than what I have read! Don't be afraid to do it. Just some simple tools is all that is needed.
Video is in 2 parts:
Enjoy,
Bob
I think you did a great job on the video and talking your way through it. My wife even commented that with your video, she could do it. Thanks
pitzerwm
New member
This thread is indeed very valuable. The hemi links apparently weren't replaced in this video. Makes sense to me to replace plastic with metal. Is this a 50/50 deal as to the value of replacing the links at the same time or more like 25/75, its smart but you can live without, or 75/25 "you are an idiot if you don't?
Thanks
Thanks
finless
New member
This thread is indeed very valuable. The hemi links apparently weren't replaced in this video. Makes sense to me to replace plastic with metal. Is this a 50/50 deal as to the value of replacing the links at the same time or more like 25/75, its smart but you can live without, or 75/25 "you are an idiot if you don't?
Thanks
I have since added the metal links. They were not available from Ron yet when I did this video.
Bob
rick_w
Member
Hi bob,
Re: I have since added the metal links.
Was it an 'easy' job?
Just wanting a non-biased thought,
Jerry Baumchen
Very easy install.
Just drive up on some car ramps for easier access then replace the links.
Have seen people replace them in parking lots also.
You need two wrenches, to loosen up, then tighten the upper and lower bolt on each Link.
We have seen the stock links break and also cracked when removed. A good idea to change the links if adding the Bar.
finless
New member
Just like Rick said. Super easy. Took me all of about 15 minutes.
You will get the idea of how to replace them by watching part 2 of the Baja Ron sway bar install video. I show putting the stock links back on the new sway bar so this shows the aligning and bottom bolts. The top bolts you will see in my video. Those also have tpo be removed to put on the links.
Bob
Similar threads
- Replies
- 8
- Views
- 1K
- Replies
- 10
- Views
- 1K
- Replies
- 30
- Views
- 5K


