• There were many reasons for the change of the site software, the biggest was security. The age of the old software also meant no server updates for certain programs. There are many benefits to the new software, one of the biggest is the mobile functionality. Ill fix up some stuff in the coming days, we'll also try to get some of the old addons back or the data imported back into the site like the garage. To create a thread or to reply with a post is basically the same as it was in the prior software. The default style of the site is light colored, but i temporarily added a darker colored style, to change you can find a link at the bottom of the site.

How to Activate Cruise Control on Base RS

you can see the shoulder on the right that needs to be removed. I started with a Dremel but finished with a small hand file.

Yea, don't use a Dremel. Took a couple of minutes with a box cutter razor blade. The plastic is very brittle, which makes it easy to shave, but also easy to f' up. I got mine super smooth & round with only vertical strokes with a razor blade.

this was my first attempt at the switch.

Those inserts look perfect! Where did you source them from?

Welcome to the RS Cruise Control Club!
 
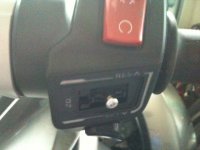
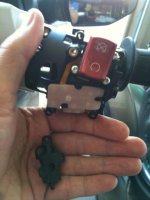
ImageUploadedByTapatalk1403221852.556549.jpgHere you can see the dumb part of the switch that need to be modified. The white pad just above the black piece is the waterproof portion of the switch. The contacts are all under the silicon. They have no idea what is pushing them.

The larger diameter "button" to the left center is the on/off. The large hole in the back of the dummy switch goes over this hole. This switch is activated by the left spring/bb.

The two smaller "buttons" to the right center are the accel and decel buttons. They are activated by the ears on the rocker switch.

This mod requires NO modification to the wiring harness. NO electrical ability is needed.


Sent from my iPhone using Tapatalk
 
Last edited:
ImageUploadedByTapatalk1403222236.189472.jpg
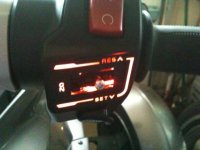
This is the "finished" product. I removed the double sided tape that "sealed" the old blank plate that was screwed to the switch and found the labels for the cruise already stenciled on the bike. I reused the screw that held the plate so I could push up to accel and down to decel. The switch needs to rock.

Sent from my iPhone using Tapatalk
 
Last edited:
Those inserts look perfect! Where did you source them from?

Welcome to the RS Cruise Control Club!
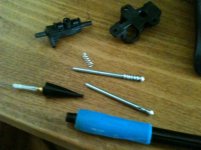
Those were the center pin from a pop rivet. I punched it out of the rivet and then cut it down. Fit was great but it took too much force to move the slider.

I made the holes a little bigger (diameter) and used a couple bb's in place of the pop rivet pin. I think the pressure is perfect now.
No pics with the bb's because they wouldn't sit still.
 
Last edited:
ImageUploadedByTapatalk1403222696.072121.jpg
This may explain the pop rivet center. The mechanical pencil and it's brother died for a good cause. The spring was almost perfect.

Sent from my iPhone using Tapatalk
 
Did you test it yet? I'm curious to see if the spring set-up on the left hole has enough pressure to hold down the ON switch. I couldn't figure out if there needed to be a spring'ed ball or a solid shaft in that hole.
 
Did you test it yet? I'm curious to see if the spring set-up on the left hole has enough pressure to hold down the ON switch. I couldn't figure out if there needed to be a spring'ed ball or a solid shaft in that hole.

Can't test drive until the pain meds wear off. Had one of my bum knees scoped last week. Still on pain killers.

I turned the key on and slid the switch to "on" LCD panel still said "off" When I rocked the switch up or down the LCD panel said cruise "on". But when I let go of the switch it went back to "off".

The stenciled words for the cruise control lit up real pretty when I powered up the bike.
 
Last edited:
Can't test drive until the pain meds wear off. Had one of my bum knees scoped last week. Still on pain killers.

I turned the key on and slid the switch to "on" LCD panel still said "off" When I rocked the switch up or down the LCD panel said cruise "on". But when I let go of the switch it went back to "off".

The stenciled words for the cruise control lit up real pretty when I powered up the bike.

Ha, yea, that's a good idea not to ryde. Get better.

Sounds like you might not have enough pressure on the left spring assembly. This is definitely the trickiest part of this mod. I'm convinced there isn't supposed to be a spring there at all, or if there is, a very short and very tight spring. I think you need a very precisely cut to length rod in there, just short enough to clear the ramp but long enough to press the ON button all the way without tearing up the white rubber waterproof material.
 
Seems stupid to not just have it on all if its already wired , I just looked , can not get the plastic rocker switch separate either. Apart of the pod and the cruise pod is $70 plus more for the one with the rocker switch on it???? :dontknow:

I wanna work on the putting the ST radio on my RS. pull the panels and it is wired for it already and the cluster shows the radio section. Plenty of room under the back for a small amp and sub and set of speakers inside the dash even with my HID ballasts mounted in there.
 
I wanna work on the putting the ST radio on my RS. pull the panels and it is wired for it already and the cluster shows the radio section. Plenty of room under the back for a small amp and sub and set of speakers inside the dash even with my HID ballasts mounted in there.

Awesome. Please write that one up! Soon, us RS guys will have an RT Limited with a few dollars in parts!!


Sent from my iPhone using Tapatalk
 
Awesome. Please write that one up! Soon, us RS guys will have an RT Limited with a few dollars in parts!!


Sent from my iPhone using Tapatalk


Im tring to find someone with the install instructions for the ST, and most important that I don't loose my frunk space and not adding anything to mess the look up of the bike. I heard the JL speaker kit for the spyders and they sound great but really hate the way they look on the bike. I have a set of 2.5 inch bose speakers that fit perfect inside, just need to make a box for them to mount in .
 
ImageUploadedByTapatalk1403277572.772290.jpg
I decided to try a stronger spring. Since I had made the hole a slightly larger diameter I figured a ball point spring may work. Cut it about 3/8" and installed. Cruise now comes on. Sometimes I have to wiggle the switch a little so I know I am on the low side for spring pressure.

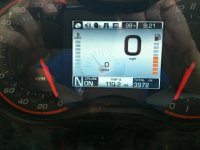
The better news. I have been off the pain meds for 24 hours so I took it for a test drive on a street that is never busy. It works perfect! Slide it over to "on", push down to set. LCD changes from "Cruise on" to "Cruise set". Push up, the bike speeds up about one mph. Push down, it slows one mph. Tap the brakes and the LCD goes from "set" to "on" and the bike slows. Push down again and the bike sets at the new speed.


Sent from my iPhone using Tapatalk
 
Last edited:
Seems stupid to not just have it on all if its already wired , I just looked , can not get the plastic rocker switch separate either. Apart of the pod and the cruise pod is $70 plus more for the one with the rocker switch on it???? :dontknow:

I wanna work on the putting the ST radio on my RS. pull the panels and it is wired for it already and the cluster shows the radio section. Plenty of room under the back for a small amp and sub and set of speakers inside the dash even with my HID ballasts mounted in there.

When i was installing my BRP passenger back rest, I saw what I believe is the radio unit up inside the rear fender on the right side. I looked and the part number is 710003552 but it says that it's "not available" and doesn't list a price for it either
 
I wanna work on the putting the ST radio on my RS. pull the panels and it is wired for it already and the cluster shows the radio section. Plenty of room under the back for a small amp and sub and set of speakers inside the dash even with my HID ballasts mounted in there.

I installed the factory radio on my ST. The "instructions" were next to useless. About two words in 14 pages. The rest were line drawings with too many details removed to understand the drawing. Some of the pics were mildly helpful.

In short, the brain installs behind the plastic, on the right side under the passenger grab rail. The wiring harness runs forward along the gas tank seam. It is held in place with supplied zip ties. Wiring harness hooks to the blank connector that it fits. Again, pretty obvious when you see it.

The large connector hooks to the similar sized large connector on the left side, near the radio brain. Use some of the little green silicon plugs to fill the empty holes on the new connector. They are just used to keep grime out of the unused pins in case you ever want to add more Farkles.

Drill a hole in the plastic for the antenna. Then a much smaller hole for the bracket to hook into. You will understand when you see the factory antenna. Ground comes from the bolt for the "brain" bracket. The extra antenna cable and ground strap gets coiled up and zip tied on the left side, kind of behind the brain. Pictures of this step were useless. Just wad it up and zip tie it somewhere.
 
BonesDT PM me your address and shirt size. As a "Thank You" I might be able to find a polo shirt with a embroidered Spyder logo in your size. Also what color shirt and logo would you like?
 
The complete right hand switch housing new is part number 710003921 and sells for $301.85 with free shipping
 
View attachment 90351
I decided to try a stronger spring. Since I had made the hole a slightly larger diameter I figured a ball point spring may work. Cut it about 3/8" and installed. Cruise now comes on. Sometimes I have to wiggle the switch a little so I know I am on the low side for spring pressure.

The better news. I have been off the pain meds for 24 hours so I took it for a test drive on a street that is never busy. It works perfect! Slide it over to "on", push down to set. LCD changes from "Cruise on" to "Cruise set". Push up, the bike speeds up about one mph. Push down, it slows one mph. Tap the brakes and the LCD goes from "set" to "on" and the bike slows. Push down again and the bike sets at the new speed.


Sent from my iPhone using Tapatalk

good to hear it's working but better that your off the pain meds
 
I installed the factory radio on my ST. The "instructions" were next to useless. About two words in 14 pages. The rest were line drawings with too many details removed to understand the drawing. Some of the pics were mildly helpful.

In short, the brain installs behind the plastic, on the right side under the passenger grab rail. The wiring harness runs forward along the gas tank seam. It is held in place with supplied zip ties. Wiring harness hooks to the blank connector that it fits. Again, pretty obvious when you see it.

The large connector hooks to the similar sized large connector on the left side, near the radio brain. Use some of the little green silicon plugs to fill the empty holes on the new connector. They are just used to keep grime out of the unused pins in case you ever want to add more Farkles.

Drill a hole in the plastic for the antenna. Then a much smaller hole for the bracket to hook into. You will understand when you see the factory antenna. Ground comes from the bolt for the "brain" bracket. The extra antenna cable and ground strap gets coiled up and zip tied on the left side, kind of behind the brain. Pictures of this step were useless. Just wad it up and zip tie it somewhere.

Yeah that's what I'm looking for , wanna compare the wiring and need a content list of what the kit contains
 
Back
Top