

Elqueso2
Member
Things I learned and did during the Uninstall/Install for the front and rear tires. I also included a few steps/tips that I didn’t find on the internet.
When I pulled my rear wheel apart on my 23 Spyder RTL, everything was very dry, including the seals, O-ring, and rear axle. My buddy, who sold me the bike, said the dealer worked on it last. The axle was marred from hammering it in dry. I was pissed.
 -
 -
 -
When I pulled my rear wheel apart on my 23 Spyder RTL, everything was very dry, including the seals, O-ring, and rear axle. My buddy, who sold me the bike, said the dealer worked on it last. The axle was marred from hammering it in dry. I was pissed.
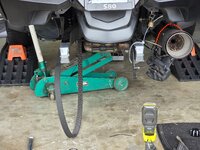
- I did the fronts first and used my steel motorcycle lift to jack up the front end enough to get both wheels off. When putting the wheels back on, I torque the wheel nuts to 77 ft-lbs. (105 Nm). Once the rims were back on, I slid my two ramps under the wheels and lowered the wheels onto the ramps. I found that the added height of the bike helped with the entire process of removing the rear wheel. I’m old and I hate bending over so much.
- In jacking up the rear, there is no need to remove the rear shock bolt from the swingarm. Some folks did it on the internet and you really don’t have to. I found that if you remove the bolt and jack up the bike from the center frame, there is a chance for the swing arm to swing down far enough to damage the ACS Ride Height sensor and/or cable attached to it. I was told by the dealer’s mechanic that this is a common problem with people removing the bolt. I did jack it up from the center part of the frame using an automotive jack.
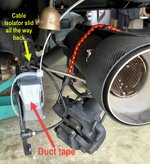
- Before removing the axle, duct tape the end cap/axle adjusters to the swingarm. This elevates it/them from moving around when trying to install the axle. Also, when you put it all back together (I found) that there was no need to adjust the wheel or belt tension & Belt position. They were prefect when I was done.
- I had to remove the rear Disk Brake Rotor from the wheel so they could install the tire. They said they couldn’t do it with it on. Be careful when removing the 5 bolts connecting the Rotor to the wheel hub. They are not as hardened as I thought and I noticed that the dealer must have used an impact putting them back on, because the ends were a little rounded. I’m going to change them the next time I have to change a tire with a higher-grade bolt. Use Blue Loctite on the 5 bolts and torque to 68 ft-lbs. (92 Nm)
- I used a Cable Tie to secure the caliper backing/speed sensor plate. I didn’t have to loosen any of the Speed cable/Brake line from the swingarm and just slid the cable isolator (grommet) that holds the Speed cable/Brake line all the way to the end, freeing them both up. See the Pic
- I unbolted the Caliper and hung it from the Exhaust with a bungee cord. This doesn’t put any stress on the line. When fitting it back on to the caliper backing/speed sensor plate, use Blue Loctite on the Caliper Bolts and Torque to 77 ft-lbs. (105 Nm)
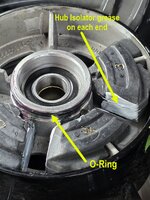
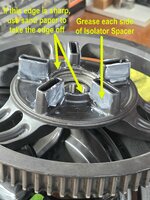
- I numbered the rubber isolators in the wheel hub to put them back in the same place (I’m anal) and lubed the rubber isolators on the ends with Silicone PTFE Grease on the 5 Isolator spacers (on the backside of the pulley) to help them slide in between the isolators and also protect the rubber from drying out. Learned this from my Harley days.
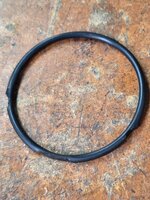
- The seal that goes between the wheel bearing hub (next to the isolators) and the Belt pulley was damaged when the dealer (see pic) put it back together dry. I called the dealer parts dept and of course they didn’t have one. I also spoke to the mechanic there, asking if he had one, and he didn’t. He said the dealer won’t stock them!? So, I had a quest to find a replacement. I found it at Napa Auto Supply, it just happens to be the correct size, and it's for an automotive radiator thermostat seal. I bought a few. The O-ring seal needs to be lubricated and put back into the hub before pressing the Belt pulley back on. **Added Note: I found that the casting where the seal goes past and seats at the bottom of the belt pulley (The 4th pic) is tearing the O-ring seal as I was installing it. It's the sharp edge from casting of the pulley and the factory doesn't clean up that surface. Mine and that of my friends Spyder that we just did had the same problem. The fixisto use some fine sand paper and take the edge off the casting. Make sure you cover the bearing, so no metal filings will get into it. Then blow it out with air and regrease the surfaces.
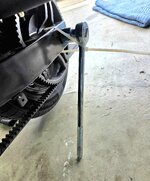
- When Torquing the Rear Axle nut, I found it easier to Cable Tie the breaker bar & socket to the swingarm, with the end of the breaker bar touching the ground. This eliminates having to hold on to it and the torque wrench at the same time. This gives you the ability to stand up and torque the axle nut slowly with both hands. Made it really easy. Torque to 166 ft-lbs. (225 Nm). Easier to torque the nut with the wheel on the ground, but I wanted it higher so that I didn't have to bend over as far, I'm old... lol
- - -
Last edited:

 Now ride the heck out of it.


