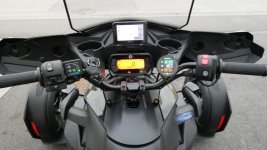
So in my continuing effort to thwart BRP making every accessory cost $300 for mediocre stuff I decided to add a set of Oxford heated grips. I've had Oxfords on literally every bike I've had for the past 15 years (that didn't come with factory heated grips) Multiple levels of heat, comfortable grip surface, and at full crank they get so hot you can't hold them. Much better than the one heat setting of the BRP grips, which I've experienced to be less than awesome. However, as usual BRP has set about making every single aspect of the job as difficult as possible and uses as many non-industry standard parts as they can get away with. Handlebars that aren't really handlebars? Check. Throttle tubes that are non-standard diameter, that are also not removable from the throttle electronics? Check. Requirement that you remove nearly every piece of plastic on the bike to access the headlight bulbs? Check. (Side note I did a headlight upgrade while I had the body off, but that's only one part of the 'different' headlight upgrade so that'll be posted in a few weeks) Anyway, here's the process. The controller is fully potted into it's housing so no making it smaller or hiding it anywhere. The controller came with a bracket that mounts to the clutch perch of literally every other motorcycle ever made, but not this one. It also can mount to the handlebars with a clamp, except not this one due to a nonstandard size bar. So I looked at the way it all works together and came up with a plan. I cut the stock mounting bracket apart first, and measured the thickness of the steel, fifty four thousandths of an inch. I did some magic to make the lower clamshell fit in my mill vise and machined a slot in it slightly over a half inch wide, fifty thousandths of an inch deep. Then I rounded off the back of the post on the mating clamshell, and cut/sanded/drilled a piece of metal to fit into that and around that post. Next I reassembled the clamshell with the mounting tab in place, figured out where to cut it, did so, and welded the mount plate to the mount tab. Makes more sense when you look at the pictures. Anyway, I gave it a quick coat of epoxy paint and mounted the grip controller, and reassembled that side. The clutch side grip mounts to the handlebar stub with a pair of screws under the grip, so it came off pretty easily. Of course this left a non-standard size bar to mount the new heated grip to, so I had to add some shim stock and lots of superglue to get it to fit correctly. One other side note, I generally mount my Oxfords upside down relative to how they expect because it fits my hands better that way. So once I got the grip in place I had to take the clamshell off again for some filing and grooving to make a place for the wire to pass through. Wrapped both wires in matching loom and zip tied to the stock harness, then on to the throttle side. Here is where I had my 'well, if I screw this up I'll be getting the BRP grips anyway to fix it' moment. Once again, nonstandard size parts. Two throttle return springs. BRP used an enormous amount of glue to hold the stock grip onto the throttle tube. The throttle tube cannot be separated (that I could figure out, and the FSM doesn't say anything) from the throttle electronics, which makes mounting it in a lathe problematic. Once I cut/pulled/shaved/wire brushed the stock grip off the throttle tube, I measured the diameter of the tube at 1.060", when everybody else in the universe uses 1". This left me with thirty or so thousandths to take off the tube, without the lathe. Ended up cutting a 2x72" sanding belt in half and using it to slowly grind off the thirty thousandths per side. This of course led to thin spots, thick spots, etc. which took a fair amount of work to even out. Then I reassembled that side, applied the glue and drove the grip onto the throttle tube. Allowed enough slack to make sure I can get full throttle, then carefully zip tied the wire along the stock look to meet the other wires in front of the headstock. I grabbed power from the customer accessory circuit on the left side of the bike, connections crimped and heat shrunk to seal, then wrapped the wiring in matching loom cover and dropped the excess down next to the headstock. Quick test to verify that I didn't break anything and it all went back together. Quick test showed that the grips reach a bit over 110*f in about a minute on high, which is much hotter than the stock BRP grips ever get. Following that was reassembly of the rest of the bike, and tomorrow my daughter and I are taking it out for a couple hours for proper testing.
 Untitled by Uncle Grr!, on Flickr√
Item 4 is the stock mounting bracket I cut apart.
 Untitled by Uncle Grr!, on Flickr
Why the actual hell do you need to get this far to change a headlight bulb?
 Untitled by Uncle Grr!, on Flickr
Pretty awful picture of the bracket. Imagine it rotated 90* clockwise and you can see the mounting tab with the hole that goes into the clamshell.
 Untitled by Uncle Grr!, on Flickr
Slot milled into the lower clamshell
 Untitled by Uncle Grr!, on Flickr
Post rounded over on the upper clamshell
 Untitled by Uncle Grr!, on Flickr
Slot left when clamshell is reassembled. If I ever get rid of these grips that's the only evidence I modified anything at all.
 Untitled by Uncle Grr!, on Flickr
Controller installed, but no cable management applied yet. It looks much neater in person now.
Untitled by Uncle Grr!, on Flickr√Item 4 is the stock mounting bracket I cut apart.
Untitled by Uncle Grr!, on FlickrWhy the actual hell do you need to get this far to change a headlight bulb?
Untitled by Uncle Grr!, on FlickrPretty awful picture of the bracket. Imagine it rotated 90* clockwise and you can see the mounting tab with the hole that goes into the clamshell.
Untitled by Uncle Grr!, on FlickrSlot milled into the lower clamshell
Untitled by Uncle Grr!, on FlickrPost rounded over on the upper clamshell
Untitled by Uncle Grr!, on FlickrSlot left when clamshell is reassembled. If I ever get rid of these grips that's the only evidence I modified anything at all.
Untitled by Uncle Grr!, on FlickrController installed, but no cable management applied yet. It looks much neater in person now.
")