Hi All,
I just changed the headlight bulb on my 2013 ST Limited and I thought it may he helpful to other ST owners if I explained a few things that I experienced during the change. This may also be useful for RT owners
First this is a 15min. operation the second time you do it AND if you have a helper with a very small hand. It took me and my ridding buddy about an hour and 4 Buds.
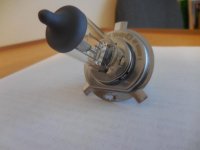
The bulb is not just a bulb but the complete bulb and housing assembly. See photo. Notice the assembly has three tabs and a flat area on the bottom.
Book directions 1,2,3 and 4, removing the plastics was easy.
Step 5 removing the rubber boot. There are a few clips on the outer edge of the boot to grasp to pull the boot off the outer bulb flange. But because it has been there for a few years it doesn’t want to move. With needle nose pliers you can get a grasp on it and pull it away from the outer housing. The center of the boot is tight on the bulb housing. To loosen it I used a long flat screwdriver and forced it between the boot collar and the bulb housing. A couple of twists of the screwdriver loosened the boot collar and then the entire boot came out.
Step 6: The retaining clip is two long spring wires with loops on one end to hold them in place when snapped in place, and the other end is hinged allowing the “clips” to swing out of the way after they are released. However they are still in the way of removing the bulb assembly. A few wiggles gets it done.
Step 7: Remove the bulb assembly. This is where a very small hand helps. Or time and another Bud.
Replace the bulb assembly. The tabs have to line up and also the flat area on the bottom of the bulb base. Once in place nothing holds it until you swing the retaining clip into place.
Step 8: When replacing the rubber boot moisten the middle collar of the boot and the outer flange to help it slide in place.
Step 9: Installing the power plug. It has to line up with the tabs on the base of the bulb. Patience helps. Or another Bud.
When all is completed, you will have to reset the clock.
I hope this helps.
I just changed the headlight bulb on my 2013 ST Limited and I thought it may he helpful to other ST owners if I explained a few things that I experienced during the change. This may also be useful for RT owners
First this is a 15min. operation the second time you do it AND if you have a helper with a very small hand. It took me and my ridding buddy about an hour and 4 Buds.
The bulb is not just a bulb but the complete bulb and housing assembly. See photo. Notice the assembly has three tabs and a flat area on the bottom.
Book directions 1,2,3 and 4, removing the plastics was easy.
Step 5 removing the rubber boot. There are a few clips on the outer edge of the boot to grasp to pull the boot off the outer bulb flange. But because it has been there for a few years it doesn’t want to move. With needle nose pliers you can get a grasp on it and pull it away from the outer housing. The center of the boot is tight on the bulb housing. To loosen it I used a long flat screwdriver and forced it between the boot collar and the bulb housing. A couple of twists of the screwdriver loosened the boot collar and then the entire boot came out.
Step 6: The retaining clip is two long spring wires with loops on one end to hold them in place when snapped in place, and the other end is hinged allowing the “clips” to swing out of the way after they are released. However they are still in the way of removing the bulb assembly. A few wiggles gets it done.
Step 7: Remove the bulb assembly. This is where a very small hand helps. Or time and another Bud.
Replace the bulb assembly. The tabs have to line up and also the flat area on the bottom of the bulb base. Once in place nothing holds it until you swing the retaining clip into place.
Step 8: When replacing the rubber boot moisten the middle collar of the boot and the outer flange to help it slide in place.
Step 9: Installing the power plug. It has to line up with the tabs on the base of the bulb. Patience helps. Or another Bud.
When all is completed, you will have to reset the clock.
I hope this helps.