-
There were many reasons for the change of the site software, the biggest was security. The age of the old software also meant no server updates for certain programs. There are many benefits to the new software, one of the biggest is the mobile functionality. Ill fix up some stuff in the coming days, we'll also try to get some of the old addons back or the data imported back into the site like the garage. To create a thread or to reply with a post is basically the same as it was in the prior software. The default style of the site is light colored, but i temporarily added a darker colored style, to change you can find a link at the bottom of the site.
You are using an out of date browser. It may not display this or other websites correctly.
You should upgrade or use an alternative browser.
You should upgrade or use an alternative browser.
Front trunk
- Thread starter J48cruiser
- Start date
BLUEKNIGHT911
Sadly Passed Oct 2024 - RIP
TRUNK PROBLEM
I am the least fond of Dealers here, depending on how far away yours is............They can and should fix this.......Mike :thumbup:
I am the least fond of Dealers here, depending on how far away yours is............They can and should fix this.......Mike :thumbup:
vided
New member
fpfy

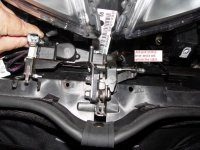
My front trunk on my 2015 RT Limited will not latch and lock any ideas will help
Attachments
stillriding
Happy old fart
This is the temporary remedy. The ignition switch needs replacing. Mine's in the shop now for replacement under warranty.Until I can get my '14 RTL to the dealer, I'm having to turn the key to unlatch the seat in order for the latch mechanism to engage.
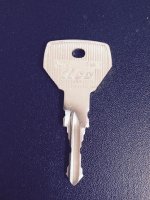
Thought I'd pass along something I learned after the new switch was installed. If you have a "back-up, non-chipped" key to unlock things in case you misplace the regular key (I've used the Ilco blank #x270 for years) it may need a little extra work by the locksmith. Apparently the new ignition switch is slightly different from earlier switches. The black circle is a bit higher preventing the Ilco blank from being fully inserted. The upper portion of the Spyder key, above the shank, is triangular. Ilco's upper portion is rectangular. A little grinding on either side from the top of the shank to make the upper section in somewhat of a triangle solved the problem by allowing the key to be fully inserted. A little hand-filing to some of the cuts also was needed to make the new key operate smoothly. This was all done before I left the locksmith's parking lot and required a bit of trial and error.
Last edited:
trikermutha
Active member
Unhook the cable by the latch .
One other thing does the cable move when you turn the key to open the Frunck? If not then the post above maybe the issue
One other thing does the cable move when you turn the key to open the Frunck? If not then the post above maybe the issue
Orientation
Thanks for doing this. I thought maybe the problem with his frunk was that it was lying on it's side.......
~Sandee~
Thanks for doing this. I thought maybe the problem with his frunk was that it was lying on it's side.......
~Sandee~
Bob Denman
New member
:roflblack: :clap: :thumbup:
Seriously; if it's just not latching down; there's a good chance that the foam seal around the top of it has gotten knocked loose...
Double-check that; before getting too nervous! :shocked:
Seriously; if it's just not latching down; there's a good chance that the foam seal around the top of it has gotten knocked loose...
Double-check that; before getting too nervous! :shocked:
J48cruiser
New member
Check the seal its ok the lock dose not close lid just sits their
Bob Denman
New member
remark2013
New member
Our Bike did the same thing last week. Seal was in it's proper place, however when I turned the Key it felt like nothing was attached? Was like this for 4 days had an appointment and all made. Pulled the bike onto the lawn to give her a bath and all of a sudden Frunk was latched??? Been fine the last 4 days and have used it everyday since! Cancelled my appointment as my dealer is 2 hrs. away. Time will tell I guess. :dontknow:
stillriding
Happy old fart
Resubmitted with a tip
Thought I'd pass along something I learned after the new switch was installed. If you have a "back-up, non-chipped" key to unlock things in case you misplace the regular key (I've used the Ilco blank #x270 for years) it may need a little extra work by the locksmith. Apparently the new ignition switch is slightly different from earlier switches. The black circle is a bit higher preventing the Ilco blank from being fully inserted. The upper portion of the Spyder key, above the shank, is triangular. Ilco's upper portion is rectangular. A little grinding on either side from the top of the shank to make the upper section in somewhat of a triangle solved the problem by allowing the key to be fully inserted. A little hand-filing to some of the cuts also was needed to make the new key operate smoothly. This was all done before I left the locksmith's parking lot and required a bit of trial and error.
pitzerwm
New member
I noticed on my frunk that the lid was flush with the top piece of plastic and I needed to push on it before it latched/locked. There is no adjustment that I could find so I removed the 2 screws holding the latch part in the lid and with a Demel and a small round diamond bit elongated the screw holes/slots in the lid. I didn't need much and then when it hit the latching mech, there was 3/8 to 1/2" between the lid and the plastic. The locking and unlocking was never an issue, the OP stated that it didn't lock.
"My front trunk on my 2015 RT Limited will not latch and lock any ideas will help"
So the advice on unlatching might not apply.
"My front trunk on my 2015 RT Limited will not latch and lock any ideas will help"
So the advice on unlatching might not apply.
JayBros
Well-known member
Thought I'd pass along something I learned after the new switch was installed. If you have a "back-up, non-chipped" key to unlock things in case you misplace the regular key (I've used the Ilco blank #x270 for years) it may need a little extra work by the locksmith. Apparently the new ignition switch is slightly different from earlier switches. The black circle is a bit higher preventing the Ilco blank from being fully inserted. The upper portion of the Spyder key, above the shank, is triangular. Ilco's upper portion is rectangular. A little grinding on either side from the top of the shank to make the upper section in somewhat of a triangle solved the problem by allowing the key to be fully inserted. A little hand-filing to some of the cuts also was needed to make the new key operate smoothly. This was all done before I left the locksmith's parking lot and required a bit of trial and error.
This is what my X270 looks like after I finished the grinding session; works as well as one of the chipped keys.
Attachments
flaggerphil
New member
A year or so ago my frunk wouldn't latch. I took it to my dealer and they found the catch was bent. They straightened it out at no cost and it's been fine since.
vided
New member
Thanks for doing this. I thought maybe the problem with his frunk was that it was lying on it's side.......
~Sandee~
:roflblack::roflblack::roflblack::roflblack::roflblack:
Attachments
Similar threads
- Replies
- 4
- Views
- 320
- Replies
- 1
- Views
- 299
- Replies
- 10
- Views
- 1K
- Replies
- 2
- Views
- 583


