Front Flasher wires 2008 GS
2008 Can Am Spyder GS flasher wire location
Pop out the instrument panel using a small screwdriver and the two holes above the dash. Be sure the screwdriver goes into the small slots on top of the instrument panel. You will feel the snaps release when you push on it. Directions are in the owners manual. If you have a tall wind screen you will need to remove it.

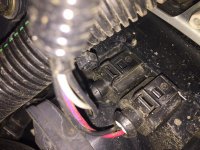
The right side flasher connector. (There are just two connectors sitting right there between the headlights, on top of the main frame steel.)

There is some black shrink wrap-remove it.On my Spyder-wire colors are Black and Yellow/Gray.

I found the Black wire was the one that worked on the right side.
It is easy to thread the yellow “blinker” wire from the LED to this location.

LEFT SIDE
The flasher connector on the left side has Black and Gray wires. I found unplugging the connector gave me more wire to play with. There are also some “hooks” on the upper rear where you can tuck the wires in when you finish. (These are on both sides.)

Again, remove the shrink wrap to expose the two wires.
On the left side-on my Spyder-you use the Gray wire.
Again the yellow wire from the LED strip threads easily to this location. I used tie wraps to secure this wire and relieve the tension. Tuck the wires in and replace the instrument panel and you are ready to go. One important note: when you put the instrument panel back in you must be sure the bottom two fingers or clips are in place-BEFORE you snap in the top of the panel. If you don’t you will have one heck of a time getting it back out and correctly seated. Those top clips are tough to free.
Before you start this I'd suggest getting some Posi-Tap connectors. These are great for tapping into wires without destroying them. You can tap into the wrong wire, remove the posi-tap and all you leave is a pin hole in the wire. This is helpful since the Can Am shop manual doesn't list wire colors. They make it fast and easy.