• There were many reasons for the change of the site software, the biggest was security. The age of the old software also meant no server updates for certain programs. There are many benefits to the new software, one of the biggest is the mobile functionality. Ill fix up some stuff in the coming days, we'll also try to get some of the old addons back or the data imported back into the site like the garage. To create a thread or to reply with a post is basically the same as it was in the prior software. The default style of the site is light colored, but i temporarily added a darker colored style, to change you can find a link at the bottom of the site.

Fox Shocks Installed

tehrlich

New member
I installed a set of Fox Shocks on my RT Limited tonight, and I think it is a HUGE improvement! I could feel the difference on the VERY first turn I took! (I'm installing the upgraded swaybar later. but this was a major improvement in my opinion)

I will admit that I was concerned about doing it myself, but it was very easy. It took me about 45 minutes, but it was hot in my garage, and I took my time. This is the very first time for me to do this, and I found it so easy that I took pictures during the 2nd install. Please be advised that I'm an amateur and am showing the pictures only to show how easy it is, and what I discovered.

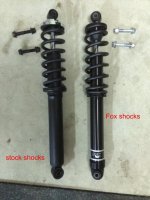
It was surprising to me that the stock shock seemed to have the same size spring and piston. It was also heavier.
attachment.php


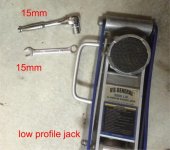
I only used a few things: a 15mm wrench, a 15mm ratchet, and a low-profile hydraulic jack.
attachment.php


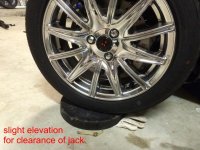
I had to elevate the front just a little to get the hydraulic jack to go under.

attachment.php


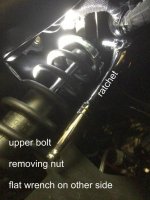
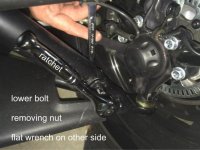
I removed the nut off of the upper bolt first. The tension of the shock on the bolt made it easy to get the nut loosened.
attachment.php


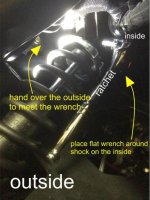
The room is very limited with hoses in the way. The backside of the shock is easy, and the front side of the shock has limited access to the bolt head. I found that if I slipped the flat wrench around the shock on the inside, I could get my hand around the outside of the shock to meet it over the bolt head. Just keeping the wrench on the bolt head is enough to get the nut off completely.

attachment.php
 

Attachments

  • Fox shocks 1.jpg
    Fox shocks 1.jpg
    33.4 KB · Views: 1,070
  • fox shocks 2.jpg
    fox shocks 2.jpg
    52.2 KB · Views: 1,067
  • fox shocks 3.jpg
    fox shocks 3.jpg
    69.6 KB · Views: 1,069
  • fox shocks 4.jpg
    fox shocks 4.jpg
    36.4 KB · Views: 1,069
  • fox shocks 5.jpg
    fox shocks 5.jpg
    43 KB · Views: 1,090
The lower bolt is easy to remove.
attachment.php


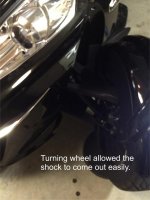
Turning the wheel made it easy for the shock to be removed.
attachment.php


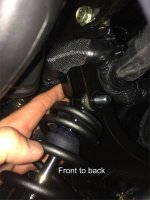
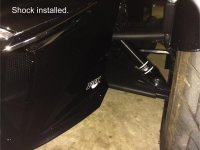
The Fox shock was worked in the same direction the stock shock came out. The upper bolt was held with two fingers and carefully placed through the frame and the Fox Shock. Then it was pushed through. This was the hardest part of the install, but it just took patience.

attachment.php


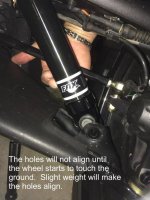
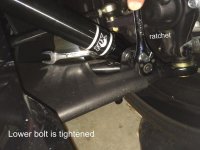
After the upper bolt was tightened, the lower was aligned. This is where the hydraulic jack really helped. Lowering it slightly allowed the holes to align, and the bolt slid through easily.

attachment.php


Lower bolt tightened.
attachment.php
 

Attachments

  • fox shocks 6.jpg
    fox shocks 6.jpg
    58.1 KB · Views: 1,052
  • fox shocks 7b.jpg
    fox shocks 7b.jpg
    30.1 KB · Views: 1,048
  • fox shocks 7a.jpg
    fox shocks 7a.jpg
    31.8 KB · Views: 1,049
  • fox shocks 7.jpg
    fox shocks 7.jpg
    40.1 KB · Views: 1,056
  • Fox shocks 8.jpg
    Fox shocks 8.jpg
    50.8 KB · Views: 1,053
Final.

attachment.php


I had a torque wrench but did not use it. It surprised me when I took off the dealer-installed shocks. They had variable torque and 3 out of 4 of them were removed with little pressure, in my opinion. I definitely tightened them down more than what the dealer had.


This was a super upgrade for me as I've not liked the very soft ride. I'm a little disappointed that these shocks are NOT standard OEM on an RT Limited! Especially with the premium price! I'm certain that the Elka shocks are better than these but I imagine that these will suffice for quite some time.

Right out of the gate, I could tell how the turns felt more solid and stable.
 

Attachments

  • fox shocks 9.jpg
    fox shocks 9.jpg
    47.2 KB · Views: 1,055
Great photos and description. What part number did you use? And did it stiffen up your ride and Reduce nosediving?

I bought this:
Fox Shocks for RT


Definitely stiffens up the ride and reduces nosediving. I feel like I am on a different machine! Now, I'm about 230lbs., and could probably feel the softness of the stock shocks more than some.
 
I was surprised that I couldn't find an installation video regarding this on YouTube. There were a couple that helped, but weren't thorough, in my opinion.

When I upgrade to Elka, I'll make the video.
 
Nicely done..!!

great job and very nice discriptive photos. Thanks for posting. You will be surprised again when you do the swaybar....:2thumbs::ohyea:
 
Forgot to mention: I have two stock RT front shocks for sale! Only 1000 mile use! :D

Pictures included! :roflblack:
 
I bought this:
Fox Shocks for RT


Definitely stiffens up the ride and reduces nosediving. I feel like I am on a different machine! Now, I'm about 230lbs., and could probably feel the softness of the stock shocks more than some.


I'm 250 and with the wife and all our stuff on board my front end is only about 2 1/2 inches off the ground. Surely would like to stiffen the front and reduce dive. Thanks for the great post.
 
My son and I went for a spin yesterday. He's about 130lbs. I could definitely feel the difference in the turns. It just is a more precise feeling, and I don't need to lean into the turn as much. More responsive.

My son even commented on it.
 
I'm 250 and with the wife and all our stuff on board my front end is only about 2 1/2 inches off the ground. Surely would like to stiffen the front and reduce dive. Thanks for the great post.
I left the spring preload as it was out of the box. It's about 1/3 up the way of the threads, so there is room to soften the preload, but there is a lot more room to stiffen it. I "think" preload is more exponential than linear, so there is probably a lot of adjustability either way.
 
I have fox shocks and Lamonster sway bar on my 2015 RT. The spyder handles way better and turns the corners like it is on rails
 
Shock Removal

I was surprised that I couldn't find an installation video regarding this on YouTube. There were a couple that helped, but weren't thorough, in my opinion.

When I upgrade to Elka, I'll make the video.

Great job and pictures. Your a better man than me, I tried to get my big hands up there and gave up. I pulled the front off to make it easy an found factory failed to complete the installation of the fresh air elbow & clamp. Did the swaybar and skid plate at the same time. What a difference in handling , should have came stock this way.
 
Great pictures! Thank you for sharing. I was looking on Fox's website could not find the specific shock for the spyder. What model number were those shocks?
 
:thumbup: You did a great job....still have my stock shocks, but am thinking about making a change......nose still sits too low..:cus:.....you made the change look so easy.:2thumbs:
 
Can someone tell me what nosediving is?

Sent from my SAMSUNG-SM-G890A using Tapatalk
It can mean alot of things :) but in this context it means when brakes are applied, the front end lowers toward the ground. The weaker the suspension and greater the speed and/or weight, the further down the front end will dip toward the ground, or nosedive.
 
It can mean alot of things :) but in this context it means when brakes are applied, the front end lowers toward the ground. The weaker the suspension and greater the speed and/or weight, the further down the front end will dip toward the ground, or nosedive.

I've not had one time where this was an issue with the upgraded and stiffer shocks.
 
Back
Top