• There were many reasons for the change of the site software, the biggest was security. The age of the old software also meant no server updates for certain programs. There are many benefits to the new software, one of the biggest is the mobile functionality. Ill fix up some stuff in the coming days, we'll also try to get some of the old addons back or the data imported back into the site like the garage. To create a thread or to reply with a post is basically the same as it was in the prior software. The default style of the site is light colored, but i temporarily added a darker colored style, to change you can find a link at the bottom of the site.

First Parts Ordered

Flanker

New member
Ordered a set of super bright amber LED stock replacements from Custom Dynamics for my fender tips, a pair of Luminix Super White H7 replacement bulbs for my head lights, a TBR M2 Black slip on exhaust, and a TBR Top Tune kit (Juice Pack Pro with a high flow filter) :ohyea:. I'll take some pics of this stuff when I get it on the RSS, and post 'em.
 
I just added the fender lights and lower a-arm LEDs from CD and love them. Already had the fender tips. I also added fog lights. The from is lit well now. You know there's no stopping now! LOL
 
Got the fender tip LEDs in OK; ran into a problem swapping the head light bulbs though. I got the windshield, safety card cover, and instrument pod off/out OK, but can't get the upper cowl (the one the turn signal stalks attach to) off. I can see there are two slots on each side of the U cowl, and one slot up front, between and above the headlight lenses. I've pressed straight in as hard as I dare with a small, narrow screw driver blade, and nothing is releasing :(. Unless one of you knows the trick involved in getting those tabs to release, I guess I'll have to wait until the next time I get in to the dealership; then ask one of the mechanics how to do it. Took off the stock S pipe and muffler tonight, and bolted on my Two Brothers Racing M2 Black exhaust. When I fired that rascal up..................I realized why there was a sticker on the TBR muffler that said for off road/competition use only. It's too **** loud! Just ordered the TBR P1X power tip for my exhaust......................the add said they're supposed to take off 7-8db........................hope so. The exhaust is very well made, went together real easy, and was a snap to bolt onto the Spyder. Should get the TBR Juice Box Pro and filter in soon.
 
Juice box and filter came in today......................after spending a good chunk of the PM learning the Zen of Spyder oil and filter changes; I've put the JB & filter on hold til next week some time. Got some advice from a helpful forum member on getting to the back of my headlights for a bulb swap......................maybe tomorrow...........................
 
Thanks to Spyd1 for some tips, and a well illustrated how to. Got the head light bulbs swapped today; by pulling the entire cowl assembly. Was pretty easy really....................except for those two stinking hex head bolts directly under the headlight assemblies. :mad: They sure made up for the ease of the rest of the project! The best part? The new head light bulbs work! :rolleyes:
 
Tore most of the body off today, and installed my K & N air filter, and Two Brothers Racing "Juice Box". Install went OK, took me about 6 hours (spent an hour or more cleaning up the puked engine oil from my air box, due to an over fill on my last oil change [DON'T DO THAT Flanker!]). Spyder started and idled fine, runs great through the rev range...................very nice complement to the slip on exhaust! :yes: Now....................if I can just figure out how to deactivate the traction control! w00t! Did I mention my R turn signals still work? Double w00t!
 
Last edited:
Leaned out my low and mid range fuel circuits on my JB/Pro by 10% a few days ago. Still starts and idles fine, seems to pull harder through mid range (3000-6000 RPM). Should give TBR a call to see about checking/monitoring my AFR across the rev range to really get it dialed in. Might have to do the JB/Pro software thing with my notebook and JB/Pro.....................will keep you posted. UPDATE: Talked with a TBR technician; there is no way to check air fuel ratio with their system....................if you want that capability...........................shoulda bought a Dyno Jet Power Commander (she said it much more politely than that; LOL!). Oh well! Pretty happy with the way mine's running anyway!
 
Last edited:
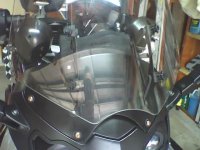
Pics below (in case anyone else wants reference material for their own install) of my Custom Dynamics LED center tail light install. Fast shipping by CD to my doorstep again, so :2thumbs: to them!

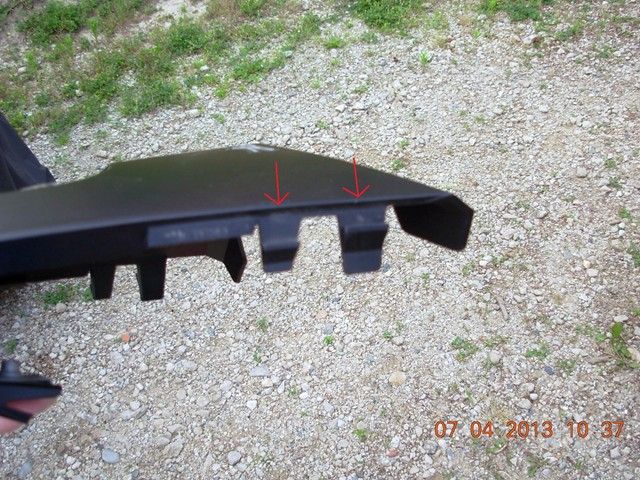
Start by removing the seven T30 torx screws that fasten the under tray to the bottom of your tail section. I used a 1/4 inch drive ratchet with a T30 bit.


Next I used a thin bladed screw driver to press the two tabs on either side of the R tail trim piece, and lifted gently on it to remove it.


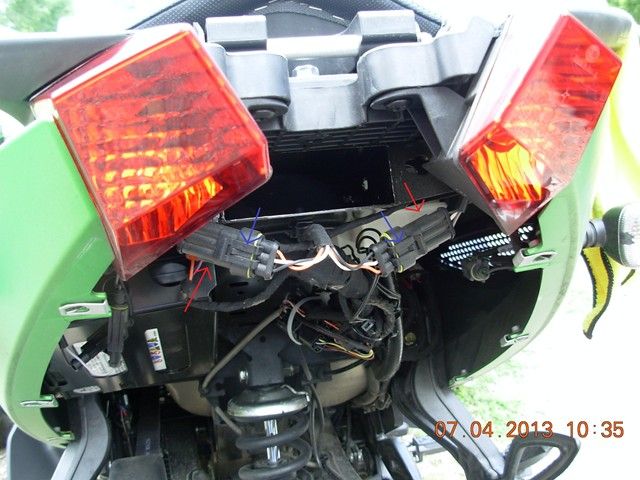
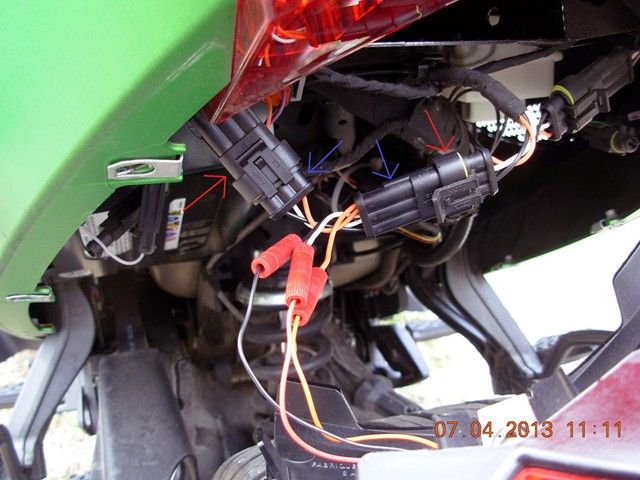
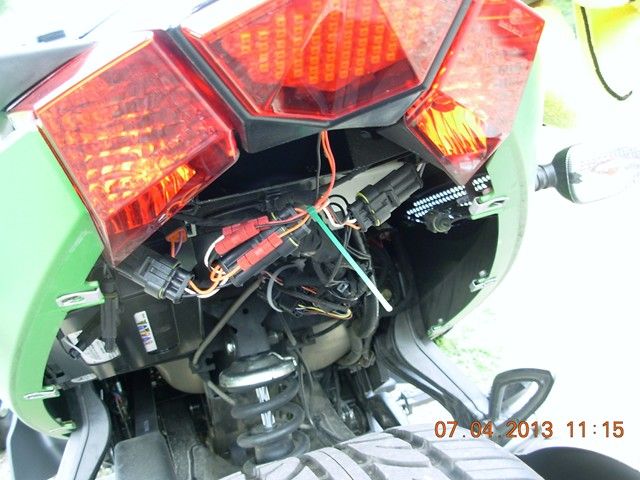
The tail with the under tray and R tail trim removed. Red arrows show the L & R tail light plugs; blue arrows show the tabs you pull out to unplug the halves from each other. You can use either plug to splice the CD LED center tail light into.


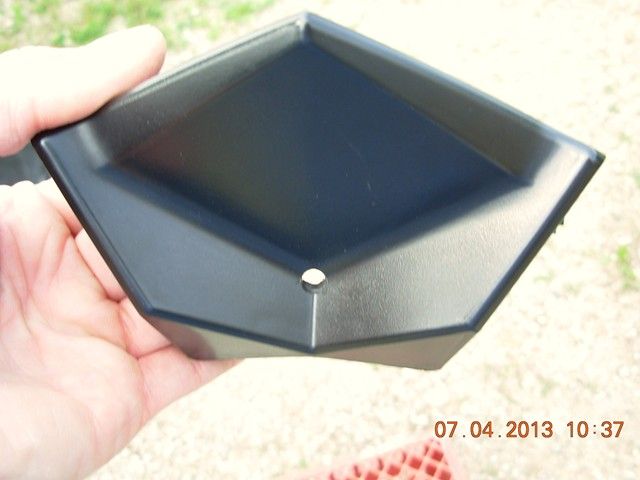
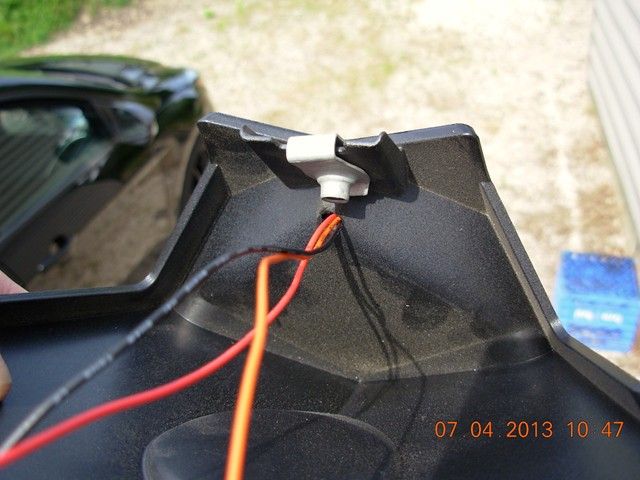
R tail trim piece with the 1/4 inch hole for the CD LED center tail light wires drilled in it.


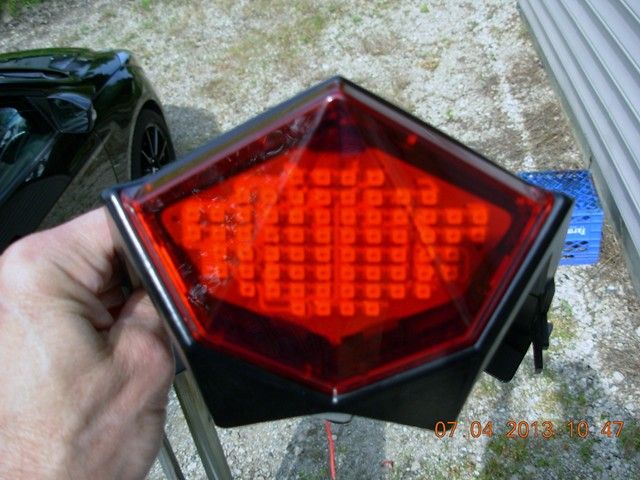
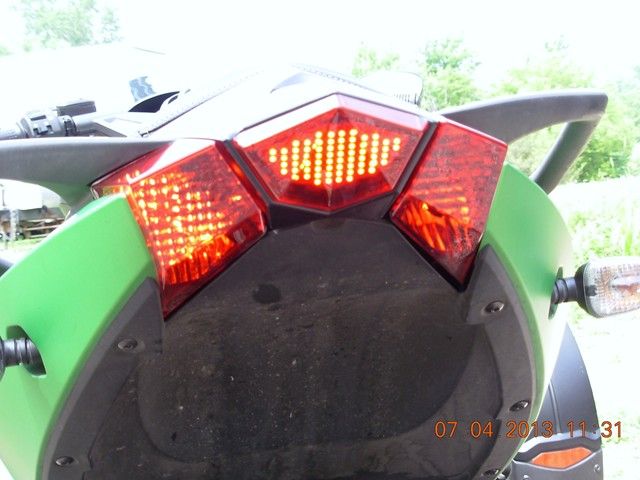
CD LED center tail light installed (double sided 3M sticky foam....all you do is peel off the backing and wipe down the trim piece with 3M adhesion promoter [included in kit]), then press the LED tail light into place.


Wires sticking through the R tail trim piece; I used a Dremel tool with a cone stone grinder bit to chamfer the inside of the hole.


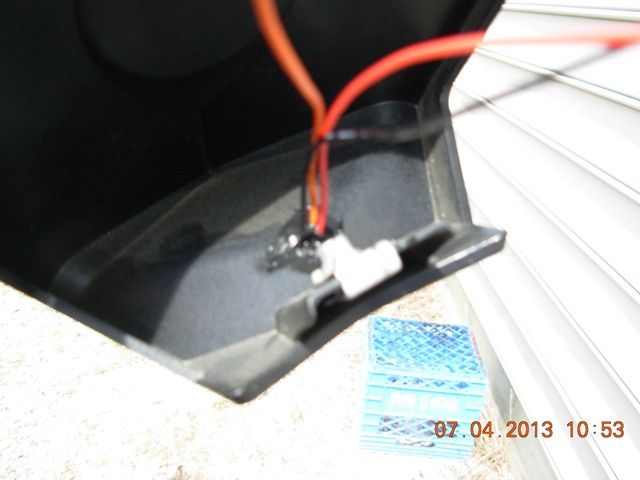
I used some black RTV silicone sealant to help insulate the wires from rubbing on the inside edges of the hole (probably overkill as the R trim is plastic anyway).


This was the most difficult part of the install as those clever manipulators at Custom Dynamics said in their written instructions to connect the black to black wires, white to white wires, and orange to orange wires of the LED tail light and CD supplied plug (used to splice into one of the stock tail light plugs/circuits). The sharper eyed amongst you will have noted; there is NO white wire on the LED tail light pig tail, only black, red, and orange wires. This is apparently a subtle and sophisticated psychological technique to get us to call into question our electrical engineering skills, necessitating a call to tech support at Custom Dynamics. :joke: Flanker ain't goin' for it! I wired the red pig tail wire to the white plug wire. Tail light works fine that way. Wankers (not to be confused with Flankers!)!


R tail trim with newly installed CD LED center tail light back in place with the new tail light (blue arrows) spliced into the L side stock tail light plug (red arrows).


Used a zip tie to help keep the extra wiring up out of the way once the under tray was back into place.


As an added bit of insult; I'd tightened the last of the 7 torx screws of the undertail, turned the ignition on, and checked the new CD LED center tail light for tail light and brake light function (both worked great), only to discover the stock R tail light bulb filament is out......................gotta take the whole shebang apart again to get the bulb out for a replacement! :cus: :cus: :cus: Stuff happens as they say. ;)
 
Last edited:
Installed my Bajaron's EBC nose bleed inducing brake pads today. Futzed around with the project for about 6 hours. Like anything else you do for the first time; it took much longer than it should have due to all the running into the house for "another tool", bathroom/beverage breaks (hhhhhhhmmmmm?????? wonder if those are related??????), had to make one parts run down town for a small rolling floor jack to lift up the Spyder, and those freakin' circlips Can Am put on the back side of the R caliper mounting bolts were the :cus: worst (musta ate up an hour and half by themselves.......all two of 'em :cus: :cus: :cus:!!!!) Why didn't they use self locking nuts on a threaded bolt end to hold the inside R pad in place huh, huh, huh??!! Ran out of patience and enthusiasm about the same time. Got the E brake on, but it's not adjusted properly.......................supposed to be nice and sunny tomorrow. Dreading the lengthy and complicated pad break in Ron made me sign for; before he'd sell me the pads! :joke: Cripes! Now that I think about it......................I'm glad I didn't get the brake disc upgrade too!!!! :roflblack:
 
Last edited:
Gotta say..!!

you have been very busy. Looks like your getting it all done with only a hitch or two..hope the pipe tones down for you...congrats..!! :thumbup:
 
Well......................my Madstad 24" med gray windshield showed up today. Excellent fit and finish; though the written directions are crap. They showed mounting brackets for another application, so I had to trial and error them into a correct mounting orientation on the supplied mounting plate, instead of being able to refer to the instructions. Inconsistent terminology in the instructions also; using different terms for the same part in different places of the instructions. Got it doped out OK though. After some MORE trial and error, I got the windshield adjusted to where I like it. The review? That's easy enough; works great; looks like :cus:! Completely destroys the low slung sporty lines of the RSS. Now I've got this big, dorky looking thing grafted onto the front end of my ride. Looks like some kid's Lucite project from shop class slapped on as an after thought. :cus:!! Very nice pocket of calm air behind it though; the way I've got it set, I'm getting a little turbulence around my shoulders/collar bone, with the main air blast just touching the top of my helmet, where the upper helmet air intake can still use it. Lotta dead bugs on the windshield; none on my face shield. Much more comfortable cruising on the freeway now...........................oh, and my exhaust is suddenly louder too. Doesn't have to compete with the windblast I'm used to. Need to get crackin', and locate a welder who can do thin aluminum, and get an extension welded onto the inside end of my TBR's P1X power tip. Cruise control is supposed to be in tomorrow! :clap:
 
Last edited:
Well......................my Madstad 24" med gray windshield showed up today. Excellent fit and finish; though the written directions are crap. They showed mounting brackets for another application, so I had to trial and error them into a correct mounting orientation on the supplied mounting plate, instead of being able to refer to the instructions. Inconsistent terminology in the instructions also; using different terms for the same part in different places of the instructions. Got it doped out OK though. After some MORE trial and error, I got the windshield adjusted to where I like it. The review? That's easy enough; works great; looks like :cus:! Completely destroys the low slung sporty lines of the RSS. Now I've got this big, dorky looking thing grafted onto the front end of my ride. Looks like some kid's Lucite project from shop glass slapped on as an after thought. :cus:!! Very nice pocket of calm air behind it though; the way I've got it set, I'm getting a little turbulence around my shoulders/collar bone, with the main air blast just touching the top of my helmet, where the upper helmet air intake can still use it. Lotta dead bugs on the windshield; none on my face shield. Much more comfortable cruising on the freeway now...........................oh, and my exhaust is suddenly louder too. Doesn't have to compete with the windblast I'm used to. Need to get crackin', and locate a welder who can do thin aluminum, and get an extension welded onto the inside end of my TBR's P1X power tip. Cruise control is supposed to be in tomorrow! :clap:

Haha...nice windshield review. That's when you know your getting old. When the "function" of something is more important than the "form". Because yes, taller shields look like total crap on the RS.
Oh, you have officially been kicked out of the sportbike club. The Spyder had you facing the door....the big windshield was the boot in the ass....lol.
Ride on Flanker!


Sent from my iPhone using Tapatalk
 
it grows on you

i thought the exact same thing when i got mine ( madstad ) , but it grows on you after a while. i like the crazy mechanical look of it now. it also provides some protected space up on top of the dash. i have a small storage bag attatched there.:thumbup:
 

Attachments

  • _Preview_-91.JPEG
    _Preview_-91.JPEG
    73.4 KB · Views: 89
Hahaahha.... I hear you on the function over form thing... I road my bike for two months and thought "I can't put a tall windshield on the bike because it will destroy the look". Well I'm right there with you now because after my first 200+ mile trip I was ordering a taller windshield. I looked at the madstad I have no doubt it probably works the best of all tall shields available for the RS but I could not get over the look. I finally broke down and ordered the Calsci tinted shorty and really don't think it looks all that bad. And at $125 the price really sold me on the unit.
 
Well...............I spotted the "I used a ZX 14 R fender to get rid of my ugly R fender" thread in the DIY forum. Just so happens...................I own a ZX14, and the stock R fender lasted about a week before I dismounted it in favor of an RC fender eliminator kit. After looking at the OP's project pics; It was obvious the ZX14 fender wasn't nearly wide enough to cover a 225mm cross section tire. I could easily picture a nasty "goop stripe" up my back anytime it rained, or I had the misfortune to drive through manure :yikes: left all over the road by one of the local farmers. Fortunately Daltmeyer posted pics of his ZX14 fender mod...................he'd used a cut down rubber mud flap zip tied to the ZX14 fender to make it wider and longer; giving much better coverage of the R tire. Got a local metal shop cutting me a foot long piece of .5" x 1.5" aluminum flat stock to use as a shim/mount (haven't got it yet) for the ZX14 fender, and rounded up a Betty Boop rubber floor mat from Wally World today to use as my custom cut mud flap (gotta trim it to shape yet). I drilled out the rivets holding the ZX14 R reflectors and bungee cord brackets on, and ditched those. I had a problem with the ZX14 license plate light; as when I took the fender off my Ninja; I cut the license plate light wires off flush with the back of bulb assembly. After eyeballing the LP light assembly and brainstorming a bit; I remembered I had a left over white LED strip with 3M self adhesive tape on the back of it from the fender eliminator/license plate light project on the Suzuki M109R I recently sold. I yanked the incandescent ZX14 LP bulb and guts out of it's housing, whittled on the housing in a couple places with my Dremel tool; cut the LED strip in half (to 3 LEDs), stuck it to the bottom of the ZX14 LP light housing, and threaded the wires through my new wiring holes. I'll try and get pics in the next few days before I finish the rest of the project.
 
So much for plans. No pics, and the :cus:ing LED TL strip isn't working. Everything else came out OK though. Got the ZX14 R fender attached to the Spyder's under tail panel, and successfully attached my Betty Boop floor mat (black side out of course) attached to the ZX14 R fender. Looks pretty much like Daltmeyers project, so use your imagination. Oh yea! I'd like to thank BRP from the bottom of my heart on the wisdom of NOT using captured nuts on any of the Stock R fender strut mounts! Real piece of engineering brilliance (kinda like the internal oil filter thing) there! Gotta pull the new sport fender assembly apart now to trouble shoot the LP LEDs. Could be a bad connection; used bullet connectors between the LEDs wiring and the stock Spyder tail light wires, or a bad LED strip. Either way.................I gotta take the whole darn thing apart............................or just never ride at night! Did I mention that :cus:ing 1/2' thick pice of aluminum bar stock I had custom cut was worthless? WAY too thick..................had to buy a piece of 1/8" x 1.5" aluminum flat stock at the local hardware and start over from scratch. R & D sucks. Custom Sporty R fender looks much better than the stock POStuff though! Just think of the frivolous stuff I can buy now with all the money I saved by NOT buying that grossly over priced fugly POStuff sport fender from Can Am! Just sayin................
 
Last edited:
As an added bit of insult; I'd tightened the last of the 7 torx screws of the undertail, turned the ignition on, and checked the new CD LED center tail light for tail light and brake light function (both worked great), only to discover the stock R tail light bulb filament is out......................gotta take the whole shebang apart again to get the bulb out for a replacement! :cus: :cus: :cus: Stuff happens as they say. ;)


Hi Flanker, Heres a tip from some crazy Austrailians that might help you change tail lights next time:

http://spyderryders.net.au/tips.html

I did this trick while doing the rear fender mod.
 
Flanker, let me know how your spyder runs with the TBR and new air filter. I have the same setup. If yours pops and gurgles on deceleration, just let me know. Mine was horrible until I got the juicebox pro, power commander map for this exact setup. Now it purrs like a kitten. Runs better than when I drove it home from the dealer.
 
I've never had any problems with the way my Spyder runs (fingers crossed); though another 100 HP would be nice ;) . I've leaned out the low and mid range circuits by 15% over the base JBP #2 setting, and the high end circuit by 10%. Thinking about installing an AFR gage for real time monitoring.....................gotta do a little more research into that, before I pop the bucks and start hacking more :cus: up though! Thanks for your offer though.
 
Back
Top