Well, with the rainy season over the winter here, what better to do than install the farkles that were collecting when the weather was nicer, and I just wanted to
:riding:
I figured that I'd shared what I've added so far in case it gives others ideas on things that they just can't live without...
I started with a new 2015 RT-S SE6, which now has...
Power
PDM 60 electronic distribution unit, mounted under the left front access panel.
Dash-mounted dual USB jack, mounted in the left speaker grill
Dash-mounted coax power connecter for Gerbing heated gear controller
Comfort
Utopia backrest
Grip puppies
Gerbing dual-zone temperature controller for heated jacket liner and gloves
Lighting
Tricled turn signal (mirror mounted) LED's
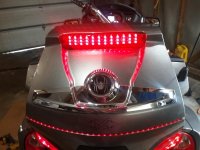
Tricled rear center brake LED strip
Lighted bumpskid with integrated LED strip
Audio/communications
Comet 2m antenna
Quansheng TG-UV2 2m/FRS/GMRS/70cm 2-way radio
SR10 Bluetooth unit for 2-way radio and Spyder audio
Cardio Packtalk bluetooth headset
Screaming Banshee horn (think about it...)
Custom entertainment cable by Doc (Thanks Doc!)
iPhone mobile communications device
Other electronics
Garmin Zumo 660LM GPS
SPOT GPS locator/tracker
FOBO TPMS
Flash-2-Pass garage door opener
Other
Baja Ron anti-swaybar(!)
[SUB]Still to be installed is my Baja Ron anti-SwayBar... I'm just chicken I guess, but given that I don't have a stable way to get it up high enough for me to safely install, and that I'm not that mechanically inclined, it'll probably wait until I head into the shop next month...
[/SUB]
Well, the sway bar has been installed by my local Spyder shop. They charged an extra 2 hours labor on top of a 4-hour 9.3k mile service. Yeow, but it does seem to make a noticeable difference.
It's been an interesting learning experience, but it's back to prime riding time and it'll be a while before I tear things apart most likely.
-Fratz
:riding:
I figured that I'd shared what I've added so far in case it gives others ideas on things that they just can't live without...
I started with a new 2015 RT-S SE6, which now has...
Power
PDM 60 electronic distribution unit, mounted under the left front access panel.
Dash-mounted dual USB jack, mounted in the left speaker grill
Dash-mounted coax power connecter for Gerbing heated gear controller
Comfort
Utopia backrest
Grip puppies
Gerbing dual-zone temperature controller for heated jacket liner and gloves
Lighting
Tricled turn signal (mirror mounted) LED's
Tricled rear center brake LED strip
Lighted bumpskid with integrated LED strip
Audio/communications
Comet 2m antenna
Quansheng TG-UV2 2m/FRS/GMRS/70cm 2-way radio
SR10 Bluetooth unit for 2-way radio and Spyder audio
Cardio Packtalk bluetooth headset
Screaming Banshee horn (think about it...)
Custom entertainment cable by Doc (Thanks Doc!)
iPhone mobile communications device
Other electronics
Garmin Zumo 660LM GPS
SPOT GPS locator/tracker
FOBO TPMS
Flash-2-Pass garage door opener
Other
Baja Ron anti-swaybar(!)
[SUB]Still to be installed is my Baja Ron anti-SwayBar... I'm just chicken I guess, but given that I don't have a stable way to get it up high enough for me to safely install, and that I'm not that mechanically inclined, it'll probably wait until I head into the shop next month...
[/SUB]
Well, the sway bar has been installed by my local Spyder shop. They charged an extra 2 hours labor on top of a 4-hour 9.3k mile service. Yeow, but it does seem to make a noticeable difference.
It's been an interesting learning experience, but it's back to prime riding time and it'll be a while before I tear things apart most likely.
-Fratz
Last edited: