Lamonster
SpyderLovers Founder
I've always thought the Spyder had some pretty good lights for being stock. I live out in the country and when it gets dark out here it's really dark. I saw where BRP offers a HID kit for $1300 bucks and I couldn't see where any light would be worth $1300 bucks. :dontknow: Now that I have my No Magic Neon HID kit in I can see why they are so much better than stock. These things are really bright and it makes the stock lights look like they are running on 6 volts instead of 12. The price is much better too and now I'm thinking it's a worth wild mod for safety if nothing else. People are going to see you going down the road night or daytime. :doorag:
The install was not too bad. It would be a little more work than changing out a stock bulb if it burned out. Getting the bulb in and out is the hardest part.
First thing you need to do is pop out the instrument cluster. That's about as easy as it can be. Just take a small flat screwdriver and poke it in the slotted hole on top of the dash and then pull on the corner of the gauges until it pops out. Do the same thing on the other side and just tilt it out of the dash. I unplugged mine for more room. Trust me you're going to need it.

Now that you have that out of the way you'll see two tubes with a rubber cap on them. Go ahead and pull the cap off and you'll see the back of the bulb that holds the light.

Grab the plug and turn it counter clockwise until it pops out.

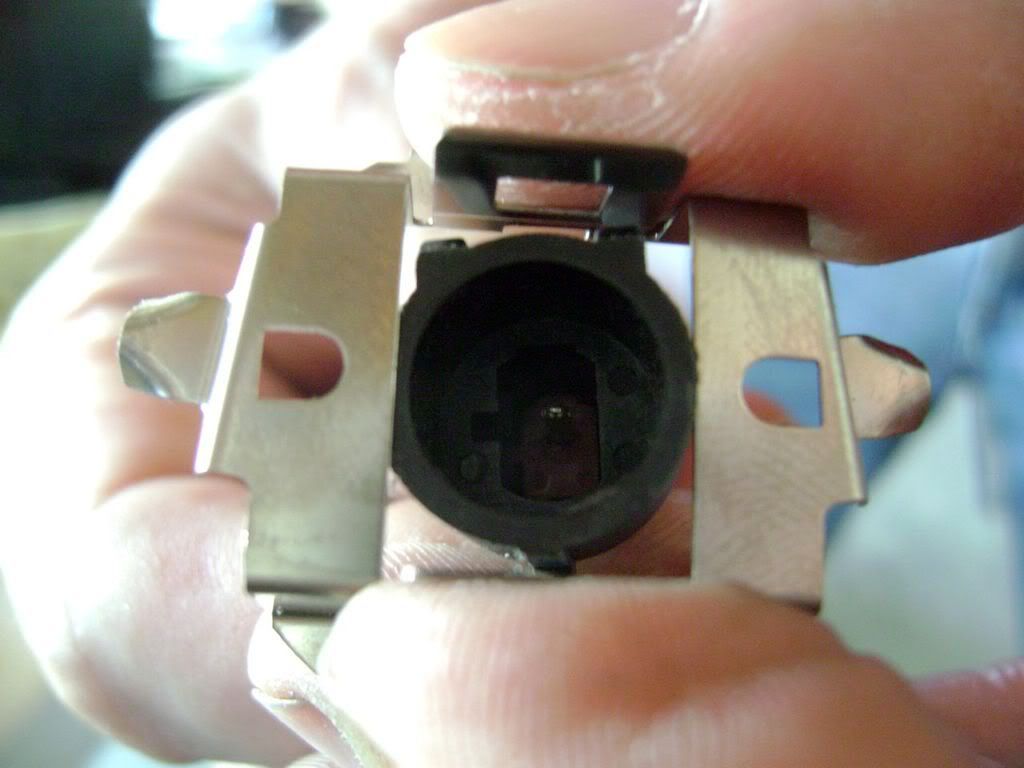
Now unplug the wires from the bulb and remove bulb holder from socket by opening locking tabs on each side of holder. This is what you will have in your hand.

There are two little tabs that locked in the stock bulb. We are going to remove those so the new thicker bulb can sit flush for mounting. I just used some needle nose to bend the one tab down and to break the other one off. I guess you could grind those off too with a small grinder. Bending and breaking worked fine for me. :doorag:

Now insert large female connector from HID bulb through locking plate hole. The first one I filed a bit to get it to go but on the second one I was able to push it through. It's a very tight fit but it will go if you try. Now pass smaller male connector through hole in locking plate.

If you look at this pic you can see why we had to break and bend those two little tabs out of the way. You want the bulb to sit nice and flush with the keeper.

Now here comes the tuff part. You need to install the bulb back in the holder. There are two tabs that lock into bolt heads. That's why they twist out so now you're going to twist them back in. This bulb has a little bit thicker plate so you need to bend them just a bit to get them to tuck under the bolt heads. It was a pain and with my big hands I decided to just take the top of the dash off so I could see what I was doing and so I could take a good picture of what you need to lock into. Just make sure they are locked in good.

The rest of the install from here is gravy. Cut a little slit in the rubber cap big enough to pass the two wires from the bulb through and to pass the pigtail wires to the plug that connected to the stock bulb.
Connect the red wire from the pigtail the white wire on the stock plug using the spade connector on the pigtail. Plug the black wire on the pigtail to the brown wire on the stock plug.
Stuff the stock plug back in the tube and reinstall rubber cap.
Now plug all three connectors to the HID ballast unit.

You can test the light now by pressing the trunk light switch on the right bar. This will give you an idea how bright these puppies are. This picture didn't show as well as I hoped but it is a huge difference.

Now do the same thing for the other side and zip-tie the ballast together and out of the way making sure all wires are free from any moving parts. Hope this helps. :doorag:

By the way if your thumbs look like this don't feel like the Lone Ranger.

The install was not too bad. It would be a little more work than changing out a stock bulb if it burned out. Getting the bulb in and out is the hardest part.
First thing you need to do is pop out the instrument cluster. That's about as easy as it can be. Just take a small flat screwdriver and poke it in the slotted hole on top of the dash and then pull on the corner of the gauges until it pops out. Do the same thing on the other side and just tilt it out of the dash. I unplugged mine for more room. Trust me you're going to need it.
Now that you have that out of the way you'll see two tubes with a rubber cap on them. Go ahead and pull the cap off and you'll see the back of the bulb that holds the light.
Grab the plug and turn it counter clockwise until it pops out.
Now unplug the wires from the bulb and remove bulb holder from socket by opening locking tabs on each side of holder. This is what you will have in your hand.
There are two little tabs that locked in the stock bulb. We are going to remove those so the new thicker bulb can sit flush for mounting. I just used some needle nose to bend the one tab down and to break the other one off. I guess you could grind those off too with a small grinder. Bending and breaking worked fine for me. :doorag:
Now insert large female connector from HID bulb through locking plate hole. The first one I filed a bit to get it to go but on the second one I was able to push it through. It's a very tight fit but it will go if you try. Now pass smaller male connector through hole in locking plate.
If you look at this pic you can see why we had to break and bend those two little tabs out of the way. You want the bulb to sit nice and flush with the keeper.
Now here comes the tuff part. You need to install the bulb back in the holder. There are two tabs that lock into bolt heads. That's why they twist out so now you're going to twist them back in. This bulb has a little bit thicker plate so you need to bend them just a bit to get them to tuck under the bolt heads. It was a pain and with my big hands I decided to just take the top of the dash off so I could see what I was doing and so I could take a good picture of what you need to lock into. Just make sure they are locked in good.
The rest of the install from here is gravy. Cut a little slit in the rubber cap big enough to pass the two wires from the bulb through and to pass the pigtail wires to the plug that connected to the stock bulb.
Connect the red wire from the pigtail the white wire on the stock plug using the spade connector on the pigtail. Plug the black wire on the pigtail to the brown wire on the stock plug.
Stuff the stock plug back in the tube and reinstall rubber cap.
Now plug all three connectors to the HID ballast unit.
You can test the light now by pressing the trunk light switch on the right bar. This will give you an idea how bright these puppies are. This picture didn't show as well as I hoped but it is a huge difference.
Now do the same thing for the other side and zip-tie the ballast together and out of the way making sure all wires are free from any moving parts. Hope this helps. :doorag:
By the way if your thumbs look like this don't feel like the Lone Ranger.


") You need to install the bulb back in the holder. There are two tabs that lock into bolt heads. That's why they twist out so now you're going to twist them back in. This bulb has a little bit thicker plate so you need to bend them just a bit to get them to tuck under the bolt heads. It was a pain and with my big hands I decided to just take the top of the dash off so I could see what I was doing and so I could take a good picture of what you need to lock into. Just make sure they are locked in good.
You need to install the bulb back in the holder. There are two tabs that lock into bolt heads. That's why they twist out so now you're going to twist them back in. This bulb has a little bit thicker plate so you need to bend them just a bit to get them to tuck under the bolt heads. It was a pain and with my big hands I decided to just take the top of the dash off so I could see what I was doing and so I could take a good picture of what you need to lock into. Just make sure they are locked in good.