• There were many reasons for the change of the site software, the biggest was security. The age of the old software also meant no server updates for certain programs. There are many benefits to the new software, one of the biggest is the mobile functionality. Ill fix up some stuff in the coming days, we'll also try to get some of the old addons back or the data imported back into the site like the garage. To create a thread or to reply with a post is basically the same as it was in the prior software. The default style of the site is light colored, but i temporarily added a darker colored style, to change you can find a link at the bottom of the site.

Drive Belt Change

Wascoman

New member
I'm changing the drive belt on my 2015 RT because I got a rock in the old one. Looked at Youtube but can't find anything covering this job. I found several videos on changing the rear tire and/or aligning the belt on the rear sprocket, but nothing about getting the belt off of the front sprocket.

It looks to me like I will have to remove the metal piece below the side plastic, the one that the driver's and passenger's foot rests mount to, in order to get the old belt off.

Is this correct? Are there any secret to removing this metal piece? Will I lose fasteners inside? Do I have to remove the upper plastic first?

I'd really love to hear from someone who has changed their own belt on a 1330 RT. Thanks.
While your in there check for the Dreaded Red Dust on the front sprocket .....if you find any there are dozens of posts here to help you fix it ..... Mike :ohyea:
 
Granted, the belt has to come off of the rear sprocket, but it also has to come off of the front sprocket and it can't do that until some cladding is removed so that the belt can slip out over a piece of the frame that is used to mount the metal pieces I mentioned in my post. Sorry for the convoluted description.
 
I'm changing the drive belt on my 2015 RT because I got a rock in the old one. Looked at Youtube but can't find anything covering this job. I found several videos on changing the rear tire and/or aligning the belt on the rear sprocket, but nothing about getting the belt off of the front sprocket.

It looks to me like I will have to remove the metal piece below the side plastic, the one that the driver's and passenger's foot rests mount to, in order to get the old belt off.

Is this correct? Are there any secret to removing this metal piece? Will I lose fasteners inside? Do I have to remove the upper plastic first?

I'd really love to hear from someone who has changed their own belt on a 1330 RT. Thanks.
Basically follow the instructions from removing the rear wheel. Once the belt is walked off the rear pulley, it easily comes off the front one with the drivers side tupperware removed back the side case. To get the new belt on you are going to most likely have to mess with the tension/alignment adjustments. So you will need some big boy tools.

https://www.amazon.com/gp/product/B01J42WOIA/ref=ppx_yo_dt_b_asin_title_o01_s00?ie=UTF8&psc=1

I used this with my torque wrench 117 ft lbs equaled the 166 ft lbs required for my 2018 rear axle nut.

https://www.amazon.com/gp/product/B07W741G7K/ref=ppx_yo_dt_b_asin_title_o04_s00?ie=UTF8&psc=1
 
Granted, the belt has to come off of the rear sprocket, but it also has to come off of the front sprocket and it can't do that until some cladding is removed so that the belt can slip out over a piece of the frame that is used to mount the metal pieces I mentioned in my post. Sorry for the convoluted description.

On my 2018 we did not have to do that, if you walk off the top first, and the reverse going back on.
 
Would not the one for removing the rear tire be the same? To remove the rear tire the belt has to come off.

Correct, except it is going to have to adjust for a new belt. I left the left adjust the same(belt tension) and adjusted the Right a quarter turn to move the belt away from the rear pulley flange a bit. I was installing a new tire.
 
You do not have to remove the rear tire walk the belt off the rear pully then take off the 3 bolts that holds the bar that is connecting the left side to the right side right at the rear floor board look under the bike and you will see the bar you will have to take off some Tupperware to get to the bolts. Installing my belt next week.
 
You do not have to remove the rear tire walk the belt off the rear pully then take off the 4 bolts that holds the bar that is connecting the left side to the right side right at the rear floor board look under the bike and you will see the bar you will have to take off some Tupperware to get to the bolts. Installing my belt next week.

It'd be so great if you did a video (hint, hint).
 
You do not have to remove the rear tire walk the belt off the rear pully then take off the 4 bolts that holds the bar that is connecting the left side to the right side right at the rear floor board look under the bike and you will see the bar you will have to take off some Tupperware to get to the bolts. Installing my belt next week.

I think that the "bar" you are talking about is my issue. There is a steel member projecting out from the frame that is inside the belt where the belt is near the front sprocket. I think that you're saying if I dis-connect this "bar" from the metal-foot peg support, I can work the belt out that way. Right?
 
Basically follow the instructions from removing the rear wheel. Once the belt is walked off the rear pulley, it easily comes off the front one with the drivers side tupperware removed back the side case. To get the new belt on you are going to most likely have to mess with the tension/alignment adjustments. So you will need some big boy tools.

https://www.amazon.com/gp/product/B01J42WOIA/ref=ppx_yo_dt_b_asin_title_o01_s00?ie=UTF8&psc=1

I used this with my torque wrench 117 ft lbs equaled the 166 ft lbs required for my 2018 rear axle nut.

https://www.amazon.com/gp/product/B07W741G7K/ref=ppx_yo_dt_b_asin_title_o04_s00?ie=UTF8&psc=1

I have a 36 mm wrench that I bought when I changed my rear tire, and my torque wrench goes high enough for me to torque the axle nut sufficiently. As far as belt tension, I purchased a Dayco belt tension gauge but it hasn't arrive yet. Hopefully it will allow me to get the correct tension in the new belt - if I can ever get the old one fully off.
 
I have a 36 mm wrench that I bought when I changed my rear tire, and my torque wrench goes high enough for me to torque the axle nut sufficiently. As far as belt tension, I purchased a Dayco belt tension gauge but it hasn't arrive yet. Hopefully it will allow me to get the correct tension in the new belt - if I can ever get the old one fully off.

Well then except for the tupperware you already have the T-shirt, Cap and merit badge, go for it!
 
I think that the "bar" you are talking about is my issue. There is a steel member projecting out from the frame that is inside the belt where the belt is near the front sprocket. I think that you're saying if I dis-connect this "bar" from the metal-foot peg support, I can work the belt out that way. Right?
Yes that what I am going to do it
 
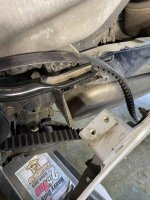
Well, I plunged ahead and, like everything else with the Spyder, it was more work than I first envisioned.

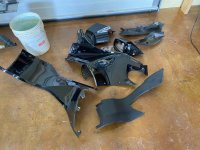
In order to get the belt off the front sprocket, you must take all of the Tupperware off on the left side, from the rear of the frunk to the front of rear bags.
IMG_1402.jpg

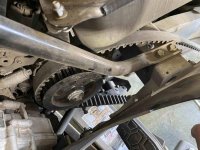
Next, you have to remove the aluminum? casting, which is the mount for the driver's and passenger's foot pegs. This is held on to the frame in the front by (3) 13mm bolts (two in the top which go into the frame member after passing thru the round angular brace, and one in the side of the same assembly. These bolts go into threaded inserts so there are no nuts involved. Next, this same casting is attached to the structure of the bike at the rear (near the rear bags) by two 10mm bolts which thread into the casting from the inside. Again no nuts.

IMG_1398.jpg

Then, I had to pry the round brace up away from the frame so that the old belt would come out. Same procedure to slide the new belt in.
IMG_1400.jpg

All in all, a tedious, but not technically difficult job. I won't be re-assembling things until I receive my Dayco belt tension gauge.

Thanks for all of the advice. If somebody knows of an easier way I would love to hear about it. Somebody really should do a Youtube video.
 
Well, I plunged ahead and, like everything else with the Spyder, it was more work than I first envisioned.

In order to get the belt off the front sprocket, you must take all of the Tupperware off on the left side, from the rear of the frunk to the front of rear bags.
View attachment 189581

Next, you have to remove the aluminum? casting, which is the mount for the driver's and passenger's foot pegs. This is held on to the frame in the front by (3) 13mm bolts (two in the top which go into the frame member after passing thru the round angular brace, and one in the side of the same assembly. These bolts go into threaded inserts so there are no nuts involved. Next, this same casting is attached to the structure of the bike at the rear (near the rear bags) by two 10mm bolts which thread into the casting from the inside. Again no nuts.

View attachment 189579

Then, I had to pry the round brace up away from the frame so that the old belt would come out. Same procedure to slide the new belt in.
View attachment 189580

All in all, a tedious, but not technically difficult job. I won't be re-assembling things until I receive my Dayco belt tension gauge.

Thanks for all of the advice. If somebody knows of an easier way I would love to hear about it. Somebody really should do a Youtube video.

Nice job ...... Did you check for " Red Dust" on sprocket face ?????? ......Mike :thumbup:
 
.....

All in all, a tedious, but not technically difficult job. I won't be re-assembling things until I receive my Dayco belt tension gauge.

Thanks for all of the advice. If somebody knows of an easier way I would love to hear about it. Somebody really should do a Youtube video.
Sorry, didn't find your thread until too late. You pretty much did all you needed to do but you could have saved a wee bit of time, I'll mention it here just incase someone else can use the info...once you got the main bolts slack on the aluminium side panel, the two bolts out of the top stay and the two M6 screws out of the frame/side panel, if you take a wide blade flat screwdriver and slide it between the steel stay and the top of the aluminium pad towards the rear of the pad, you can rotate the screwdriver 90° and it opens up the gap for you to slide the belt into. This will trap the belt between the two surfaces. You then twist the screwdriver to remove it and move it to the other side of the belt and twist it to again open up the space so the belt can slide right through. Remove the old belt and slide in the new one, move the screwdriver back to the rear side and again twist it to open the gap and then move the new belt right through. As usual it sounds tricky in words but it's dead easy in practise.

It you walked the belt off your rear sprocket rather than taking the whole shebang apart, after you walk the new belt on you may find the tension and alignment is ok. Check it out before messing with the rear adjustment.
 
Back
Top