• There were many reasons for the change of the site software, the biggest was security. The age of the old software also meant no server updates for certain programs. There are many benefits to the new software, one of the biggest is the mobile functionality. Ill fix up some stuff in the coming days, we'll also try to get some of the old addons back or the data imported back into the site like the garage. To create a thread or to reply with a post is basically the same as it was in the prior software. The default style of the site is light colored, but i temporarily added a darker colored style, to change you can find a link at the bottom of the site.

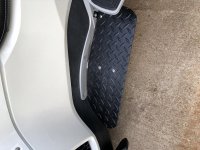
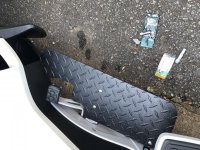
DIY 2012 RTL floorboards

Lookin' pretty good to me!! :thumbup:

Maybe you could add a quick touch of black paint to those shiny bolt heads on the boards and the brackets too, just to make them blend in a bit better?! :dontknow:

Your call, they certainly look as tho they'll do the job, and probably keep juust a bit more spray off your feet than some?! :rolleyes:

That’s the plan to paint the screw heads. All the screws and nuts are stainless, so no rust. Just need a good warm day to do it, boards are painted with bed liner.
 
Very nice. I did something very similar with aluminum diamond plate, though I didn't paint them. Way cheaper than buying a set.
 
The diamond plate came from a scrap yard and the color didn’t exactly match even after polishing, so I sprayed the with bed liner. $14.00 worth of aluminum and about $20.00 in supplies and hardware. Can’t beat them.
 
Can you elaborate on the attachment? Pics possibly? Thanks Dave

His are similar to mine ..... I can't tell if He bent His or not ??? ...... my boards are not bent, after taking the oem rubber pads off the pegs, I mounted the boards using the oem angle and hardware ...... the rear of mine are a bit higher in the rear , they will be just ABOVE the bolt head shown in His pics, so my bracket is hidden under the board completely ...... the reason I went with the same angle as the pegs were to make sure the Brake Pedal could be FULLY applied in a Panic stop..... it's hard to tell if His can do that ..... On the RT-S and RTL the oem boards can drop lower in the front in a Panic stop ..... I haven't found my angle to be un-comfortable ..... it feels right ...... Mike :thumbup:
 
I haven’t had a chance to take more pictures yet. I put a 1” square tubing spacer between my brake pedal rubber pad and brake arm to allow for panic braking. Works great.
 
Back
Top