• There were many reasons for the change of the site software, the biggest was security. The age of the old software also meant no server updates for certain programs. There are many benefits to the new software, one of the biggest is the mobile functionality. Ill fix up some stuff in the coming days, we'll also try to get some of the old addons back or the data imported back into the site like the garage. To create a thread or to reply with a post is basically the same as it was in the prior software. The default style of the site is light colored, but i temporarily added a darker colored style, to change you can find a link at the bottom of the site.

Did oil change & checked level properly; NO oil showing on dip stick - any ideas?

Here's the dipstick out of my F3S
View attachment 211786
Thank you sir. My dip stick measures right at 16 inches like yours... same as my older 2015 F3.

Is it possible to measure how much oil you drained out? I’m not sure this will tell you a lot but might be interesting to know.

Poasttown 2019 F3L
I drained around 5 quarts out of the bike when I did my recent oil change. I did not measure exactly, but I filled up about 5 of the quart containers with the old used oil. Bike seems to have had around the correct amount of oil in it before I changed it. I didn't see any oil on the dip stick before I changed the oil.
 
Last edited by a moderator:
At the end of the day, I believe the issue with you guys who don't think there's any oil on your dip sticks is stemming from the oil being too clean, so maybe using the paper towel trick would help? Good luck anyway, I hope you work it out!!
 
I dunno what BRP genius decided to make the level indicator moulded on the end of the dipstick 'fresh oil' colour. :rolleyes:

I followed the manual's instructions for checking the level but just couldn't reliably read the oil level, so I gave up. I now just pour in the manual's recommended volume of oil... 4.7L (5qt US) when doing engine oil and oil filter replacement.
Mariner, I just kept reading until I found yours. That is exactly what I do, hot/warm drain, then dump 5 quarts back in, button up, and ride. We all pretty much agree that stick is difficult to read at best. If you really must check the dip, then after a nice leisurely ride, shut it down, let it sit for a few mins, then check the stick, and read it with a paper towel if ya can't read the stick, as described in this thread.
 
I solved my no oil visible on dip stick issue.

I discovered that the previous owner had taken my Spyder to his local dealer for warranty work not long before he sold the bike to me. When pressed, he admitted that he had also encountered the no oil visible on dip stick issue but only after that warranty work was done. Before the warranty work, he said he could always see oil on the dipstick.

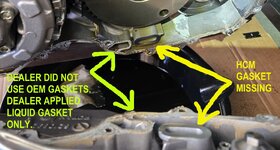
The warranty work required the dealer to remove the clutch cover. I consulted the Can-Am service manual, and it said one possible cause of the no oil visible on dipstick issue could be a missing HCM gasket inside the clutch cover. I decided to remove the clutch cover myself to see if the HCM gasket was missing, and it was!

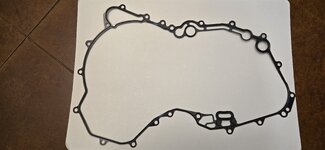
I discovered that the dealer did not install the metal OEM clutch cover gasket nor the small rectangular rubber HCM gasket that comes with the gasket kit. The dealer instead just used liquid gasket around the outer periphery of the clutch cover. The dealer made no attempt at sealing the interface where the HCM gasket goes. I installed a new OEM clutch cover gasket and HCM gasket. I now can see oil on my dipstick. Problem solved!
I've attached a photo of what I found when I removed the clutch cover and a photo of the new OEM gasket and HCM gasket kit I installed.

MODIFIED PHOTO SHOWING DEALER ERROR REALLY smaller.jpg - clutch cover gasket.jpg
 
You will never drain all the oil that is in there out when you change the oil. Some oil is coating the inner walls and some is stuck in galleries and doesn't completely drain out. The amount of oil required in the manuals (unless the manual specifically says different) is the amount required for filling a clean, dry, engine. If you put in the amount required for a clean dry engine, it will overfill by the amount left of the old oil which did not drain out. Even an unlevel position on a set of ramps or a lift can affect how much oil will drain. When you lower it to the floor and get it back on the springs is when you will be checking how much it takes.

Once you determine the exact amount required for an oil and filter change to bring the dipstick level to where you want it. Write that amount down (in the manual, or on the side of your toolbox, or somewhere it won't get lost.) That will be the amount you will be putting back in for an oil change, instead of whatever the specifications say is the amount required. You have to compensate for oil that does not drain out or for different conditions, such as changing oil, but not the filter... Filters are not expensive and I always change them, but some may not.

Get a quart, clear measuring cup with a pour spout, like is used for cooking to accurately measure the oil. If you're single, just take the one from the kitchen and buy another one later. If you're married, you need to go buy one for the shop, or you will be single.
 
I know this isn't "by the book", but I changed my own oil, adding the correct amount per the manual, so I know it's correct.
Using the paper towel method, I verified that the hot oil level is just over halfway between the add and full bulbs on the dipstick.
Now, every tank or two of gas, I start the bike cold, let it idle for 30 seconds or so, and check the oil with it running.
The cold oil, being thicker, is easy to see on the dipstick, and it just covers the add oil bulb.
Doing it this way verifies that I have sufficient oil to supply the pump, and I know the hot level will rise somewhat when hot, as hot oil will drain down to the scavenge pump and get pumped back to the tank faster than when cold.

I have experience with racing dry sump systems, and the oil level on those is always checked when idling.

______________________________________________________________________
I check mine when I pull it back inside the shop and shut it off after riding. Before riding, if there is no large puddle of oil under it on the floor, it is all good to go. It stays inside a locked shop and nobody else rides it.
 
I solved my no oil visible on dip stick issue.

I discovered that the previous owner had taken my Spyder to his local dealer for warranty work not long before he sold the bike to me. When pressed, he admitted that he had also encountered the no oil visible on dip stick issue but only after that warranty work was done. Before the warranty work, he said he could always see oil on the dipstick.

The warranty work required the dealer to remove the clutch cover. I consulted the Can-Am service manual, and it said one possible cause of the no oil visible on dipstick issue could be a missing HCM gasket inside the clutch cover. I decided to remove the clutch cover myself to see if the HCM gasket was missing, and it was!

I discovered that the dealer did not install the metal OEM clutch cover gasket nor the small rectangular rubber HCM gasket that comes with the gasket kit. The dealer instead just used liquid gasket around the outer periphery of the clutch cover. The dealer made no attempt at sealing the interface where the HCM gasket goes. I installed a new OEM clutch cover gasket and HCM gasket. I now can see oil on my dipstick. Problem solved!
I've attached a photo of what I found when I removed the clutch cover and a photo of the new OEM gasket and HCM gasket kit I installed.

View attachment 212322 - View attachment 212323
I got to ask, if all you did was replace the gaskets and seals that the shop didn't put in there and now you are showing oil on your dipstick the way it should. Where was the oil going?
 
I believe that the scavenge pump will not be able to do its job. Therefore oil will not return to the RESERVOIR.
This will look like low oil level. So the correct gaskets/seals allow the pump to operate correctly. This fixed the problem. Hope this helps everyone.
Fixed it for you, Blue! ;)

The oil on our Spyders doesn't have a real 'sump' to return to, just the scavenge points/pick-ups and the Reservoir, which is where the dipstick does it's 'oil level' reading.

But you're right, without that HCM Gasket, the scavenge pumps won't be able operate correctly in order to return the oil to the reservoir properly, leaving it puddling around in places where it shouldn't really puddle, and there might even be a moment or three on start-up where the pumps have little or no oil to circulate to anything... 😖

I wonder how long it's been starting like that?! :unsure:
 
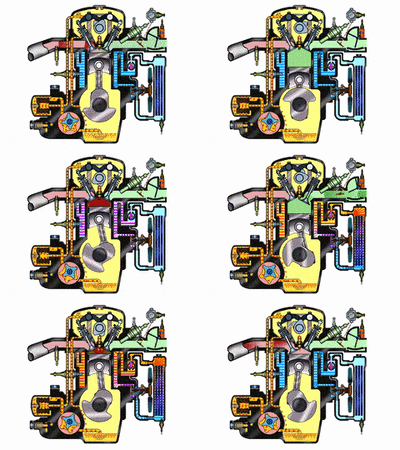
How the four stroke engine works;
engine-2.gif
On the right side is the cooling system connected to the water jacket of the engine. When the thermostat is open it routes water therough the radiator to cool it down. The thermostat closes when the water drops below the ideal operating temperature.

On the left side is the oiling system. It sucks oil out of the lower crankcase using a postive dispalement gerotor pump, sends the oil through the filter, and the filtered oil goes up the lines to lubricate all the moving parts of the valve train under the valve cover, and eventually drains back into the lower oil sump after it has lubricated the moving parts.

Just above the cooling system on the right side the green is the air coming in, given a shot of misted fuel from the fuel injection, then it enters the combustion chamber by the intake valve, the valves both close, ignition fires, the exhaust valve opens to clear the hot gas out the left side, and allow room to pull in another combustion chamber of cool air and fuel mist.

These systems are not actually on the right or left of a real engine. That is just to explain the illustration. They work the same where ever they are located.
 
Last edited:
My method which is just my choice, remove filter, let the oil drain for 30 mins or so, replace filter, install drain plugs remember to replace crush washers. Refill with the exact amount shown in the book with a scant pint more and go. If there is no oil leaks, that's it. What can possibly be wrong with that?
 
My method which is just my choice, remove filter, let the oil drain for 30 mins or so, replace filter, install drain plugs remember to replace crush washers. Refill with the exact amount shown in the book with a scant pint more and go. If there is no oil leaks, that's it. What can possibly be wrong with that?
My method pretty much mimics yours except I use the drain pan as my guide as to how much oil drains out, and therefore how much to refill with. My last oil change (1 week ago ) drained 5 qts exactly. I refilled 5 qts, checked the stick and was good to go. Have to agree though, there is definitely not a set amount that equals all machines. It's all trial and error, at first.
 
On the first oil change, I put the exact amount of oil back in that was specified in the manual. It was slightly over filled when checked by the proper method. Used a hand operated vacuum pump with a catch jar to remove a little of the oil. Measured the oil removed, subtracted that from the amount the book said put in, and wrote that down. After 2 times removing some of the oil with the vacuum jar, the level was exactly where I wanted it. I wrote that down on an old smart phone that is not activated. I just use it to store part numbers and parts needed for certain jobs, and it stays in a tool box in the shop. Before starting any repeat jobs I look at what is in the old smart phone to see if I have all the parts on hand to do the jobs. After the first time when I had to remove some to get the level where I wanted it, the amount to add to get to that level has always put it just right on every oil change since.

The oil amount and parts needed, o-rings, etc. is also written on a blank back page in the Can Am manual.
 
Back
Top