• There were many reasons for the change of the site software, the biggest was security. The age of the old software also meant no server updates for certain programs. There are many benefits to the new software, one of the biggest is the mobile functionality. Ill fix up some stuff in the coming days, we'll also try to get some of the old addons back or the data imported back into the site like the garage. To create a thread or to reply with a post is basically the same as it was in the prior software. The default style of the site is light colored, but i temporarily added a darker colored style, to change you can find a link at the bottom of the site.

Dash went black & I couldn't shift - blown fuse! No idea why...

BamaJohn

Active member
Yesterday, I suited up and went out for a ride. Key "on", Spyder fired right up...but when I tried to put it into reverse, the dash went black and the left hand switch cluster went dead.
Having replaced the left hand switch cluster a few months ago, my worst fear was that it had crapped out again.
But, thinking through the sequence of events and the suddenness of the blackout, I got the owners manual out and checked the fuse boxes diagrams and the culprit was a blown #7 fuse (10amp) in the left hand fuse box...an easy fix.

I have no idea why the fuse blew, but the ride yesterday (about 100 miles with multiple stops and restarts) was uneventful. Perhaps I should include a fuse puller in my tool kit....:thumbup:

edit: FYI...there are a few spare fuses in the cover of the left hand fuse box.
 
Last edited:
Glad that replacing the fuse worked for you, but the fact that the fuse burnt means that something caused the circuit to draw excess current indicating that it may happen again. You indicated that multiple starts and stops on your ride were all good but you seemed to indicate that when you attempted to put the bike into reverse the fuse burnt. I would pay real close attention to the reverse sequence as something in that sequence probably caused the problem. Good luck.
 
There are all kinds of reasons for that to happen, maybe you washed it and got some water where water don't belong, maybe when your last go around with your dash and switches weaken the fuse and a spike in voltage for whatever reason finished it off! You're on the right page with having a few fuses in the bike just in case, the hard part with electrical gremlins is that until they rear their ugly heads, their hard to find! You may want to recheck any connections that was played with in your last repairs to make sure their tight and right, and no pinched wires. Myself when I take a connector apart, I like putting a little dielectric grease on them, keeps the water out! Good luck, I hope that gremlin stays away from you!!!
 
Thanks Bert...that was the first and only time it happened in 31K miles. An upcoming 1,000 mile trip 13 days from now makes me consider replacing it.
 
Last edited:
I don't know about your bodywork but the solenoid is not too difficult to access on my 2014 RT. As part of your end-to-end visual inspection, perhaps a drop or two of light oil (eg 3-in-1) may be sufficient for reliable operation and certainly cheaper than replacement.

My only road trip suggestions are refuel at name-brand stations that appear well maintained and kinda busy for freshness and to avoid overfilling the tank because that can create weird problems, especially if refueled after a hot run and then left parked.

Best wishes on your trip. Hope the autumn colors are out for you.

Thanks Bert. I appreciate your learned comments.
Gasoline for all my vehicles is Chevron with Techron; Shell; BP; or some other top tier station. Got caught in South Dakota last summer, needing any gasoline that I could find... I'll try to not let that happen again.
 
Last edited by a moderator:
Well, the gremlin bites again....
About 4 weeks ago, during a day ride, the fuse immediately blew when I was turning around and put the Spyder in reverse. As I stated above, I had extra fuses and a fuse puller, so it only caused a slight delay in my ride.
But, yesterday (Christmas Eve) I wanted to go riding around noon, so got all dressed out, and started the Spyder...hit the "R" button and the fuse immediately blew again! Immediately I remembered Bert Remington's post predicting repeat performance(s) of this issue. 👾
I located the Reverse Actuator Solenoid and sprayed De-Ox on the shaft, then manually worked the shaft in-out about 6 times; installed a new fuse; held my breath; and cranked the Spyder....all worked fine. BUT....I admit that I'm not very trusting that the issue won't repeat again, and am now considering replacing the Reverse Actuator Solenoid. The part is $80, and I'll do the work, so it's not a deal-breaker, just frustrating.
Has anyone else had this problem or, am I just the lucky one?
 
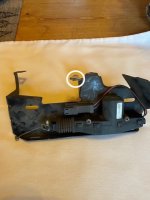
On January 5 I replaced the "reverse actuator assembly" p/n 219800522 on my 2020 Spyder RT STD.

Procedure:
  • Raise Spyder about 18"
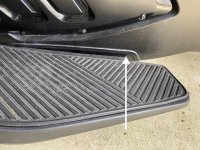
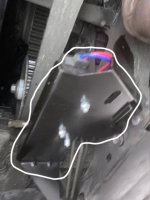
  • Remove ALL left side body panels, including floorboard and passenger foot peg. (The solenoid is just inboard of the side frame behind the lefthand floorboard, with a small cable going forward to the shift shaft)--(see Photos)
  • Small hands are a plus at this point
  • Disconnect the modular electrical connector at the solenoid
  • Remove the forward and lower 10mm bolts holding the assembly in place, then loosen (do not remove) the top bolt (it acts as a hanger bolt for the install of new assembly). (see photo)
  • At the attachment point to the shift shaft, rotate the assembly so that the small cable is vertical and remove the cable, leaving it attached to the solenoid (see photo)
Installation of the new assembly is the reverse of removal.

location of rev actuator.jpg - Reverse Actuator Assy.jpg - rev actuator top bolt.jpg
 
Last edited:
Did you put and dielectric grease in that plug boot? It does ride in the crap and water! Good job and I hope that's your issue and not a short in the hand controls.
 
Did you put and dielectric grease in that plug boot? It does ride in the crap and water! Good job and I hope that's your issue and not a short in the hand controls.
Yes, the whole assembly rides in the weather. And yes, I did put a little dielectric grease in the connector... although the male part of the connector has double o-rings to seal the joint.
The actual piston that slides in/out of the solenoid has an accordion rubber boot that is tight on shoulders at both ends.
I have not bench-tested the original actuator yet... have to make up a pigtail with a 10amp fuse inline first, plus some kind of physical resistance to mimic the shaft pull. (I'll try it with NO resistance first.)
Cramming the connection void full of dielectric grease for terminals that see weather is a very good idea. It doesn't hurt to fill it until the grease squirts out the side, if needed, and just wipe off the extra. Just putting a little on the pins is not nearly as fool proof.
 
Back
Top