cmbspyderrss
New member
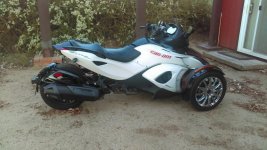
2014 Spyder RS-S SE5
ST Limited Wheels
Comfy Mod #1:
Based on Forum input I decided to install RT Handlebars. Being a cheapskate, I decided to change my stock bars to RT bars myself. All the research I did lead me to believe it was a 2hr swap. We will just say it wasn’t. The Full-blown service manual is garbage. You have to find one thing, flip to another section which has you flip to another section. Not anything is a step by step and I have no idea how the Spyder techs do their jobs. They must be specifically trained on shortcuts or magic trick to doing any modification or maintenance on Spyders. Truly frustrating.
In short, I somehow damaged the DESS and ruined the tumbler on my ignition. I had to buy a new Ignition switch, tumbler(s) and keys. I figured since I screwed it up the first time, I would have the dealer put it back together. The RT bars were fairly cheap but you add in the Ignition, Keys, reprogram of the keys and dealer labor it was a $750 learning experience. I will never do anything other than a bolt item in the future. Oil changes etc the dealer can do from now on.
Overall a Night and Day difference just sitting on the Spyder. For me, the RT bars are 100% perfect. Instead of the “Tucked Super Bike” riding position, you are more in a vertical riding position. Arms are bent in a very natural position, Head and Back are Vertical as nature intended. Way more relaxed for sure. Look forward to putting more miles in a day than normal. With the new riding position, the stock seat umm not so much. See below.
** PICS TO FOLLOW **
Comfy Mod #2:
Next on my list of comfort upgrades is a new Hiney Cushion. I ride maybe 350-500mi a month if I get lucky, have back and neck issues so my focus was on pressure points. I want to be as comfortable as possible without having to skip a mortgage payment. Ultimately, I am trying to figure out if I can have decent comfort for as little $$ as possible. I am willing to spend a few $$ to see if I can. If I can’t, I will sell it to another Ryder to enjoy. Sometimes you just have to concede and throw in the towel.
I did a lot of research on Seats and it came down to these three choices.
Russell Day Long with Driver Backrest - $1100 plus riding downtime and waiting list
Ultimate with Driver Backrest - $750 No riding downtime
Can Am Comfort NO Backrest - $425-$550 - No riding downtime
If $$ was no object the RDL would be the clear winner based on what I have read in the reviews. Seeing that I ride maybe 350-500mi a month it is hard to justify the RDL. I read a lot of great reviews on the BRP Comfort seat and that was going to be my next purchase as it made more $$ vs ride time sense. I then found a great deal on an Ultimate ST with Driver and Passenger Backrest. For less than $100 more than a BRP Comfort seat it was a no brainer for me.
** PICS TO FOLLOW **
I will try the Ultimate Seat and if I feel an upgrade to the RDL is warranted then I will start saving some $$. By going with either the BRP or Ultimate I would at least have a stock pan to send in to Russell and still be able to ride while it is being shipped, built and then shipped back.
Mod #3: Lidlox Helmet Lock
Mod #4: Show Chrome Brake Pedal Extension
Mod #5: Excelvan X-Grip Cell Phone Holder w/USB Charger (Need to Install)
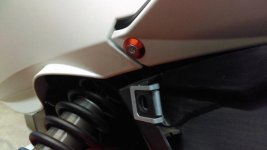
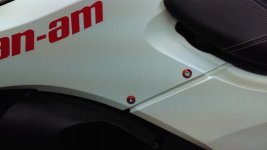
Mod #6: Aluminum Countersunk Washers in Orange
For what i would call my first “Farkle” is the M6 Aluminum Washers to replace the stock ugly black bolts on the Side Panels/Tupperware. Both sides and front panel were done for $10.
Mod #7: Lamonster Black Dymond Detailer & Black Trim Renew
My Spyder is fairly new and was well taken care of from the previous owner but had the normal “Grime” on it. I know the detailer is a “In-Between” product but damn is that some good stuff. Cleaned and could not ask for a better result. Will apply as needed per directions. My Black items were not bad but using the Black Trim renew is mind blowing. Looks 100% brand new as it rolled off the showroom floor. Will order more for sure.
Mod #8: ………………..
ST Limited Wheels

Comfy Mod #1:
Based on Forum input I decided to install RT Handlebars. Being a cheapskate, I decided to change my stock bars to RT bars myself. All the research I did lead me to believe it was a 2hr swap. We will just say it wasn’t. The Full-blown service manual is garbage. You have to find one thing, flip to another section which has you flip to another section. Not anything is a step by step and I have no idea how the Spyder techs do their jobs. They must be specifically trained on shortcuts or magic trick to doing any modification or maintenance on Spyders. Truly frustrating.
In short, I somehow damaged the DESS and ruined the tumbler on my ignition. I had to buy a new Ignition switch, tumbler(s) and keys. I figured since I screwed it up the first time, I would have the dealer put it back together. The RT bars were fairly cheap but you add in the Ignition, Keys, reprogram of the keys and dealer labor it was a $750 learning experience. I will never do anything other than a bolt item in the future. Oil changes etc the dealer can do from now on.
Overall a Night and Day difference just sitting on the Spyder. For me, the RT bars are 100% perfect. Instead of the “Tucked Super Bike” riding position, you are more in a vertical riding position. Arms are bent in a very natural position, Head and Back are Vertical as nature intended. Way more relaxed for sure. Look forward to putting more miles in a day than normal. With the new riding position, the stock seat umm not so much. See below.
** PICS TO FOLLOW **
Comfy Mod #2:
Next on my list of comfort upgrades is a new Hiney Cushion. I ride maybe 350-500mi a month if I get lucky, have back and neck issues so my focus was on pressure points. I want to be as comfortable as possible without having to skip a mortgage payment. Ultimately, I am trying to figure out if I can have decent comfort for as little $$ as possible. I am willing to spend a few $$ to see if I can. If I can’t, I will sell it to another Ryder to enjoy. Sometimes you just have to concede and throw in the towel.
I did a lot of research on Seats and it came down to these three choices.
Russell Day Long with Driver Backrest - $1100 plus riding downtime and waiting list
Ultimate with Driver Backrest - $750 No riding downtime
Can Am Comfort NO Backrest - $425-$550 - No riding downtime
If $$ was no object the RDL would be the clear winner based on what I have read in the reviews. Seeing that I ride maybe 350-500mi a month it is hard to justify the RDL. I read a lot of great reviews on the BRP Comfort seat and that was going to be my next purchase as it made more $$ vs ride time sense. I then found a great deal on an Ultimate ST with Driver and Passenger Backrest. For less than $100 more than a BRP Comfort seat it was a no brainer for me.
** PICS TO FOLLOW **
I will try the Ultimate Seat and if I feel an upgrade to the RDL is warranted then I will start saving some $$. By going with either the BRP or Ultimate I would at least have a stock pan to send in to Russell and still be able to ride while it is being shipped, built and then shipped back.
Mod #3: Lidlox Helmet Lock
Mod #4: Show Chrome Brake Pedal Extension
Mod #5: Excelvan X-Grip Cell Phone Holder w/USB Charger (Need to Install)
Mod #6: Aluminum Countersunk Washers in Orange
For what i would call my first “Farkle” is the M6 Aluminum Washers to replace the stock ugly black bolts on the Side Panels/Tupperware. Both sides and front panel were done for $10.


Mod #7: Lamonster Black Dymond Detailer & Black Trim Renew
My Spyder is fairly new and was well taken care of from the previous owner but had the normal “Grime” on it. I know the detailer is a “In-Between” product but damn is that some good stuff. Cleaned and could not ask for a better result. Will apply as needed per directions. My Black items were not bad but using the Black Trim renew is mind blowing. Looks 100% brand new as it rolled off the showroom floor. Will order more for sure.
Mod #8: ………………..

