jeuchler
New member
OK, for about a year and a half since I took delivery of old PE#2929, I've been considering some sort of change to the color.
Back in the day, Spyders only came in silver & black and yellow & black. From Homecoming 2008 to all the recent pics that you all have posted of beautiful paint, I finally chose a temporary appearance change.
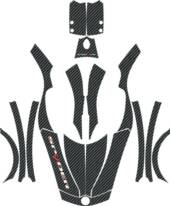
I purchased a carbon fiber set from Spiralus Designs. I just asked them to remove the company logo. It took a while to get here from downtown Canada, but I finally installed it today.
Yes, I would use the word "install" especially if you've never done one of these before. I took my time, taking frequent breaks (eyestrain from trying to line up the contours on the panels) and kept triple-checking adhesion.
My kit was not the Rapid Tac fluid kind, but the (newer?) Control Tac dry adhesive. I've never done a job this large, but I've also not worked with anything so forgiving for an amateur.
It worked best that, after cleaning the Spyder, I removed most panels and laid them on a bed and adhered the vinyl to the parts cold. The pieces I did still on the vehicle were tougher than when I could move the body part around willy-nilly to get the best angle and let gravity help me.
When bubbles threatened, then the blowdrier came out. (I've seen guys use heat guns and propane torches while wrapping, but a 1200 Watt blowdrier was plenty enough, so I put those big guns aside.)
I started using a squeegee and just my fingers (vinyl gloves on--oil from hands would interfere with proper adhesion) but I ended up using the perfect tool:
My Spyder 2.5K owners card!
It flexed just enough to follow the splines and was just small enough to get into the crevises.
The color is grey and black as you can probably see in the photos, although to my eyes there's a green hue in the sunlight--which is "cool" according to my son, a big fan of Master Chief from Halo books and games.
I'll have to live with it for a while to see how I really feel about the look of it, but I certainly would have been able to find my ryde if parked with the other 300 at last month's Spyderfest since it's no longer typical!
Anyhow, keeping the blowdrier about 4 inches away from the piece about to be adhered, v e r y slowly scraping lightly with the card, I was amazed at how much the vinyl conformed to the shapes of the body panels under heat.
After I reinstalled the silver body panels, I don't know if it helped baking the whole vehicle out in the sun (pretty hot in New England today) but I figured it wouldn't hurt.
I will say that Marc of Spiralus was very helpful, very communicative, to the point of getting Canada Post to call me when delivery over the border was delayed and it looked like the package might have been lost. Also, any suggestions I made above are not meant to contradict any of Marc's professional advice.
Also, I really, really appreciate tatt2r sending me some carbon fiber logos to replace the stock ones I yanked off the day the Spyder came home. I love the black on black look, and I put some on the CHAD as well. Hopefully this might (might) cut down on the "What is it? Who makes it??" questions. Thanks again, Jamey!
So, I just wanted to share my efforts like so many of you all have shared these last two years on this messageboard. One thing is, if I end up changing all this, it's a pretty easy fix.
(Keep the negative comments to a minimum. You know my ego is fragile...) :thumbup:
Back in the day, Spyders only came in silver & black and yellow & black. From Homecoming 2008 to all the recent pics that you all have posted of beautiful paint, I finally chose a temporary appearance change.
I purchased a carbon fiber set from Spiralus Designs. I just asked them to remove the company logo. It took a while to get here from downtown Canada, but I finally installed it today.
Yes, I would use the word "install" especially if you've never done one of these before. I took my time, taking frequent breaks (eyestrain from trying to line up the contours on the panels) and kept triple-checking adhesion.
My kit was not the Rapid Tac fluid kind, but the (newer?) Control Tac dry adhesive. I've never done a job this large, but I've also not worked with anything so forgiving for an amateur.
It worked best that, after cleaning the Spyder, I removed most panels and laid them on a bed and adhered the vinyl to the parts cold. The pieces I did still on the vehicle were tougher than when I could move the body part around willy-nilly to get the best angle and let gravity help me.
When bubbles threatened, then the blowdrier came out. (I've seen guys use heat guns and propane torches while wrapping, but a 1200 Watt blowdrier was plenty enough, so I put those big guns aside.)
I started using a squeegee and just my fingers (vinyl gloves on--oil from hands would interfere with proper adhesion) but I ended up using the perfect tool:
My Spyder 2.5K owners card!
It flexed just enough to follow the splines and was just small enough to get into the crevises.
The color is grey and black as you can probably see in the photos, although to my eyes there's a green hue in the sunlight--which is "cool" according to my son, a big fan of Master Chief from Halo books and games.
I'll have to live with it for a while to see how I really feel about the look of it, but I certainly would have been able to find my ryde if parked with the other 300 at last month's Spyderfest since it's no longer typical!
Anyhow, keeping the blowdrier about 4 inches away from the piece about to be adhered, v e r y slowly scraping lightly with the card, I was amazed at how much the vinyl conformed to the shapes of the body panels under heat.
After I reinstalled the silver body panels, I don't know if it helped baking the whole vehicle out in the sun (pretty hot in New England today) but I figured it wouldn't hurt.
I will say that Marc of Spiralus was very helpful, very communicative, to the point of getting Canada Post to call me when delivery over the border was delayed and it looked like the package might have been lost. Also, any suggestions I made above are not meant to contradict any of Marc's professional advice.
Also, I really, really appreciate tatt2r sending me some carbon fiber logos to replace the stock ones I yanked off the day the Spyder came home. I love the black on black look, and I put some on the CHAD as well. Hopefully this might (might) cut down on the "What is it? Who makes it??" questions. Thanks again, Jamey!
So, I just wanted to share my efforts like so many of you all have shared these last two years on this messageboard. One thing is, if I end up changing all this, it's a pretty easy fix.
(Keep the negative comments to a minimum. You know my ego is fragile...) :thumbup:
Last edited:

") . I just hope I do as fine a job with my install as you've done! Beautiful work!:clap:
. I just hope I do as fine a job with my install as you've done! Beautiful work!:clap: