• There were many reasons for the change of the site software, the biggest was security. The age of the old software also meant no server updates for certain programs. There are many benefits to the new software, one of the biggest is the mobile functionality. Ill fix up some stuff in the coming days, we'll also try to get some of the old addons back or the data imported back into the site like the garage. To create a thread or to reply with a post is basically the same as it was in the prior software. The default style of the site is light colored, but i temporarily added a darker colored style, to change you can find a link at the bottom of the site.

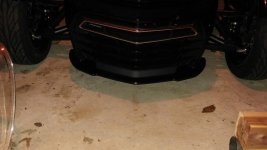
Bumperskid (Spyderpops) for F3T Limited

GrayAuthor

New member
I just purchased my F3, and the need for a bumperskid has become very apparent. I have purchased a bumperskid from spyderpops; however, I feel that I need more instruction than the paperwork they offer. Has anyone installed a bumperskid on their F3?
 
I just purchased my F3, and the need for a bumperskid has become very apparent. I have purchased a bumperskid from spyderpops; however, I feel that I need more instruction than the paperwork they offer. Has anyone installed a bumperskid on their F3?

I have a 2016 F3T, and it is pretty easy to install. The real secret is to get it as high as you can.
 
put it up on jacks....remove the front plastic piece from the underside.....unneeded...also have to remove the two plastic pieces that fit right behind the larger front plastic piece. leave the plastic on the bumpskid until ready to intsall....the 2 40 mm bolts get put in the appropriate holes indicated on the instructions and tighten them up careful not to cross thread them. now with the bumpskid up tight, take your 1/4 inch drill bit and carefully drill the remaining holes using the bumpskid as a template plus the 2 through the metal frame in the back. then remove the bumpskid, put the nut backers or whatever they are called on...the 2 in the small plastic bag go on the metal frame in the back. all the bolts are the same except the 2 40mm ones which you know where they go. 2 of the others are marked differently on the bolt head....put those two into the metal frame holes. tighten all the bolts up carefully so not to cross thread the nut backers. then replace the 2 plastic pieces you removed initially.
Now if permitted, it is time to admire your craftsmanship and have a cold one.
 
Thanks for your help!

Thank you both for your advice! I really like the look, I really need the protection.

:ohyea: :yes:
 

Attachments

  • 1508241790581.jpg
    1508241790581.jpg
    34.5 KB · Views: 48
If you have any more questions you can always contact Spyderpops (Harvey) he will be more than happy to assist you.

Cruzr Joe
 
Back
Top