-
There were many reasons for the change of the site software, the biggest was security. The age of the old software also meant no server updates for certain programs. There are many benefits to the new software, one of the biggest is the mobile functionality. Ill fix up some stuff in the coming days, we'll also try to get some of the old addons back or the data imported back into the site like the garage. To create a thread or to reply with a post is basically the same as it was in the prior software. The default style of the site is light colored, but i temporarily added a darker colored style, to change you can find a link at the bottom of the site.
You are using an out of date browser. It may not display this or other websites correctly.
You should upgrade or use an alternative browser.
You should upgrade or use an alternative browser.
BRP Satellite Radio Kit Installation / Entertainment Harness Questions
- Thread starter SpyderGTL
- Start date
finless
New member
OK got it!
OK so I looked up the connector. BRP uses mostly Delphi automotive connectors.
In this case these are the GT-150 model.
Here is the data sheet.
http://catalog.delphi.com/connectors/assets/product_brochure/gt150.pdf
So we need what is on page 6 of the PDF.
Male connector 12 pin Delphi part# 15326854
Mouser electronics part# 829-15326854
Male pins for that plug are:
Delphi part# 15326268
Mouser part# 829-15326268
If you want the rubber plugs to seal off unused holes from water:
Delphi part# 15305171
Mouser part# 829-15305171
But you can do that with silicon sealant.
If you want the rubber cable seals (they go around wires in holes that have pins) to seal off holes
Delphi part# 15366021
Mouser part# 829-15366021
So BRP, your wasting money now spending the time to seal that off with epoxy so the plug cannot be used to make your own cable!
I wish you would spend more of that money on other reasons like things you have neglected to fix for years!! :banghead::banghead::banghead:
The Delphi plug from Mouser is $1.00 I am sure it is costing you more than $1 to epoxy that off!
All up all in the parts above cost about $10....
Bob
Last edited:
finless
New member
Carl question please.....
On the XM radio side of the ENT harness wasn't there a dummy plug on that as well?
Was it not the same plug as the epoxied CB plug?
I have never seen what the XM radio side of the ENT harness looks like.
If you have that dummy plug, can you take a picture of it for me please?
Bob
On the XM radio side of the ENT harness wasn't there a dummy plug on that as well?
Was it not the same plug as the epoxied CB plug?
I have never seen what the XM radio side of the ENT harness looks like.
If you have that dummy plug, can you take a picture of it for me please?
Bob
SpyderGTL
Member
Bob, it certainly crossed my mind that the end of that CBXM connector/cap was epoxied so it couldn't be used as a functioning connector, just as a cap. Of the three caps that came with the harness, this was the only one that was epoxied on the end. I had to install the little green plugs myself into the holes in the other two connectors/caps, so there's no reason they couldn't have had me do the same with this one. One thing to note in this particular cap is that there are two male pins installed on one end of the connector, top and bottom row, and they appear to be mated in the epoxy. You can see the wires (or whatever buried in the epoxy) in the first picture. The epoxy was in there very solid - I tried cutting it with a box cutter blade and prying it out with a flat head screwdriver. Didn't get far enough to tell if the wire holes were filled as well.
As far as the third cap for the driver's headset connection, on the LH side, I don't have a picture of it. I was only working on the RH side of the Spyder last night. I was wondering if it was interchangeable with the CB/XM cap. I'm pretty sure it isn't. I did give a passing thought to pulling off the RH panels last night to look at it, but decided not to.
I did take a picture of the CB/XM cap (second pic). (I thought it was the connector part number, but I see it's the material code.) The third picture is the entertainment harness configuration.


Carl
Sent from my iPhone using Tapatalk
As far as the third cap for the driver's headset connection, on the LH side, I don't have a picture of it. I was only working on the RH side of the Spyder last night. I was wondering if it was interchangeable with the CB/XM cap. I'm pretty sure it isn't. I did give a passing thought to pulling off the RH panels last night to look at it, but decided not to.
I did take a picture of the CB/XM cap (second pic). (I thought it was the connector part number, but I see it's the material code.) The third picture is the entertainment harness configuration.
Carl
Sent from my iPhone using Tapatalk
Last edited:

finless
New member
Interesting.... So the epoxied off connector had 2 pins in it and your saying you could see a wire jumping the 2 pins under the epoxy?
If so, that is serving some purpose like maybe telling the cluster no CB is installed. This for sure is new for this latest ENT harness. Before that, the dummy plug had nothing in it.
So if I am to make a cable for people with this ENT harness it might be good to know what 2 pins are jumpered!
If they just order the connector and wire up, then without this jumper who knows what happens. Again it may allow CB to show up on the cluster.
To help people here can I ask a favor please?
1) Can you take a picture of the dummy plug so I can see which 2 pins are in it and thus replicate it. Can you also take a meter and see for sure if they are jumpered? e.g. there is 100% continuity between the 2 pins? There might be a resistor in it and not just jumpered... So a Ohm meter would tell us that. It might even be a diode and thus the resistance might be different one direction vs the other. It would be nice to know for sure!
2) Can you see what happens if the dummy plug is not plugged into the harness? e.g. do CB settings show up on the cluster or something like that?
This would really help folks. I have a guy right now wanting me to make him a cable and I am now worried I cannot unless I know this information.
If you cannot do the above, would you be willing to ship me that dummy plug and I can ohm it out. I will ship it right back to you ASAP and I will pay for shipping both directions.
Thanks,
Bob
Last edited:
finless
New member
Here's a picture of the LH side connections in the installation instructions. It looks like the driver's headset connector is possibly a 4x2 configuration. BTW, the entertainment harness PN used was 219400610, from June, 2014. View attachment 100584
Sent from my iPhone using Tapatalk
FYI, the XM radio connector on the LH side is in fact the same 2 rows 12 pins. So the dummy plug there you could have used BUT without knowing about the jumper wires inside the epoxy, no clue what that does.
Bob
SpyderGTL
Member
Bob, the 2 pins in the dummy plug are in the end opposite of the Audio Right (blue/green stripe) wire. One at the end of each row. They would be at the left hand side in your picture of the CB connector. It does look like there is something between the two wires in the epoxy - it looks like a blue dot in the first picture in post #24. This cap is used on either the CB connector on the RH side (the one we're trying to use) or the XM connector on the LH side. No idea if those pins serve a purpose on the CB side or the XM side when plugging the harness at that location. I'll see if I can easily get to that cap later this evening to get a couple of pictures and to see if there are any different menu options with and without.
Sent from my iPhone using Tapatalk
Sent from my iPhone using Tapatalk
finless
New member
Thanks, this info would be helpful. I would hate to make someone a cable that has problem because the jumper is not there.
BUT this does make me wonder if the BRP Bluetooth cable has changed?
The BRP BT cable does not have that jumper in it today. So if it has not changed, then maybe it is not needed at all to enable BT cable. That CB connector is the one used for the BT cable.
I am going to look around and see if there is a new part number for BRP BT setup and cable.
Bob
finless
New member
OK I just checked the BRP web site.
NOW, this does NOT mean it has not changed (correct I don't trust BRP) or that they even updated it. But the BT dongle system has the same part number as it did 2 years ago.
So if someone buys that system and plugs it into the ENT harness, the jumper will not be there.
Carl, I am unclear what you are saying as to what pins #'s the jumper pins are in? Are you saying they are jumping the same audio pins that the BT audio cable would connect to?
If so that might explain it although I do not know why they would jump those! POSSIBLY if they are not shunted and just hanging there live, they induce or allow noise into the audio input of the radio. Again, thinking out loud, this might explain what they are! Shunts to stop random noise on unconnected input wires.... That would make sense to me.
Bob
finless
New member
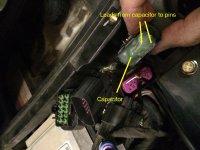
OK looking at your picture again, I think I can clearly see a small ceramic capacitor in the epoxy.
This is starting to make sense. Again it maybe for noise elimination when the audio wires are not connected to anything!
Only way to know is to know exactly what pin hole numbers the pins on the dummy plug were in. If they are the same as the audio lines this would make sense.

This is starting to make sense. Again it maybe for noise elimination when the audio wires are not connected to anything!
Only way to know is to know exactly what pin hole numbers the pins on the dummy plug were in. If they are the same as the audio lines this would make sense.
Attachments
GPS on 2014 RTS
Thanks Steve for your help on the phone and photos. Found the 2 pin Delphi connector for GPS power and the audio female connector right at the right rear top corner of the gas tank - just like you said. Gets confusing as the changes from year to year and model to model. In any event BRP has made it easier and less expensive to wire in your own GPS on the 2014 RTS.The 2014 RT does not use the harness that comes with the GPS mount kit. Feel free to PM me and I will send you my phone number. I have installed a GPS on a 2010 and a 2014 RT.
SpyderGTL
Member
Bob, the two pins in the cap are on the opposite side of the connector from the audio lines. They apparently jump the white/black stripe and white/brown stripe wires. You can see where I cut the two audio lines in the one picture.


I didn't see any difference in the radio/CB menus with or without the cap installed, nor any difference in the SM10 performance.
Sent from my iPhone using Tapatalk
I didn't see any difference in the radio/CB menus with or without the cap installed, nor any difference in the SM10 performance.
Sent from my iPhone using Tapatalk
finless
New member
Thanks Carl!
So those pins have nothing to do with the Bluetooth setup which is a little odd. Reason I say that is if you order the BRP Bluetooth setup, the dummy will be removed and the BRP BT cable will not have the capacitor in it. So that leads me to ponder a little.
The fact that this dummy is used on the other end of the ENT harness to plug it off if you do not have XM radio, or plug off if you don't have CB makes me think it must be on one side or the other. Not used at all if you have both XM and CB.... The instructions state this now as you showed.
Well neither here nor there, I will continue to make my DIY Bluetooth cables the same way since BRP has not changed it.
Thanks for all the help Carl!
Was nice talking to you on the phone to put a voice to the name")
Bob
So those pins have nothing to do with the Bluetooth setup which is a little odd. Reason I say that is if you order the BRP Bluetooth setup, the dummy will be removed and the BRP BT cable will not have the capacitor in it. So that leads me to ponder a little.
The fact that this dummy is used on the other end of the ENT harness to plug it off if you do not have XM radio, or plug off if you don't have CB makes me think it must be on one side or the other. Not used at all if you have both XM and CB.... The instructions state this now as you showed.
Well neither here nor there, I will continue to make my DIY Bluetooth cables the same way since BRP has not changed it.
Thanks for all the help Carl!
Was nice talking to you on the phone to put a voice to the name
Bob
finless
New member
OK so I talked to Carl live. I was hoping he could read the value of the capacitor through the epoxy. Alas.... no go.
But that's OK... BRP has not changed the Bluetooth cable so pretty sure it wont matter.
On with the show and special thanks to Carl for doing a bunch of leg work on the new Entertainment harness...
FYI... Just a side note we discussed. He was putting this on a 2011 RTS and used the latest ENT harness. I have a feeling he could not get audio out of the passenger helmet jack because of changes made in the NEWER ENT harness hooking it up to a 2011 older radio.
So BE AWARE! The latest ENT harness may not be fully backward compatible to older Spyders!
BRP really needs to get this stuff well known and understood! Too many changes over the years to the audio system and especially the Entertainment harness! What is compatible with what? What is backwards compatible? Was is not?
COME ON BRP.... this is your systems... You know what all this is... can you please make this all clear with the RadioSound radio and compatibility across models!!!!
EVEN DEALERS do not get all this stuff and then scratch their heads when something doesn't work and it is probably due to revisions and changes over the last 5 years!
I have talked to dealers and when they hook all this stuff up and something doesn't work.... THERE IS NO information about troubleshooting it in the service manual! They have to call BRP and even then, they don't get the help. It is obvious 1st level and even 2nd level support doesn't understand all this either!
Again, BRP.. you really need to get this sorted! Too much confusion due to lack of documentation!
Bob
Last edited:
IdahoMtnSpyder
Well-known member
Don't know that you can. See this page: https://can-am.brp.com/on-road/shop/spyder-accessories/audio-communication-systems.html. It says the Sirius kit is for 2010 to 2017 models. They don't show a kit for the 2018. The instructions page has no instructions available to install satellite radio on the 2018 and the 2018 Operator's Guide has no instructions for satellite radio.OK, I just upgraded from a 2012 rt to a 2018 rt limited and want to put sirius xm on board. Can someone tell me the best way to go about this. Thanks in advance, David
You might have to get an XM receiver and plug it into the aux input.
Similar threads
- Replies
- 17
- Views
- 4K
- Replies
- 6
- Views
- 392
- Replies
- 5
- Views
- 4K