• There were many reasons for the change of the site software, the biggest was security. The age of the old software also meant no server updates for certain programs. There are many benefits to the new software, one of the biggest is the mobile functionality. Ill fix up some stuff in the coming days, we'll also try to get some of the old addons back or the data imported back into the site like the garage. To create a thread or to reply with a post is basically the same as it was in the prior software. The default style of the site is light colored, but i temporarily added a darker colored style, to change you can find a link at the bottom of the site.

Bolt a Seat Back in Place.

Bob Denman

New member
Hi Guys!
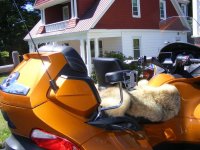
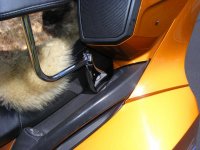
Well; I finally mounted a set of armrests for the Missus. :yes:
Only thing is: I've got a seat sitting loose, and I haven't figured out the right version of the "hokey-0Pokey", to get it back into place. :gaah:
At least I haven't lost the square nuts, or collars down into the recesses of the bike yet. :D
Since the collars seem longer than the area where you put them: does the part that sticks out go to the outside? Is there a trick to getting the seat to slide rearward into place?
Once in place: do you then put the square nuts down there, and attack them from the other side with the mounting bolts?

:helpsmilie:
 
You put the nuts (with the little black boxes) into the bracket area. These little boxes capture the nut so you should not need a wrench on the nut.
Feed the tubes into the seat hinges.
Put the seat in place and wiggle around until you can push the long bolts through.

Yes the tubes are longer than the seat hinge. They are suppose to be as they act like a bushing.

Bob

No video?? :)


I wasn't there but I still care!
POW MIA VETS
 
Hi Guys!
Well; I finally mounted a set of armrests for the Missus. :yes:
Only thing is: I've got a seat sitting loose, and I haven't figured out the right version of the "hokey-0Pokey", to get it back into place. :gaah:
At least I haven't lost the square nuts, or collars down into the recesses of the bike yet. :D
Since the collars seem longer than the area where you put them: does the part that sticks out go to the outside? Is there a trick to getting the seat to slide rearward into place?
Once in place: do you then put the square nuts down there, and attack them from the other side with the mounting bolts?

:helpsmilie:[/QUOTEHaving replaced the stock seats on two Spyders, here's what I do. Remove the passenger backrest to provide a little extra space to see and work. Also remove the strut (or at least disconnect it from the seat). Have a piece of 2X4 or something to hold up the seat at times. The most important thing I learned is to put tape over the fronts of the channel in which the square "nuts" slide so that they remain close to where they'll be needed. Just leave the tape on in case you have to remove the seat again. There's no need to worry about the sleeves sticking out one side or the other. They'll take care of themselves when you tighten things down. The bolt will be inserted from the outside with the nut on the inside. Of course the bolt goes through the sleeve and the "slider." To get the seat reinstalled, slide it back, keeping it as level as possible while you're eyeing the mounting holes. Once you get it in (you may need to use that short wood piece in the front of the seat to see back there) insert the bolt, sleeve and nut on each side, but DON'T TIGHTEN THEM TOO MUCH because you'll have to "play" with the seat it get it properly positioned. Rather than working under the seat I work from above. It's easier on my back and there's enough space since the passenger backrest if off. To make it even easier I bought a ratchet that not only operates in the usual way, but also allows you to tighten just by turning the handle as you would with a screw driver. There's not much room to swing a regular ratchet. Since you didn't tighten the seat you can move it forward and backward and even the front of the seat left and right to obtain proper alignment. You'll want to be certain the seat lock engages properly. Then some fine tuning. It might take a couple of tries. You may find that you must tighten the bolts a little more to retain the seats position. Once you have the seat in the right spot tighten the bolts (they don't have to be real tight) reconnect the strut and replace the passenger backrest.
 
Lot's of good suggestions.
I've never removed the passenger back rest, but it seems like a good idea.
I agree with pegasus. Stuff some rags or tape over the holes in the back of the pan so that when you drop the fasteneres, they don't fall into a black hole.
Hold the nuts in place with a little tape just like finless Bob suggested. That man has a powerful set of skills.
You can mount the tubes in place using some vaseline or other thick grease to hold them in place while you set it in place.
Leave the bolts in the back a little loose so the seat can move forward and back.
Latch the seat in place. Once latched in place tighten down the bolts in the back to lock it in place. That way the seat will pivot up and down in the right place.
 
To align the seat, after the nuts and bolts are connected, I leave them loose. Then, lower the seat so the locking mechanism catches. That's where the seat is perfect. Then, tighten the seat bolts.

Reinstall the seat piston and the backrest. Job is done.
 
Thanks, Guys! :thumbup:
I'm going to tape up the "chasms", that swallow hardware... (I already lost a 10mm socket...:opps:)
Taping the square nuts into place seems like an excellent idea! :clap:
When I attempted to get the seat slid back into place, it seemed that I couldn't get the bushings started on the proper path. They just sort of hit something; went "thunk!", and would stop... :banghead:
 
Thanks, Guys! [emoji106]
I'm going to tape up the "chasms", that swallow hardware... (I already lost a 10mm socket...:opps:)
Taping the square nuts into place seems like an excellent idea! :clap:
When I attempted to get the seat slid back into place, it seemed that I couldn't get the bushings started on the proper path. They just sort of hit something; went "thunk!", and would stop... :banghead:
The bushings fit snug & slide into grooves.

Sent from my SM-T350 using Tapatalk
 
I solved the seat bolt problem by not using them. Two zip ties. The largest you have. It works. :thumbup: Tom :spyder:
 
There you go....

You can't not get it now....:roflblack: so much information, suggerstions and even a video link. Put down the coffee and get to it....:thumbup:
 
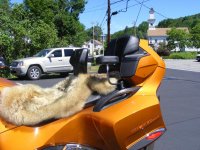
Some Pictures

Armrests1.jpgArmrests2.jpgArmrests3.jpg
I like the way that they bolt to the "guts" of the bike. They seem to mount nice and solid, with very little flexing. You can easily set the amount of effort it takes to have them pivot out of your way. :thumbup:
 
Epilogue...

After last weekend; I only had the seat hinges "cable-tied", to their moorings... nojoke
After grinding the final fitment in my molars all week :shocked:; I tackled the homestretch: armed with a couple of tools, and a Magnum-sized lack of common sense. :D
I finally decided to remove the passenger backrest, in order to give me better "eyeballs-on the prize" capability. This made a HUGE difference, I have to heartily suggest this step for anyone who is attempting any work that involves removing the seat.
Now that I had more room, I Duct-Taped up the three spots that could swallow hardware and tools. While I had the tape out, I also used it to capture the nuts in their proper locations.
I greased the spacers, slid them in place, (Covered the "tank" with protective cloths), and positioned the seat into a rough location.
Surprisingly: it slid into place with almost no wiggling or cussing needed. I guess that I got lucky!
:shocked: Then: I couldn't get the bolts to start! :gaah:
Taking a wild swing at the problem, I decided to latch the seat into place up front. I figured that it would at least give me the proper fore and aft positioning.
That did the trick! :clap:
It only took a little bit of playing with the vertical plane, and the bolts slid into place, and I was able to get them started into the nuts! :yes:
At that point: it was just down to tightening things up, replacing the strut, plugging in the passenger sensor, and replacing the strut.

Now, I'm a happy camper again! :2thumbs:
 
Hi Guys!
Well; I finally mounted a set of armrests for the Missus. :yes:
Only thing is: I've got a seat sitting loose, and I haven't figured out the right version of the "hokey-0Pokey", to get it back into place. :gaah:
At least I haven't lost the square nuts, or collars down into the recesses of the bike yet. :D
Since the collars seem longer than the area where you put them: does the part that sticks out go to the outside? Is there a trick to getting the seat to slide rearward into place?
Once in place: do you then put the square nuts down there, and attack them from the other side with the mounting bolts?

:helpsmilie:
Just sayin....did anyone suggest how to insert the square nuts thingy in or thingy out and why. Oh.....by the way your instal was quite interesting....Congratulations!:ohyea:
 
Back
Top