• There were many reasons for the change of the site software, the biggest was security. The age of the old software also meant no server updates for certain programs. There are many benefits to the new software, one of the biggest is the mobile functionality. Ill fix up some stuff in the coming days, we'll also try to get some of the old addons back or the data imported back into the site like the garage. To create a thread or to reply with a post is basically the same as it was in the prior software. The default style of the site is light colored, but i temporarily added a darker colored style, to change you can find a link at the bottom of the site.

Birthday present - “some assembly required” Reverse Trike model!

BCNewell

Active member
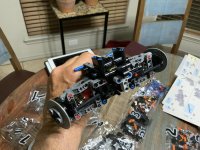
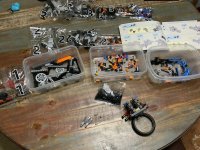
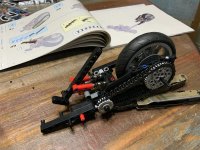
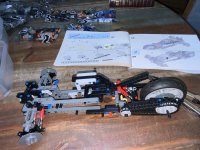
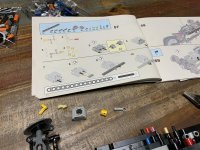
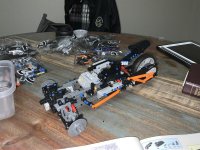
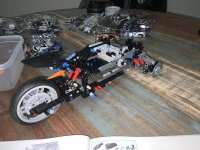
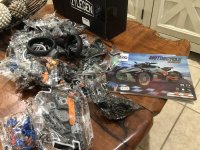
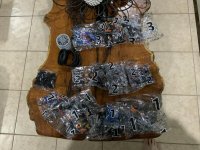
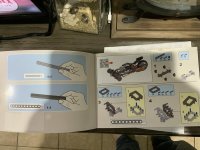
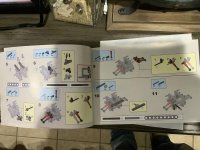
Well - the spousal unit just gave me a birthday present. Black box with “Zylegen” meant nothing to me. Opened it, and started pulling bag after bag of what appeared to be Lego-looking pieces out …. Then found the assembly book. Is a build kit for a model reverse trike similar to the F3 series. There’s somewhere between 103 and 16 million pieces! Will post back in the following months with progress reports … :yikes: :helpsmilie:
 

Attachments

  • IMG_4228.jpg
    IMG_4228.jpg
    105 KB · Views: 154
Motorsickle tyres... that's different. I like your table too, what species is that? :thumbup:
 
Last edited by a moderator:
Cobwebs - table was built by a friend of the wife’s. I ‘believe’ it is mesquite wood.
 

Attachments

  • image.jpg
    image.jpg
    65.3 KB · Views: 39
Keep us posted. Can't do them anymore. The cats would steal the pieces and destroy the project. :gaah:
 
Last edited:
Hmmm … I consider myself a pretty educated fellow, but these “instructions” seem to be the worst I have ever seen. Not a single word - in ANY language - in the instruction book. Apparently, there are 3 ‘groups’ of parts, plus the wheels/tires and a bag full of some kind of connector pins (all same size) in an unmarked bag. Looks like everything in the seven bags marked “1” are used to comprise the initial assembly. This assembly is laid out in the first 30 pages, comprising 73 steps. :gaah:

Judging by how long it took me to figure just THIS much out … this could be quite the adventure! Have a feeling it may actually go together pretty straight forward - now that my initial shock of the procedure has kinda passed. Think that I can see a “Ages 8+” printed on the front cover, but mostly obscured by the brand sticker. :banghead:
 

Attachments

  • IMG_0346.jpg
    IMG_0346.jpg
    89.4 KB · Views: 48
  • IMG_0347.jpg
    IMG_0347.jpg
    62.9 KB · Views: 51
  • IMG_0348.jpg
    IMG_0348.jpg
    65.2 KB · Views: 45
....... Think that I can see a “Ages 8+” printed on the front cover, but mostly obscured by the brand sticker. :banghead:

Are you sure that doesn't say 'Years' not 'Ages'?? :dontknow:

As in - it'll likely take you 8+ YEARS to assemble this?? :yikes:

:roflblack: Looks like it'll be fun tho, and quite a challenge ;)

Which as we all know while we work hard at aging disgracefully, is a good thing; essential for keeping the mind active and all of your brain working! :ohyea:
 
Last edited:
True that!!

Decided to put off opening the 7 bags marked “1” until I can put a couple hours into it. And - don’t want parts scattered all over Hades.
 
Just in case you can't work it out... That's a nice clock base you've got there. :popcorn:
 
Last edited by a moderator:
Spent about an hour and a half on the new ‘toy’ tonight. Nine pages, 27 steps, and I have a nearly complete front end. Has working steering and suspension, complete with control arms, shocks, ball joints, drag links, even a u-joint on the steering system. Didn’t all go perfectly smoothly, as there were several pieces I had to disassemble to orient an earlier part correctly. But nothing major.

Next assembly is the rear swing arm assembly. I see it includes a chain that I have to assemble with 39 individual links. It appears this unit can be upgraded with a remote control steering and propulsion system - all sold separately, of course. Amazing, for something near a Lego kit!!
 

Attachments

  • IMG_0350.jpg
    IMG_0350.jpg
    75.6 KB · Views: 54
  • IMG_0349.jpg
    IMG_0349.jpg
    97.7 KB · Views: 50
I've been curious about this, so did some searching on Google.

To me, it appears to be a model of an Spyder F3-S.
The Can-Am website says the F3-S dimensions are:

L x W x H: 104 x 58.9 x 43.3 in.

The information online says the model is:
Measures over 8.26''*16.5''*19.5”

So if we switch the model dimensions around, to show them in the shortest to longest dimension, in order to match the Can-Am information, the model is:

19.5 in x 16.5 in x 8.26 in.

If I did the math correctly that's roughly 1/5 scale.

I say roughly, because if you convert the actual F3-S dimensions to 1/5 scale the numbers don't exactly match the model size, especially the width:

L: 104 = 20.8
W: 58.9 = 11.78
H: 43.3 = 8.66

Yeah, I'm bored and retired, and have too much free time. ;)
 
Worked on it another ~2 hours tonight. Got the complete swingarm assembly put together - 140 parts to just that segment. Then started the process of mating it to the front suspension assembly. Again, some better instructions and clearer diagrams would help. Ended up having to disassemble quite a bit of stuff to get the rear suspension oriented correctly with the lateral tie rails. But all’s good now. So far, haven’t broken any pieces (though I have had to jiggle/wiggle/press hard a few times!), and have not come up short any pieces … let’s hope that holds out for the remainder of the build.

Looking at diagrams, looks like up next is … the building of a reciprocating V4 engine! Appears there is no head on any of the cylinders, so you can see the pistons moving while the machine moves! Crazy …
 

Attachments

  • IMG_0353.jpg
    IMG_0353.jpg
    87.7 KB · Views: 36
  • IMG_0354.jpg
    IMG_0354.jpg
    86.3 KB · Views: 39
  • IMG_0355.jpg
    IMG_0355.jpg
    92.1 KB · Views: 38
Lego makes a little plastic tool to help in disassembling/disconnecting their bricks when you need too.

A faster choice would be to go to an auto parts store and look for a trim removal tool set.
They come with several plastic tools with slim tips that make it easy to get between the pieces to pry them apart.
 
Got to work on the kit again tonight. (Drat!! - forgot to take measurements for bore & stroke!). You can see the yellow pistons in the cylinder bores of the V4 engine. Worked about another hour, and am finally finished with ‘subassembly 1’. Have some parts left over, but think that is by design … don’t think I forgot/missed something. Would venture to say there are close to 750 individual parts installed to this point. Now … on to the bags marked “2”.

Edit: using my high-dollar, highly accurate instruments (a toothpick and the cm scale on my Leatherman!), I come up with a ~1cm bore and ~.9cm stroke on my mighty plastic V4. It looks like 2.83cc’s total - if my metric math is right …
 

Attachments

  • IMG_0356.jpg
    IMG_0356.jpg
    82.4 KB · Views: 39
  • IMG_0357.jpg
    IMG_0357.jpg
    89.4 KB · Views: 39
Last edited:
Back
Top