• There were many reasons for the change of the site software, the biggest was security. The age of the old software also meant no server updates for certain programs. There are many benefits to the new software, one of the biggest is the mobile functionality. Ill fix up some stuff in the coming days, we'll also try to get some of the old addons back or the data imported back into the site like the garage. To create a thread or to reply with a post is basically the same as it was in the prior software. The default style of the site is light colored, but i temporarily added a darker colored style, to change you can find a link at the bottom of the site.

Best RT Farkles for the mechanically challenged

kitkat61

New member
So, I want to do more to my 2015 RT-S, but not leave it at the dealership during this awesome riding weather. I am, however, uncomfortable with some DIY aspects. Especially drilling or changing the wiring. :yikes:

I've done some super easy things, like my FOBO's and Spyder cuff, I installed my Ultimate seat and flagpoles, made my own trailer adapter to convert the 4 square to a flat 4, I even installed the 3rd/4th brake lights & rear turn signals from Lamonster. But that type of install is about as complicated as I want to do on my own. Taking off the tupperware is scary enough. I'm not going to put holes in it too. Or start splicing wires.

But it's really hard to tell which Farkles are truly 'plug-n-play' like the rear lights were, and which are ALMOST plug-n-play.
So here's what I know I want to do this summer, can someone tell me which can be done with zero modifications to the body? And since pretty much everything I've accomplished has been done with the help of tutorials I found on these forums [because you guys rock!!], if you know of a tutorial to match one of my projects below, please include a link.

In no particular order:
- Better headlights ... and should I get HID or LED? (hubby said he can't see me if I don't have high beans on. Yikes!)
- Stebel Air Horn
- Baker Air Wings
- Changing saddlebag reflectors to active lights
- Changing front fender yellow reflector to turn signal, and front red reflector to brake
- TricLED's Dual color DRL LED white & yellow turn signals for arms (upper and lower)
- SpyderPops "Spyclops" light to run 100% if engine is on - since the state of VA now lets you run with FIVE lights on the front instead of four. I know, an LED strip is not necessarily '1' light, but I figure better to beg forgiveness later is I ever get stopped for it (in VA, you WILL get stopped for riding with your 'parade' lights on).
- SpyderPops LED turn signals for mirrors

I know most of you could install this stuff in your sleep, but if it requires cutting anything, I'm going to wimp out and have the dealer do it.

Thanks in advance for all the help I know I'm going to get!!:D

Kathy
 
Chrome handlebar end-caps are pretty easy... :D
I changed out my saddlebag reflectors (TricLEDs), and it wasn't too bad at all.
The instructions in the kit were very complete, and easy to follow!)
 
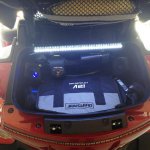
The (inside) rear trunk LED lights are awesome and easy to install with no cutting or wiring and pretty inexpensive to, Great lights.

Foam Grips are easy to install and helps make your hands comfortable.


Both Items are available at www.Spyderpops.com

Cruzr Joe

attachment.php
 

Attachments

  • TrunkLightOn.jpg
    TrunkLightOn.jpg
    45 KB · Views: 487
Last edited:
The (inside) rear trunk LED lights are awesome and easy to install with no cutting or wiring and pretty inexpensive to, Great lights.

Foam Grips are easy to install and helps make your hands comfortable.


Both Items are available at www.Spyderpops.com

Cruzr Joe
That rear trunk LED strip that Spyderpops sells is nice. Almost ordered one until I realized it would not work if you use the flip-down trunk shelf that comes with the RTL. The shelf would interfere with both the mounting position and the power plug. Love the foam grips, though. :thumbup:
 
- Better headlights ... and should I get HID or LED? (hubby said he can't see me if I don't have high beans on. Yikes!)
- Stebel Air Horn
- Baker Air Wings
- Changing saddlebag reflectors to active lights
- Changing front fender yellow reflector to turn signal, and front red reflector to brake
- TricLED's Dual color DRL LED white & yellow turn signals for arms (upper and lower)
- SpyderPops "Spyclops" light to run 100% if engine is on - since the state of VA now lets you run with FIVE lights on the front instead of four. I know, an LED strip is not necessarily '1' light, but I figure better to beg forgiveness later is I ever get stopped for it (in VA, you WILL get stopped for riding with your 'parade' lights on).
- SpyderPops LED turn signals for mirrors

Kathy

Stebel Air Horn or Wolo Bad Boy are easy installs on the 15 RT. Spyderpops sell the Wolo with a bracket and a longer wire
Baker Air Wings are super easy
Saddlebag reflectors requires drilling a hole but are easy once you get the goo off from the old reflectors
Front fender reflectors to lights is easy to and so are the DRL
Don't know about Spyderpops Spyclops and the mirror turns are probably easy but may require drilling. The type of mirror light that we install does require you to drill holes to route the wires through on the inside of the mirror housing.

Good luck.
 
Based on replies ...

So it looks like I will be able to install by myself:
-Baker Air Wings
-Wolo Bad Boy horn from SpyderPops (Since theirs is supposed to come with all the wiring and brackets I will need)

I've also added to the list:
-Inside rear trunk light from SpyderPops
-Foam grips from SpyderPops

But I'm going to have to wait for off-riding season and the dealer for:
-Changing saddlebag reflectors (you all might think it's east to drill a hole, I do not)
-Mirror (again, not comfortable drilling)

And I've seen comments that these are 'easy' but define 'easy' please. I truly need 'plug-n-play':
-Upgraded headlights
-Front fender reflectors
-TricLED dual color turn signals for arms

I already added the upgraded brake light LED strips from Lamonster. Everyone who responded that I could do that, you're right, it was fairly easy.

Keep the suggestions coming, and yes, it's very helpful to tell me where to get something if a specific vendor includes everything I would need (like SpyderPops adding in the bracket for the horn).

Kathy
 
You already have a good list of farkles in your signature as well as the additions you plan to add. I strongly suggest getting a Spyderpops bump skid on that puppy. One big speed bump and you could mess up some beautiful Tupperware. If you're uncomfortable drilling two holes for the bump skid ask for help from a Spyder owning friend who also has a pair of car ramps. Oh, it also helps if you like rolling around on the garage floor. LOL!
 
Rhino Ramps

You already have a good list of farkles in your signature as well as the additions you plan to add. I strongly suggest getting a Spyderpops bump skid on that puppy. One big speed bump and you could mess up some beautiful Tupperware. If you're uncomfortable drilling two holes for the bump skid ask for help from a Spyder owning friend who also has a pair of car ramps. Oh, it also helps if you like rolling around on the garage floor. LOL!

I have Rhino ramps that we use for the cars & trucks, would that lift the front high enough to get under it? And while I won't drill, maybe - just maybe - I can convince my dear sweet hubby to do it.
 
I have Rhino ramps that we use for the cars & trucks, would that lift the front high enough to get under it? And while I won't drill, maybe - just maybe - I can convince my dear sweet hubby to do it.

They work great for doing oil changes!

Neil
 
I have Rhino ramps that we use for the cars & trucks, would that lift the front high enough to get under it? And while I won't drill, maybe - just maybe - I can convince my dear sweet hubby to do it.

Then you're all set for that important farkle. Your hubby will be able to see where he has to be careful when drilling because of the radiator hoses but it's not a problem with a good, sharp bit and going slowly. Spyderops' instructions are very clear and complete.
 
Kradellock

TricLEDs 3rd & 4th brakelights were pretty easy...
As was the Kradellock on my GPS. :thumbup:

Already did the 3rd & 4th brakelights. That's what convinced me I was good to do "plug-n-play" by myself.

I already have the 590 installed on the Tri-Axis bars ... how does the Kradellock work with that? Can you send photos?
 
I just installed a Stebel. The hardest part was reading the tiny diagram that came with the horn! So, I found it online.

Sent from my SAMSUNG-SM-G890A using Tapatalk
 
I just installed a Stebel. The hardest part was reading the tiny diagram that came with the horn! So, I found it online.

Sent from my SAMSUNG-SM-G890A using Tapatalk

Di your Stebel come with the bracket? If so where did you order it from? Don't want to have to make my own.
 
I already have the 590 installed on the Tri-Axis bars ... how does the Kradellock work with that? Can you send photos?

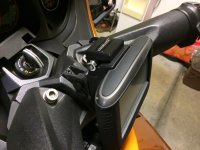
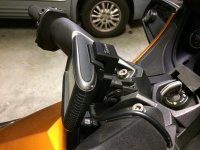
The Kradellock, http://www.kradellock.com/, is fall off a log simple. It installs between the Tri-Axis bars GPSmount and the 590 cradle; max 10 minutes to undo cradle undo and install.
 

Attachments

  • IMG_0572.jpg
    IMG_0572.jpg
    62.6 KB · Views: 37
  • IMG_0571.jpg
    IMG_0571.jpg
    61 KB · Views: 29
Was just about to order ...

The Kradellock, http://www.kradellock.com/, is fall off a log simple. It installs between the Tri-Axis bars GPSmount and the 590 cradle; max 10 minutes to undo cradle undo and install.

In looking at your photos, the Kradelock doesn't cover the release button. But I though that was how it worked - by making it so the GPS can't be 'released'. Am I missing something? I want to be able to leave the GPS on 24/7, but don't want to spend $170 on something that won't let me do that.

And thanks on advance for your help!! Really appreciate everyone's input. :clap:

It doesn't cover the button, but it makes it impossible to move it. :thumbup:
(It blocks it from behind.)
 
Back
Top