IdahoMtnSpyder
Active member
Can anyone tell me how much of a turn of the right side adjusting screw will make the belt tracking move from flange to outside, or vice versa?
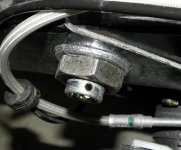
The belt was running against the flange on my new RTS when I got it. I'm putting the hitch I had on my 2013 RT on my 2014 RTS. It is held on by the axle nuts. So naturally this is the time to adjust the belt alignment, right? The left side adjuster stayed pretty close to where it was. I loosened it just a bit so the belt has a tension of about 180# on the Krikit II. But I am having one hell of a time getting the right side adjuster set so the belt tracks correctly.
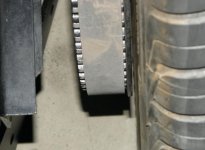
The first thing I discovered is when I tightened the axle nut the tracking changed so what was good with the nut snug was not with the nut tight. The belt moved to the flange. I must have loosened and tightened the axle nuts 20 times these past two evenings. First the belt rides the flange, then it wants to track off the outer edge. I finally resorted to loosening the axle nut all the way. I loosened the right adjuster full three turns and then made sure the axle was pulling it snug into the swing arm. Then I tightened it 2 7/8 turns and tightened the axle nut, and then spun the tire. The tracking finally changed after three of these rigmaroles to where it is just inside the outer edge. I want the next cycle to bring the belt to just shy of the flange. Hence my question above.
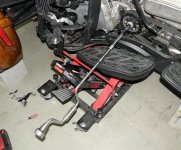
Another thing I discovered is turning the tire faster caused the belt to move to the flange. I have the side panels off so I've been using a socket speed wrench on the drive sprocket nut to turn the tire. Works good, except it's not fast enough. To turn it faster I use a 1/2" Milwaukee 28 volt cordless drill. The only problem with that is it's downright dangerous. As soon as the drill stops it locks up. So guess what happens when the drill locks up, the socket is still on the drive sprocket, and the tire is spinning. Yep, I've got bruises on my arm to show how dumb this trick is. Most of the time I've been able to pull the drill off while it's still running, so that removal is smooth. I guess I really should plug the cluster back in so I can start the Spyder and turn the tire with the engine, but then I have to deal with exhaust fumes in the garage.
I ain't winning! :banghead::banghead:
The belt was running against the flange on my new RTS when I got it. I'm putting the hitch I had on my 2013 RT on my 2014 RTS. It is held on by the axle nuts. So naturally this is the time to adjust the belt alignment, right? The left side adjuster stayed pretty close to where it was. I loosened it just a bit so the belt has a tension of about 180# on the Krikit II. But I am having one hell of a time getting the right side adjuster set so the belt tracks correctly.
The first thing I discovered is when I tightened the axle nut the tracking changed so what was good with the nut snug was not with the nut tight. The belt moved to the flange. I must have loosened and tightened the axle nuts 20 times these past two evenings. First the belt rides the flange, then it wants to track off the outer edge. I finally resorted to loosening the axle nut all the way. I loosened the right adjuster full three turns and then made sure the axle was pulling it snug into the swing arm. Then I tightened it 2 7/8 turns and tightened the axle nut, and then spun the tire. The tracking finally changed after three of these rigmaroles to where it is just inside the outer edge. I want the next cycle to bring the belt to just shy of the flange. Hence my question above.
Another thing I discovered is turning the tire faster caused the belt to move to the flange. I have the side panels off so I've been using a socket speed wrench on the drive sprocket nut to turn the tire. Works good, except it's not fast enough. To turn it faster I use a 1/2" Milwaukee 28 volt cordless drill. The only problem with that is it's downright dangerous. As soon as the drill stops it locks up. So guess what happens when the drill locks up, the socket is still on the drive sprocket, and the tire is spinning. Yep, I've got bruises on my arm to show how dumb this trick is. Most of the time I've been able to pull the drill off while it's still running, so that removal is smooth. I guess I really should plug the cluster back in so I can start the Spyder and turn the tire with the engine, but then I have to deal with exhaust fumes in the garage.
I ain't winning! :banghead::banghead:
")