Hi everyone -
I bought a 2013 RT-S last month and was very leery of its handling. Way too much lean and the 'turn in' seemed like it happened in two parts - the initial turn in and then an abrupt corner when the weight transferred resulting in having too much turn in requiring a correction(s) to take out some wheel deflection -- it was very unnerving. I also had the problem of the machine darting side to side as described by many.
I am an advocate of sway bar controls lean and shocks control rate so I went for the roll bar first. It made an improvement in the darting but I waited until I got the Spyder alignment before making a final opinion.
Bottom line the darting was an alignment problem and now the Spyder actually wants to go straight and the BajaRon Sway Bar is an absolute must for lean and corner control. When I drove home with an aligned Spyder and the bar I was no longer a 'white knuckle rider' went faster with a lot more confidence. Thanks Ron!!
I did the install in about 3 1/2 hours but I believe I could now do it in about 1 or 1 1/2 hours. The instructions for install from Ron are excellent in telling you what to do but a bit short on the how to. I am going to share my experience for whatever it is worth to those who are going to do this later.
1. Get your tools laid out. Here is what I used:
For the speed nut bolts - T-30 torx (all of the access holes are tight so I used a hex bit in a 1/4 inch drive)
for linkage bolts you need 2 13mm (I used both open /box and speed ratchet - you will see them in the picture)
for bushing bolts 2 8mm open / box (as I remember)
for all other 10 mm
modified floor jack - 'jenga blocks' lol
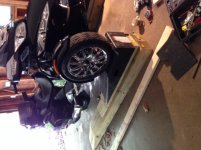
2. Getting the Spyder up in the air takes real caution. Ron is not kidding when he says it needs to be up 22-24 inches. From the pix you will see that the bar is back so the front is really up. Originally I tried to work under it on just the 8 inch ramps. There just wasn't enough room - period. Then my wife recalled we had a bunch of scrap wood from a fence build. Voila! Jenga blocks!!
First I made sure the rear wheel was well chocked and the parking brake set.

Then I began building my "Jenga" blocks:

The jack you see is one I modified a few years back to lift my Pacifica which had a high frame and a standard 16" would not get the wheel off the ground.
It is basically a HF floor jack with an aluminum cylinder slightly smaller than the jack's pad about 7" long - I bored a thru hole and topped it with a hockey puck countersunk to accept bolt and washer. It gave me just about 23' of lift (15 1/2 for the jack and the extension) which was 'just enuff'.
I placed the jack where the main frame member and the cross member are located. I stayed on the main frame member but I moved it off center alternatively left and right. That way I could lift a side a couple of inches place some 'blocks' then move to the other side. The blocks were large enough that the "jenga" tower was very solid.
Once up the question was how to get the underside panels off - so here is how they are fastened (took me a while to figure it out)
First I strongly urge you to remove the side panels and front bottom side panel on both sides. The large deflector panels Ron refers to have a 10 mm bolt/nut on the outboard lip. I found it nearly impossible to get a wrench on the nut from below. 5 minutes to take off the four side panels would have saved me an hour of dropping wrenches while on my back But I figured it out. LOL
There are three underbody panels you need to remove per Ron's instructions.
The smaller left side forward panel is held on by one of the speed nuts you will remove early on and 3 plastic rivets. Easy to find once you know there are three but took me a while to figure it out.
The two large deflector panels are held by two plastic rivets inboard on the frame and that pesky 10mm nut - you did remove those side panels right?")


The first picture shows the plastic rivets and you will notice that the panel also snaps to underside frame tubing. The bolt I am talking about does not show in the first picture but it is visible in the second two. I can tell you that you need 'skinny' tools and socket/drives as the access cutouts are not really large.
After you get the jacking done and panels off you are home free! The actual sway bar removal goes quickly and just as Ron describes.
Putting everything back is just a reverse of the process.
I will give you a caution - remove the 'jenga' blocks 1-2 inches at a time on each side. I got so confident near the end that I pulled about 5 at once and the Spyder started to tilt. After I got my heart started again - I went back to slow but sure.
Hope this helps anyone trying to install the bar. it is worth every penny - Ron has both a fine product and great support.
If you need larger pix PM me and I will email them to you.
Regards.
I bought a 2013 RT-S last month and was very leery of its handling. Way too much lean and the 'turn in' seemed like it happened in two parts - the initial turn in and then an abrupt corner when the weight transferred resulting in having too much turn in requiring a correction(s) to take out some wheel deflection -- it was very unnerving. I also had the problem of the machine darting side to side as described by many.
I am an advocate of sway bar controls lean and shocks control rate so I went for the roll bar first. It made an improvement in the darting but I waited until I got the Spyder alignment before making a final opinion.
Bottom line the darting was an alignment problem and now the Spyder actually wants to go straight and the BajaRon Sway Bar is an absolute must for lean and corner control. When I drove home with an aligned Spyder and the bar I was no longer a 'white knuckle rider' went faster with a lot more confidence. Thanks Ron!!
I did the install in about 3 1/2 hours but I believe I could now do it in about 1 or 1 1/2 hours. The instructions for install from Ron are excellent in telling you what to do but a bit short on the how to. I am going to share my experience for whatever it is worth to those who are going to do this later.
1. Get your tools laid out. Here is what I used:
For the speed nut bolts - T-30 torx (all of the access holes are tight so I used a hex bit in a 1/4 inch drive)
for linkage bolts you need 2 13mm (I used both open /box and speed ratchet - you will see them in the picture)
for bushing bolts 2 8mm open / box (as I remember)
for all other 10 mm
modified floor jack - 'jenga blocks' lol
2. Getting the Spyder up in the air takes real caution. Ron is not kidding when he says it needs to be up 22-24 inches. From the pix you will see that the bar is back so the front is really up. Originally I tried to work under it on just the 8 inch ramps. There just wasn't enough room - period. Then my wife recalled we had a bunch of scrap wood from a fence build. Voila! Jenga blocks!!
First I made sure the rear wheel was well chocked and the parking brake set.
Then I began building my "Jenga" blocks:
The jack you see is one I modified a few years back to lift my Pacifica which had a high frame and a standard 16" would not get the wheel off the ground.
It is basically a HF floor jack with an aluminum cylinder slightly smaller than the jack's pad about 7" long - I bored a thru hole and topped it with a hockey puck countersunk to accept bolt and washer. It gave me just about 23' of lift (15 1/2 for the jack and the extension) which was 'just enuff'.
I placed the jack where the main frame member and the cross member are located. I stayed on the main frame member but I moved it off center alternatively left and right. That way I could lift a side a couple of inches place some 'blocks' then move to the other side. The blocks were large enough that the "jenga" tower was very solid.
Once up the question was how to get the underside panels off - so here is how they are fastened (took me a while to figure it out)
First I strongly urge you to remove the side panels and front bottom side panel on both sides. The large deflector panels Ron refers to have a 10 mm bolt/nut on the outboard lip. I found it nearly impossible to get a wrench on the nut from below. 5 minutes to take off the four side panels would have saved me an hour of dropping wrenches while on my back
But I figured it out. LOLThere are three underbody panels you need to remove per Ron's instructions.
The smaller left side forward panel is held on by one of the speed nuts you will remove early on and 3 plastic rivets. Easy to find once you know there are three but took me a while to figure it out.
The two large deflector panels are held by two plastic rivets inboard on the frame and that pesky 10mm nut - you did remove those side panels right?
The first picture shows the plastic rivets and you will notice that the panel also snaps to underside frame tubing. The bolt I am talking about does not show in the first picture but it is visible in the second two. I can tell you that you need 'skinny' tools and socket/drives as the access cutouts are not really large.
After you get the jacking done and panels off you are home free! The actual sway bar removal goes quickly and just as Ron describes.
Putting everything back is just a reverse of the process.
I will give you a caution - remove the 'jenga' blocks 1-2 inches at a time on each side. I got so confident near the end that I pulled about 5 at once and the Spyder started to tilt. After I got my heart started again - I went back to slow but sure.
Hope this helps anyone trying to install the bar. it is worth every penny - Ron has both a fine product and great support.
If you need larger pix PM me and I will email them to you.
Regards.