• There were many reasons for the change of the site software, the biggest was security. The age of the old software also meant no server updates for certain programs. There are many benefits to the new software, one of the biggest is the mobile functionality. Ill fix up some stuff in the coming days, we'll also try to get some of the old addons back or the data imported back into the site like the garage. To create a thread or to reply with a post is basically the same as it was in the prior software. The default style of the site is light colored, but i temporarily added a darker colored style, to change you can find a link at the bottom of the site.

Baja Ron metal spacers

myrz

New member
Why doesn't the Baja Ron sway bar instructions for the 2013-2016 ST, ST-S, ST-LTD mention anything about the 8 metal spacers?

http://www.lamonstergarage.com/can-am-spyder-st-rs-bajaron-performance-sway-bar-2013-16/

UPDATE: I found that the PDF instructions on Lamonster and a few other place's on the web were using an older version of the instructions. Make sure you follow the instructions that come with your Baja Ron sway bar kit as they are the updated version. My version was 3.2 and gives full details of spacers that I questioned above. Sorry for the confusion.
 
WHAT metal spacers are you talking about?? Do you have metal spacers somewhere on your Spyder/Ryker sway bar assembly?? Which year model do you have? Exactly where are the said spacers?? Need more info? :dontknow:
 
So I say again, WHAT spacers?? :dontknow: There's none I can see in Lamonster's kit?? Or are you calling those different colored Sway Bar Links with heim joints in the end spacers?? :dontknow:

Still at a bit of a loss here?? :rolleyes:
 
Last edited:
YES PETER, there are 8 spacers in the small bag in the center of the sway bar photo.
I just did a sway bar install and dropped the spacers a couple of times. I have another install in a week and will try the super glue trick.

T.P.
 
3/8" wood dowel or plastic tube works great while you push them up into the A-frame. You push the dowel out with the bolt. He should include the dowel with the kit. They are aluminum and do not over tighten the bolts or you will crush them. narrow side goes to hemi joint.
 

Attachments

  • wooden dowel.jpg
    wooden dowel.jpg
    29.9 KB · Views: 41
I just simply put a dab of grease on the heim or spacer. this allows the spacer to stick to the heim long enough for me to get the bolt through.
 
I just simply put a dab of grease on the heim or spacer. this allows the spacer to stick to the heim long enough for me to get the bolt through. My instructions say nothing about these spacers. One side of spacer is flat the other side is rounded. some of the ones I have noticed on video's or photo's must be from older kits that seem to use just thick flat washers type spacers.

But with the ones in my kit, i was wondering if the flat edge goes towards the frame or heim? I'll try to get a photo today

The tapper goes towards the hem ball in the link the larger flat goes toward the frame
 
Seems like a legit question to me. I also always use a dab of grease to hold loose parts in place, like those spacers under the rear of the 2018 RTL seat when replacing it.
 
Interesting. The early type utilized wider high misalignment bearings. Do not recall those needing spacers or shims. This is in reference to the aluminum dogbone style links with bearings pressed into them.
 
Oops! I must apologize! My shop is separate from my house and I had left my instructions in the shop. Therefore, I was going by the PDF instructions I found on lamonster, which are not the updated instructions. My instructions are labeled Version 3.2 which must be the latest version and it does include a lot more info including the stainless steel spacers. But it was nice to learn your technique's of getting that pesky spacer to stay in place during installation. Thanks everyone!
 
Oops! I must apologize! My shop is separate from my house and I had left my instructions in the shop. Therefore, I was going by the PDF instructions I found on lamonster, which are not the updated instructions. My instructions are labeled Version 3.2 which must be the latest version and it does include a lot more info including the stainless steel spacers. But it was nice to learn your technique's of getting that pesky spacer to stay in place during installation. Thanks everyone!

So the spacers have been changed for aluminum to SS? I helped install a new one just over a week ago and the spacers were still aluminum.
 
Hopefully, I can clear things up a bit. Probably more information than you're looking for. But I want to cover all the bases because these are good and important questions being asked.

Our long past, aluminum dog bone links had trunnion bearings. These are basically spherical ball bearings with the spacers machined in giving you a 1 piece assembly. This makes installation of a bar kit easier. But trunnion bearings are a rare bird and have to be custom made. This raises the price a bit. But it is the production and assembly process to incorporate the race that really increases the price of a trunnion bearing. A trunnion bearing cannot be quickly, easily, or cheaply pressed into a race like a spherical bearing. For a trunnion, the race must be built around the bearing. A much slower and costlier procedure. In addition to this, it is more difficult to get the needed, close tolerance between the bearing and the race. Bottom line. If you don't REALLY need a trunnion bearing, it can be an expensive headache for all but the bar install for the end user. (Which is not an unimportant consideration, by any means)

OEM, BRP plastic links use a Trunnion bearing. But to avoid the added expense, BRP uses no race at all. The bearing simply presses into the compliant plastic. This is why their links have an extremely tight fit to the bearing. If they were not tight, the bearings would fall out as the plastic gives under stress. Some are simply too tight and will not move. In these cases, the plastic link itself will bend and twist.

Our earlier dog bone links with trunnion bearings work extremely well for most customers. But for those who ride in salt environments, they may rust. Not good. I tried many different angles to get a better quality trunnion bearing. To get what I wanted, it was just way too much money. So, we decided to look into other ways of achieving a higher quality bearing that would be impervious to the elements.

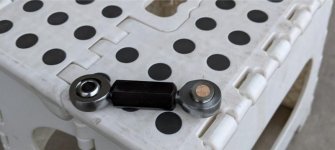
We ended up going with spherical bearing rod ends. This, of course, meant spacers, which I was trying to avoid. But it also meant a good deal of cost savings which we could put towards a much better end product. Namely, a hardened, heat treated, chromoly steel rod end with a hard chromed spherical ball bearing in a self lubricating nylon race. The end cost was a little more than the previous trunnion product. But the tolerances and quality were much improved. Pictured below is our current link set for the Ryker. The Spyder links are the same, just in a larger size.

Now to the Spacers.
Spacers for the Spyder link sets are machine tapered stainless steel. Originally, they were aluminum, which worked well enough. But we found that the machine tapered stainless steel were a better fit for the Spyder.
Spacers for the Ryker have always been aluminum. These seem to be working very well for the Ryker.

That is pretty much it. Other than some vendors are still posting outdated instructions. Be assured that all bar kits are being sent out with current instructions. I am not aware of any issues in this regard.

Questions are always welcome. The more you know, the better your odds of getting what you want the 1st time.
 

Attachments

  • LinksRyker.jpg
    LinksRyker.jpg
    25 KB · Views: 30
Last edited:
Back
Top