-
There were many reasons for the change of the site software, the biggest was security. The age of the old software also meant no server updates for certain programs. There are many benefits to the new software, one of the biggest is the mobile functionality. Ill fix up some stuff in the coming days, we'll also try to get some of the old addons back or the data imported back into the site like the garage. To create a thread or to reply with a post is basically the same as it was in the prior software. The default style of the site is light colored, but i temporarily added a darker colored style, to change you can find a link at the bottom of the site.
You are using an out of date browser. It may not display this or other websites correctly.
You should upgrade or use an alternative browser.
You should upgrade or use an alternative browser.
Any tips on 2020+ RTL Left side inner panel removal?
- Thread starter bikerjays
- Start date
Kablaam360
New member
How to remove the left side inner panel to get to the belt and front pulley
Pretty sure I have watched videos on how to remove all the pieces on the 2020+ RTL on youtube. Search up there and you're sure to find what you need. Sadly since I dont own one yet- I cant really be of much more help. I've just watched countless vids of mods/maintenance for when I do own one!
Peteoz
Well-known member
Pretty sure I have watched videos on how to remove all the pieces on the 2020+ RTL on youtube. Search up there and you're sure to find what you need. Sadly since I dont own one yet- I cant really be of much more help. I've just watched countless vids of mods/maintenance for when I do own one!
No, unfortunately all those videos are only for the outer, painted panels, Kablaam. The inner, black panel is another story.
Pete
Peteoz
Well-known member
Bikerjays,
K80Shooter kindly posted this description for me when I asked the same question. He has removed his a couple of times. I have never found any videos on it. -
I just took mine off again this morning to have access to the seat strut. There's really nothing to it. Remove the painted panels, remove the passenger and drivers floorboard/foot rest, remove the Rotax panel at the floorboard(there is one of those tiny plastic screw thingy's up front, make sure to take it out. Remove the clips and attaching screws from the panel along with the bottom front saddle bag clip/bolt. There is one hidden clip that you just pull on the panel to get loose and be careful down at the floorboard area as there is one piece that snaps around the tubing. Then just slide it out.
Takes maybe 20 minutes after you have the painted panels removed.
Pete
K80Shooter
New member
:agree: Nothing to it, just take your time and don't force anything. It gets quicker each time.
Escorial
Member
Need to remove Left body panel for belt tensioner install - any pics or video for a 2020 RTL?
Hi
I've seen most of the YouTube videos on how the tensioner is installed, but how do I remove the black inner panel that covers the drive belt?
This part seems to be missing from everything I have seen.
Anyone have a few pics to share (always preferred over a thousand words) or a video?
I asked the dealer how much to install the tensioner and from what he found in the shop the cost was around $500? Even the dealer said that did not sound right and is supposed to get back to me.
In the meantime, I figured I would have a try at removing the panels, I also understand that both passenger and rider floorboards have to be removed.
I think that what seems to be missing is how far forward do I have to go, I have seen some videos of the rivets being removed from the trunk??
Tia
Attachments
Last edited by a moderator:
Escorial
Member
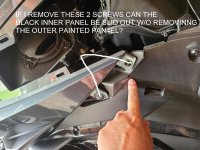
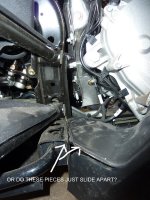
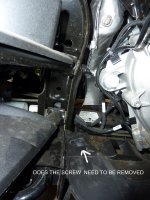
Here is where I'm at. It seems that I have removed the rivet and screws but something it still holding it at the lower front. The rear cannot be pulled out as it's behind the hard bag.
I suspect that once the front is loose, I can slide forward to clear the hard bag.
Please look at my pix
I suspect that once the front is loose, I can slide forward to clear the hard bag.
Please look at my pix
Attachments
Last edited by a moderator:
Escorial
Member
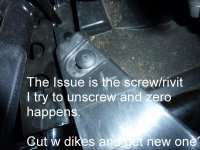
This is the last screw/rivet that will not unscrew, I think this is what is holding up the show. Anyone know a PN I may just cut it off. Any info appreciated.
I found the info Tuflock Phillips Plastic Screw
414745900 and dealer does not have any in stock.
So at this point will put everything back together and order a few. Just wish someone would confirm that this is the screw that is holding up the show?
I found the info Tuflock Phillips Plastic Screw
414745900 and dealer does not have any in stock.
So at this point will put everything back together and order a few. Just wish someone would confirm that this is the screw that is holding up the show?
Attachments
Last edited by a moderator:
Did you read this thread from the beginning, checking out all the linked threads too? :dontknow:
https://www.spyderlovers.com/forums...nel-removal-20-21-RTL-s&p=1677083#post1677083
Mind you, those plastic 'push pin' things with a really flimsy Phillips head 'screw' in them can usually be readily popped out once you've used a sharpish probe to lever out the stripped Phillips head portion of the pin, so you can carry on and do whatever you need to; then when it's time to put it back together, if you don't have a replacement you can simply push the Phillips head inner portion in just a bit so it's sitting in there ready to screw in, but it's out of it's fully screwed in position in order to allow the expansion part to close up narrow so you can push that back into the necessary holes, and only then finally push the Phillips head part right down flush instead of screwing it in, so that it's once more forcing the spreading wing parts out to grip on whatever & hold it together. :thumbup:
Yeah, I know it's not ideal and should only ever be used as a temporary fix, but it works, almost always holds well, and can get the job done NOW rather than leaving you waiting around for who knows how long in order to fix a problem. They've worked for me like that on vehicles & components that've been subjected to far higher speeds and rougher treatment than any Spyder will ever get; they've even worked on my Spyder when it's been exploring the extremities of its performance & my intestinal fortitude; so there's a better than 'just good' chance that they'll work for you like that if you want to try. hyea:
hyea:
Just Sayin' :cheers:
https://www.spyderlovers.com/forums...nel-removal-20-21-RTL-s&p=1677083#post1677083
Mind you, those plastic 'push pin' things with a really flimsy Phillips head 'screw' in them can usually be readily popped out once you've used a sharpish probe to lever out the stripped Phillips head portion of the pin, so you can carry on and do whatever you need to; then when it's time to put it back together, if you don't have a replacement you can simply push the Phillips head inner portion in just a bit so it's sitting in there ready to screw in, but it's out of it's fully screwed in position in order to allow the expansion part to close up narrow so you can push that back into the necessary holes, and only then finally push the Phillips head part right down flush instead of screwing it in, so that it's once more forcing the spreading wing parts out to grip on whatever & hold it together. :thumbup:
Yeah, I know it's not ideal and should only ever be used as a temporary fix, but it works, almost always holds well, and can get the job done NOW rather than leaving you waiting around for who knows how long in order to fix a problem. They've worked for me like that on vehicles & components that've been subjected to far higher speeds and rougher treatment than any Spyder will ever get; they've even worked on my Spyder when it's been exploring the extremities of its performance & my intestinal fortitude; so there's a better than 'just good' chance that they'll work for you like that if you want to try.
Just Sayin' :cheers:
Last edited:
K80Shooter
New member
This is the last screw/rivet that will not unscrew, I think this is what is holding up the show. Anyone know a PN I may just cut it off. Any info appreciated.
I found the info Tuflock Phillips Plastic Screw
414745900 and dealer does not have any in stock.
So at this point will put everything back together and order a few. Just wish someone would confirm that this is the screw that is holding up the show?
Your over thinking this, just use a small, pointed pick or flat screwdriver and insert it under the edge of the screw/plastic pin, apply a little pressure and it will lift up. If it makes you feel better, then go to any hardware store and take the pin with you then get a pack of screws to replace the pins. Insert the screw into the part that the pin came out of. Thats what I did.
Also, I forgot to mention, even if you get new ones, they are likely to do the same thing. Those that are easy to get to just do as I mentioned above. I only used the screws around the saddle bag pins as they are harder to get to.
Last edited:
Peteoz
Well-known member
if i remember lamont has a video
I think that only shows how to remove the outer Tupperware, fatboy. He does have another one where he shows an RT with the black panel removed, but not how to remove it.
Pete
This is the last screw/rivet that will not unscrew, I think this is what is holding up the show. Anyone know a PN I may just cut it off. Any info appreciated.
I found the info Tuflock Phillips Plastic Screw
414745900 and dealer does not have any in stock.
So at this point will put everything back together and order a few. Just wish someone would confirm that this is the screw that is holding up the show?
Once you do get it out, you can replace the fake plastic screw with a real stainless sheet metal screw for future sanity. Same with the two at the front of the hard bag.
Escorial
Member
You mentioned that there a few more of these phillips fasteners by the hardbag? Could you or anyone else please give me a better description of where they are located?
I looked at the parts diagram and really do not see the location.
Also has anyone used just regular head rivet in place of the phillips? If so, what was the PN.?
Thanks all for the patience this is my first adventure on removing the inner panel.
Did not even see those, next time apart will try and find. Crud, I should order a few more.
Many thanks
Last edited by a moderator:
You mentioned that there a few more of these phillips fasteners by the hardbag? Could you or anyone else please give me a better description of where they are located?
I looked at the parts diagram and really do not see the location.
Also has anyone used just regular head rivet in place of the phillips? If so, what was the PN.?
Thanks all for the patience this is my first adventure on removing the inner panel.
Did not even see those, next time apart will try and find. Crud, I should order a few more.
Many thanks
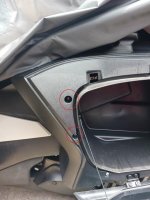
The picture (hoping is comes through) is a close-up of the front of the left hard bag with the cover open. The pesky screws are the ones at the top and middle. Once you do get them out by a combination of twisting, prying, swearing and praying, replace the plastic fake screws with real stainless Phillips screws. In American terms #10 by 1 inch. Or about 1.5 x 25 mm.
Last edited by a moderator:
USAF
Member
View attachment 203592
The picture (hoping is comes through) is a close-up of the front of the left hard bag with the cover open. The pesky screws are the ones at the top and middle. Once you do get them out by a combination of twisting, prying, swearing and praying, replace the plastic fake screws with real stainless Phillips screws. In American terms #10 by 1 inch. Or about 1.5 x 25 mm.
Is that for just the left side ?
K80Shooter
New member
Is that for just the left side ?
They are on both sides, open the saddle bag door and look, very easy to see.
Similar threads
- Replies
- 12
- Views
- 362
- Replies
- 4
- Views
- 518
- Replies
- 4
- Views
- 475
- Replies
- 3
- Views
- 403

