• There were many reasons for the change of the site software, the biggest was security. The age of the old software also meant no server updates for certain programs. There are many benefits to the new software, one of the biggest is the mobile functionality. Ill fix up some stuff in the coming days, we'll also try to get some of the old addons back or the data imported back into the site like the garage. To create a thread or to reply with a post is basically the same as it was in the prior software. The default style of the site is light colored, but i temporarily added a darker colored style, to change you can find a link at the bottom of the site.

And yet ANOTHER cat question

wifesspyder

New member
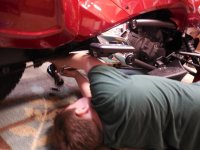
I need some suggestions. I am installing a RLS cat pipe on my 2018 RTL. After some cussing etc I managed to get the springs off. The top being the hardest of course. How do you get the top spring back on??? Almost no room under there for the spring puller, let alone not much visibility. Any help would be appreciated. Machine is up on stands and it is about 8 inches off the floor. I have sifted thru a a lot of the suggestions already posted but they seem to be mostly for the F3. Maybe that model has more clearance or visibility?? Thanks for your help.
 
I found the spring puller to be useless. I used a flat screwdriver to pry those hurky springs off and on.
 
Loop a piece of para-cord around the handle of the spring puller, long enough that you can do all your pulling from back behind the rear axle. You might need a helper to do the actual pulling while you guide the spring from below, but it isn't really too hard once you get that puller lined up properly. :thumbup:
 
I use a piece of wire with a hook on the end and a loop on the other. I put a pair of needle nose vise grips in the loop and the other end of vice grips into the end of the cat delete pipe. When I squeeze the vice grips together it pulls the spring and I can hook it to the pipe. Idea came from Doc.
 
I pierced the spring with a flat screwdriver and levered off a block of wood whilst guiding the hook onto the loop with another screwdriver.
 
All installed and good to go. The top spring is a for real PIA. Using a coat hanger and some leverage finally got it. RLS unit fit like a glove and sounds great. I used the restrictor in the inlet. Low rumble but no "drone" on the hiway. Subtle. I could tell no difference in performance or fuel mileage after about 200 miles , but I am not much of a twister anyhow. Thanks for all the help. If they (CANAM) had rotated the clips 30 degrees it would have made the job easier. Maybe.
 
All installed and good to go. The top spring is a for real PIA. Using a coat hanger and some leverage finally got it. RLS unit fit like a glove and sounds great. I used the restrictor in the inlet. Low rumble but no "drone" on the hiway. Subtle. I could tell no difference in performance or fuel mileage after about 200 miles , but I am not much of a twister anyhow. Thanks for all the help. If they (CANAM) had rotated the clips 30 degrees it would have made the job easier. Maybe.

Did you put the stock muffler back on? I did at first and wasn't impressed either. I bought a China-Akropovic muffler and sent it to Rick at RLS and he made an elbow pipe that the muffler springs onto($125). It sounds great to me. You can order a muffler like mine on Amazon for around $45.00. Not sure of Amazons ship time, mine from China took 3 weeks for same money.
 
Noise Power

:coffee: YES, Welcome to the World of Noise Power.
Louder Noise = More Noise.
An ECU Update is the only way for the More Power Things.
Good Luck on your Mission. .......:thumbup:
 
I did want to comment that other than the pesky springs, it was an easy change. I was surprised at how heavy the stock unit was/is when it came loose.
 
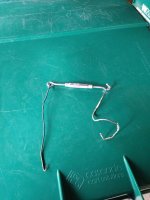
IMG_20200415_152818829.jpg Sorry it took me so long to get to this. This is the "tool" I used to get the top spring on. I don't have a helper so I did this. Made out of a hangar and a $2.00 turnbuckle from Lowe's. Hooked the "hook" around the spring end, opened the turnbuckle, pulled tight and secured it to the exhaust. Then crank turn buckle until spring is in position, push spring on, loosen turnbuckle and it's DONE. No cussing, no skinned fingers or knuckles, and spring is secure.
 
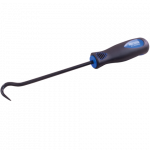
This is what I use, works great!
I also squeeze the opening of the spring for the side that mounts on the bike to just small enough opening that I can get it on. This way the spring doesn't keep falling off while your stretching it onto the pipe.

86803_e5867a19-9dca-46fe-b921-9fcbbb85164f_large.png
 
View attachment 180448 Sorry it took me so long to get to this. This is the "tool" I used to get the top spring on. I don't have a helper so I did this. Made out of a hangar and a $2.00 turnbuckle from Lowe's. Hooked the "hook" around the spring end, opened the turnbuckle, pulled tight and secured it to the exhaust. Then crank turn buckle until spring is in position, push spring on, loosen turnbuckle and it's DONE. No cussing, no skinned fingers or knuckles, and spring is secure.

This one needs to be put in the "Stickies" section.
 
OK....Next question. In my search for "that sound" I installed a pair of RLS Crusher Mufflers. They look good and other than some bending and tweeking on the mounting brace/bracket, it went on without a hitch. GREAT sound, but just a bit too loud for me. Anybody have any luck toning it down with more baffles ???? Thanks (btw....again I was surprised at how heavy the stock muffler is. I would bet that between the muffler and cat system there is at least 50 lbs and more there)
 
OK....Next question. In my search for "that sound" I installed a pair of RLS Crusher Mufflers. They look good and other than some bending and tweeking on the mounting brace/bracket, it went on without a hitch. GREAT sound, but just a bit too loud for me. Anybody have any luck toning it down with more baffles ???? Thanks (btw....again I was surprised at how heavy the stock muffler is. I would bet that between the muffler and cat system there is at least 50 lbs and more there)

I sent you a PM.
 
Back
Top