• There were many reasons for the change of the site software, the biggest was security. The age of the old software also meant no server updates for certain programs. There are many benefits to the new software, one of the biggest is the mobile functionality. Ill fix up some stuff in the coming days, we'll also try to get some of the old addons back or the data imported back into the site like the garage. To create a thread or to reply with a post is basically the same as it was in the prior software. The default style of the site is light colored, but i temporarily added a darker colored style, to change you can find a link at the bottom of the site.

Air Bag failure

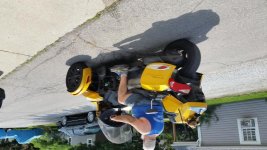
Just a heads' up. I had my airbag develop a pinhole leak on the bottom. Taking the bike apart I found the leak. Looking at how it was punctured, there were several small, sharp rocks that had gotten lodged in the bottom recessed area the bag rests in that rubbed a hole in it.

It is a great deal of work to remove it for cleaning, but what I will do from now on as my regular maintenance is to:

1. Bleed all the air off of the air bag.
2. Lift the rear tire off of the ground with a floor jack placed on the rear of the center beam. (the combined lack of air and unloading will stretch the bag as far away from the swing arm as possible)
3. Use a compressed air blow gun to blow any debris out of the dish the airbag sits in.

The location and design allows for any rocks kicked up by the rear tire to potentially land in that critical area, and in all truth I am surprised even more don't fail.

For the real wrenchers out there, you can even disconnect the air ride lever, using a floor jack unload most of the weight off of the rear shock bottom bolt and remove it. Using a 13mm loosen the bottom air bag bolt a few turns and support the swing arm with jack stands, raise the bike slightly. This will give you a chance then to get in around and really clean it well.
Hope it helps someone.
 
Sorry Finless, the thread as kinda buried. To really get to it well, the shock needs to come off. With that being said it is just a few short steps to remove the rear wheel without loosing the belt alignment. Once the wheel is off the top bolt can be gotten easily from underneath. Once that is out of the way, the air bag is right there. The dealer probably drops the exhaust for better clearance, but I didn't. The top of the bag is both internal and external threads and is plastic. I took the line loose from I think the relief valve, then after taking the bottom bolt loose (1/2" wrench) I grasp the air bag and held the line and turned the bag loosening the brass fitting a little. I then was able to reach up by hand and unscrew the exterior nut by hand. The nut will only go so far and then you will need to take the line out further. Alternating back and forth I was able to remove the air bag and find the leak.
Let me throw up some pictures.
expanded.jpg

If the bottom of the airbag stayed in this position, there wouldn't be an issue. The dished area where the bottom sits is the perfect location for road debris and sharp rocks to collect against the banded area of the airbag.

colapsed.jpg

When the air pressure drops a little the first thing that happens is that the banded area will go up into the bag, rolling the edge over and against the swing arm. If a sharp rock has gotten caught there, then as you ryde it will rub constantly, creating a hole.

I have repaired my bag rather than replacing it. Since it was a very small hole, I poured about 6oz of Green Slime and let it set for a bit then reinstalled and added 50 psi. Let is sit for 12 hours and pressure had only dropped about 5 lbs, which is probably temperature change. No more leak.

I ran a diagnostic on the 3 month old air pump and it was DOA. I have another one coming aftermarket and will be in Tuesday. Should have everything back together and going by Wednesday sometime.

I also have solved the problem with the bottom of the air bag. Cost about $6. Looking forward to ryding again. We have Gkids this week, so wouldn't be doing much ryding anyway.

If anyone would like the upgrade procedure, PM me and I will get back to you.
 
Can you just use an air Chuck to blow the rocks out?

Sent on Note 5 in Taptalk

I think doing anything would help. When I cleaned my swing arm area where the bag sits up, some of those rocks were really stuck. Had to use a screwdriver to get some of it out with the airbag disconnected at the bottom and the swing arm dropped down.
 
Success

success!.jpg

Back running, checking belt alignment. Air Ryde is now working perfectly. It even dumps and fills like it should. Pump is a little loud, but it only runs for 3-5 seconds. I'll take it since this pump was less than 1/4 the cost of a BRP pump.

Now, where does all that tupperware go?
 

Attachments

  • success!.jpg
    success!.jpg
    64.4 KB · Views: 16
What air bag and compressor did you buy?

Sent on Note 5 in Taptalk

https://www.hornblasters.com/products/details.php?i=viair-98c-air-compressor

Had to turn the inlet 180 degrees. Takes 5 minutes to change. You have to use slightly longer bolts, M6 1.0 and 1/14" long. Need two. Line connects right up. I used scotch blocks to tie into the wiring just below the plug in case I need the plug-in at a later date.

The bike works exactly like it did new. It will dump air when you stop, then refill. Just like new. As I said, the pump is a little loud, but does not run long at all.
 
Thanks for the info...need to look it over, clean area when changing tires

Thanks for the headsup. Always like to look things over when I have a chance and this seems like one of those areas to check out and clean occasionally!
 
Back
Top